April Favorites

IMG_4827
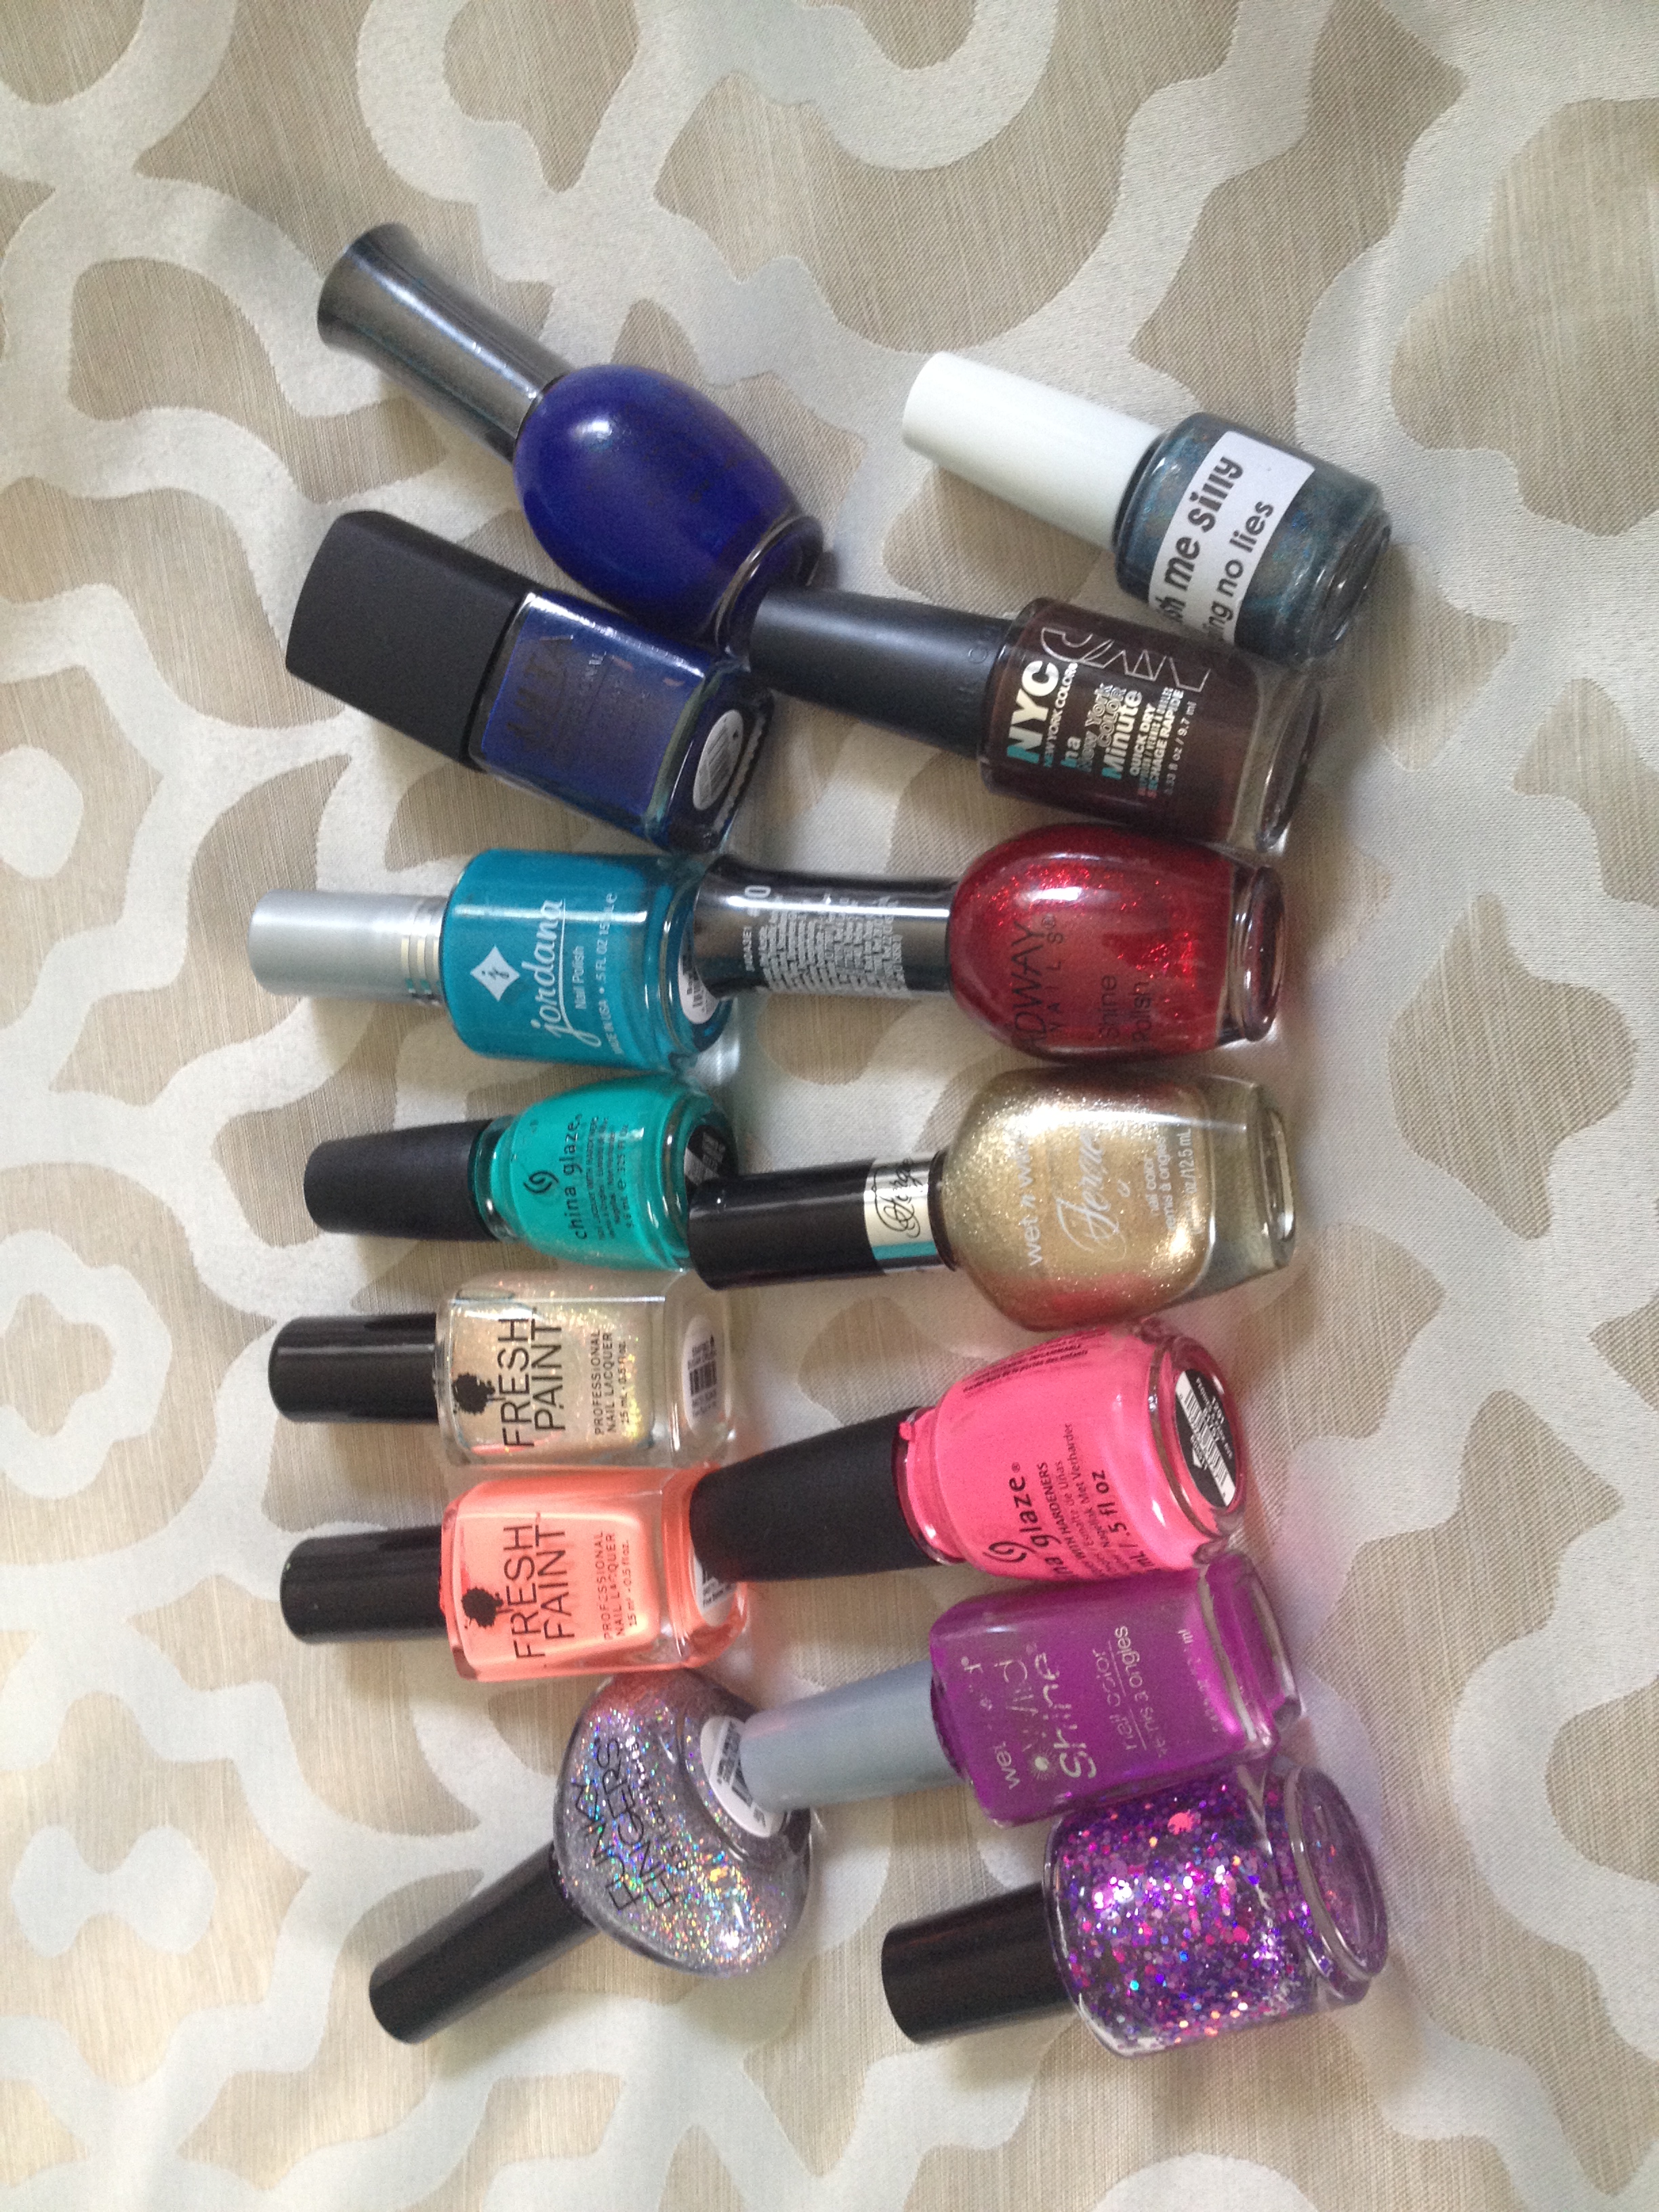
So, before it’s ancient history, here are my April Favorites.  Let’s start on the left….

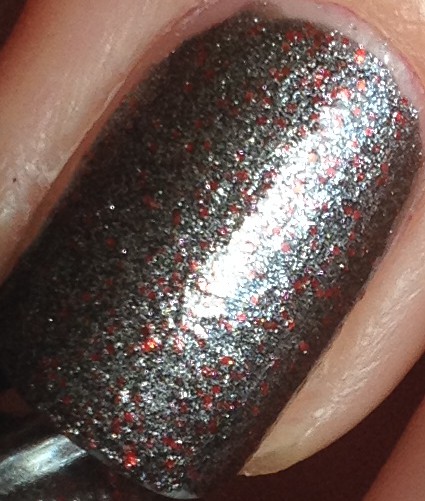
First up we have Bonita – Made to Envy.  It had been ages since I had purchased a Bonita Polish.  I used to buy them on IMG_4676occasion at Francesca’s when they used to carry them.  That was maybe 4 or 5 years ago.  Within the past year or so, I’ve noticed little Bonita displays in Kmart and Rite Aid.  IMG_3940
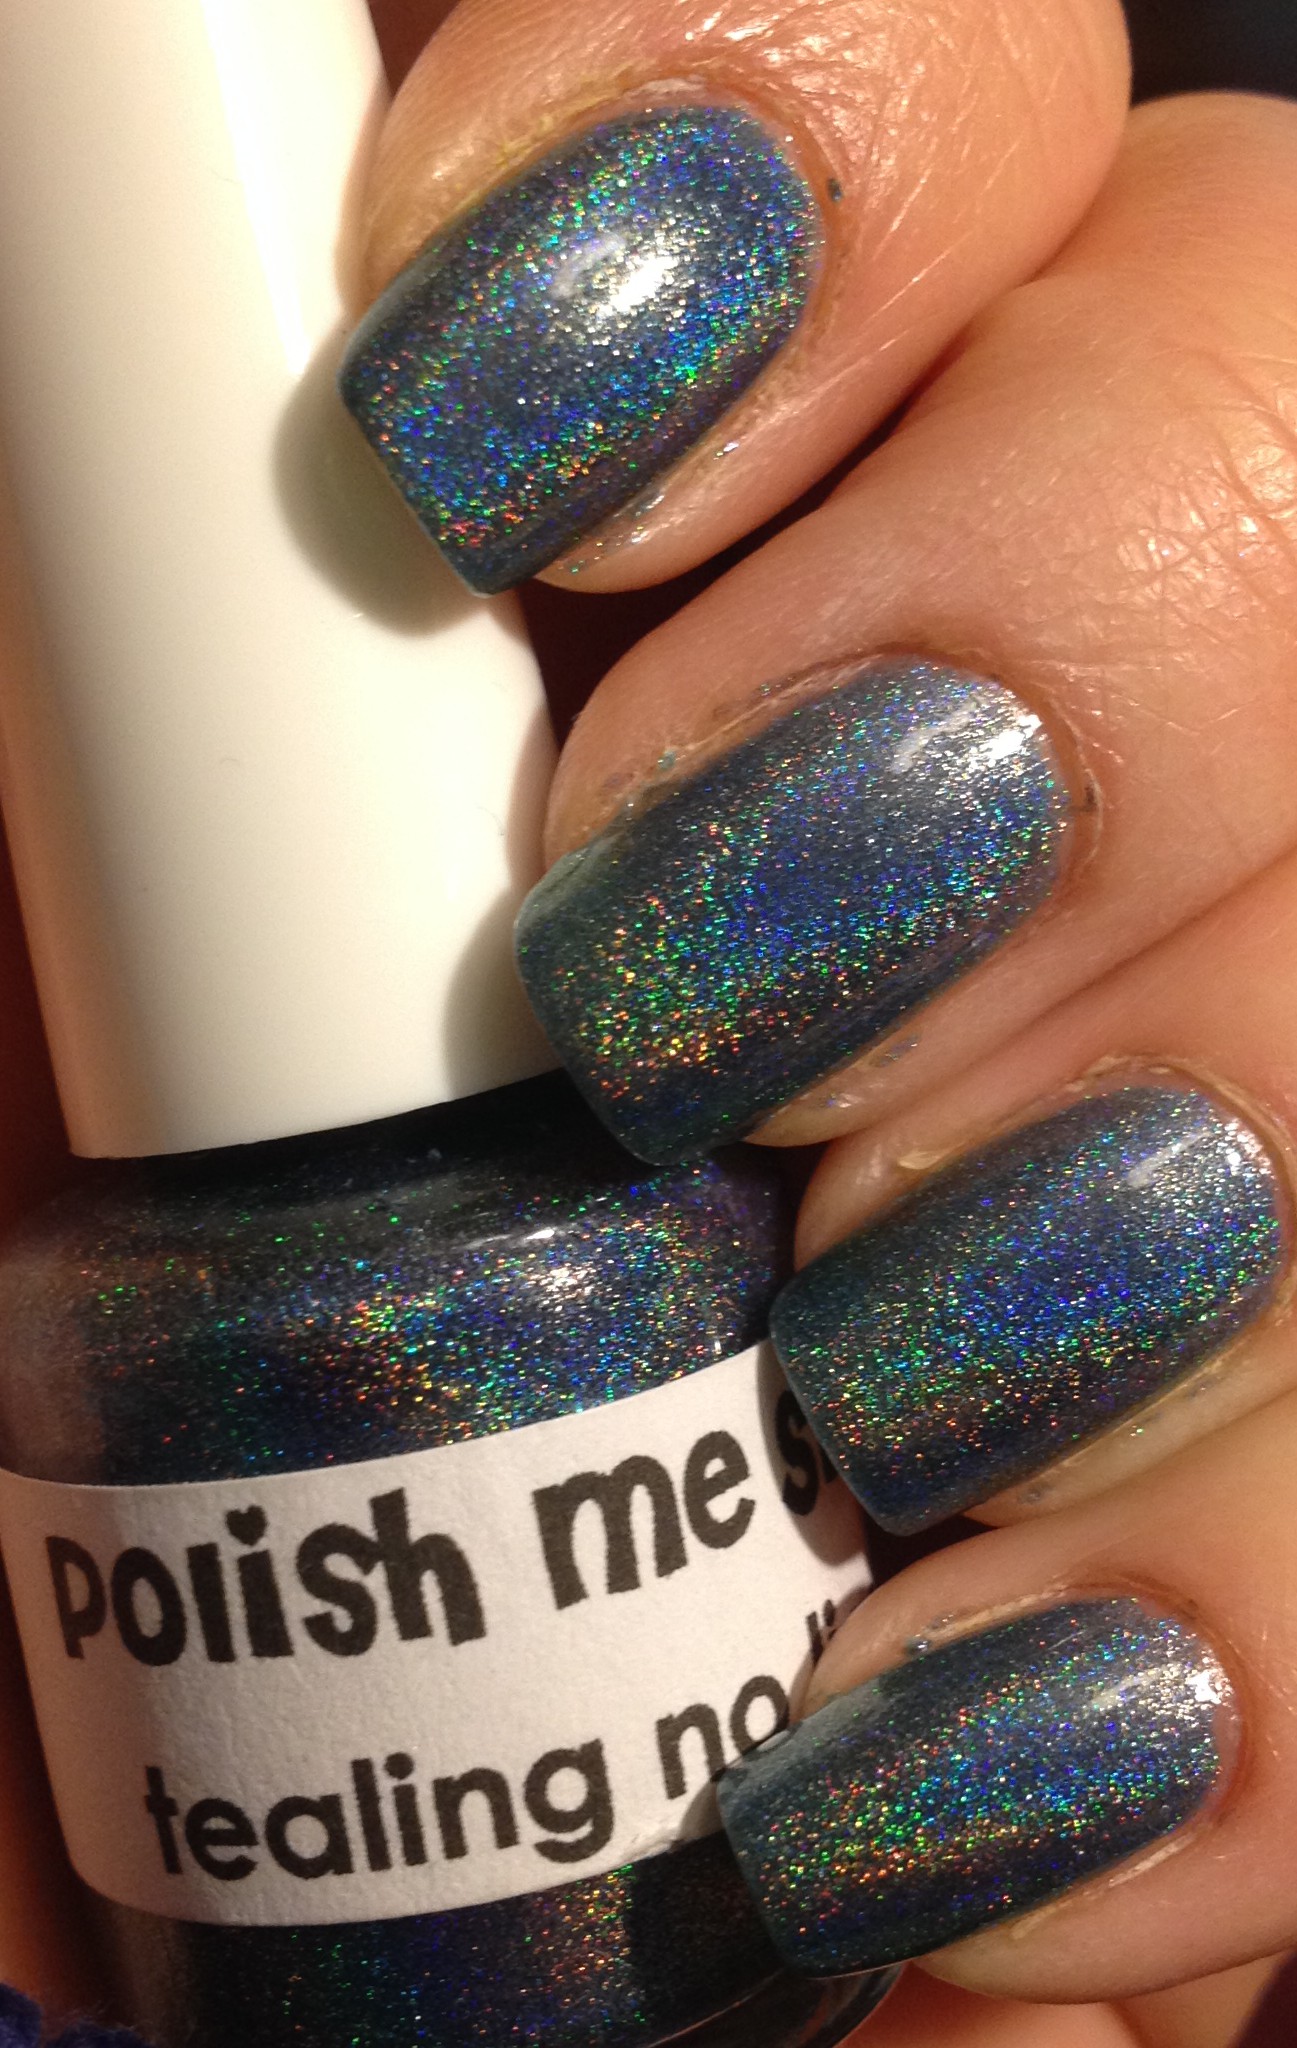
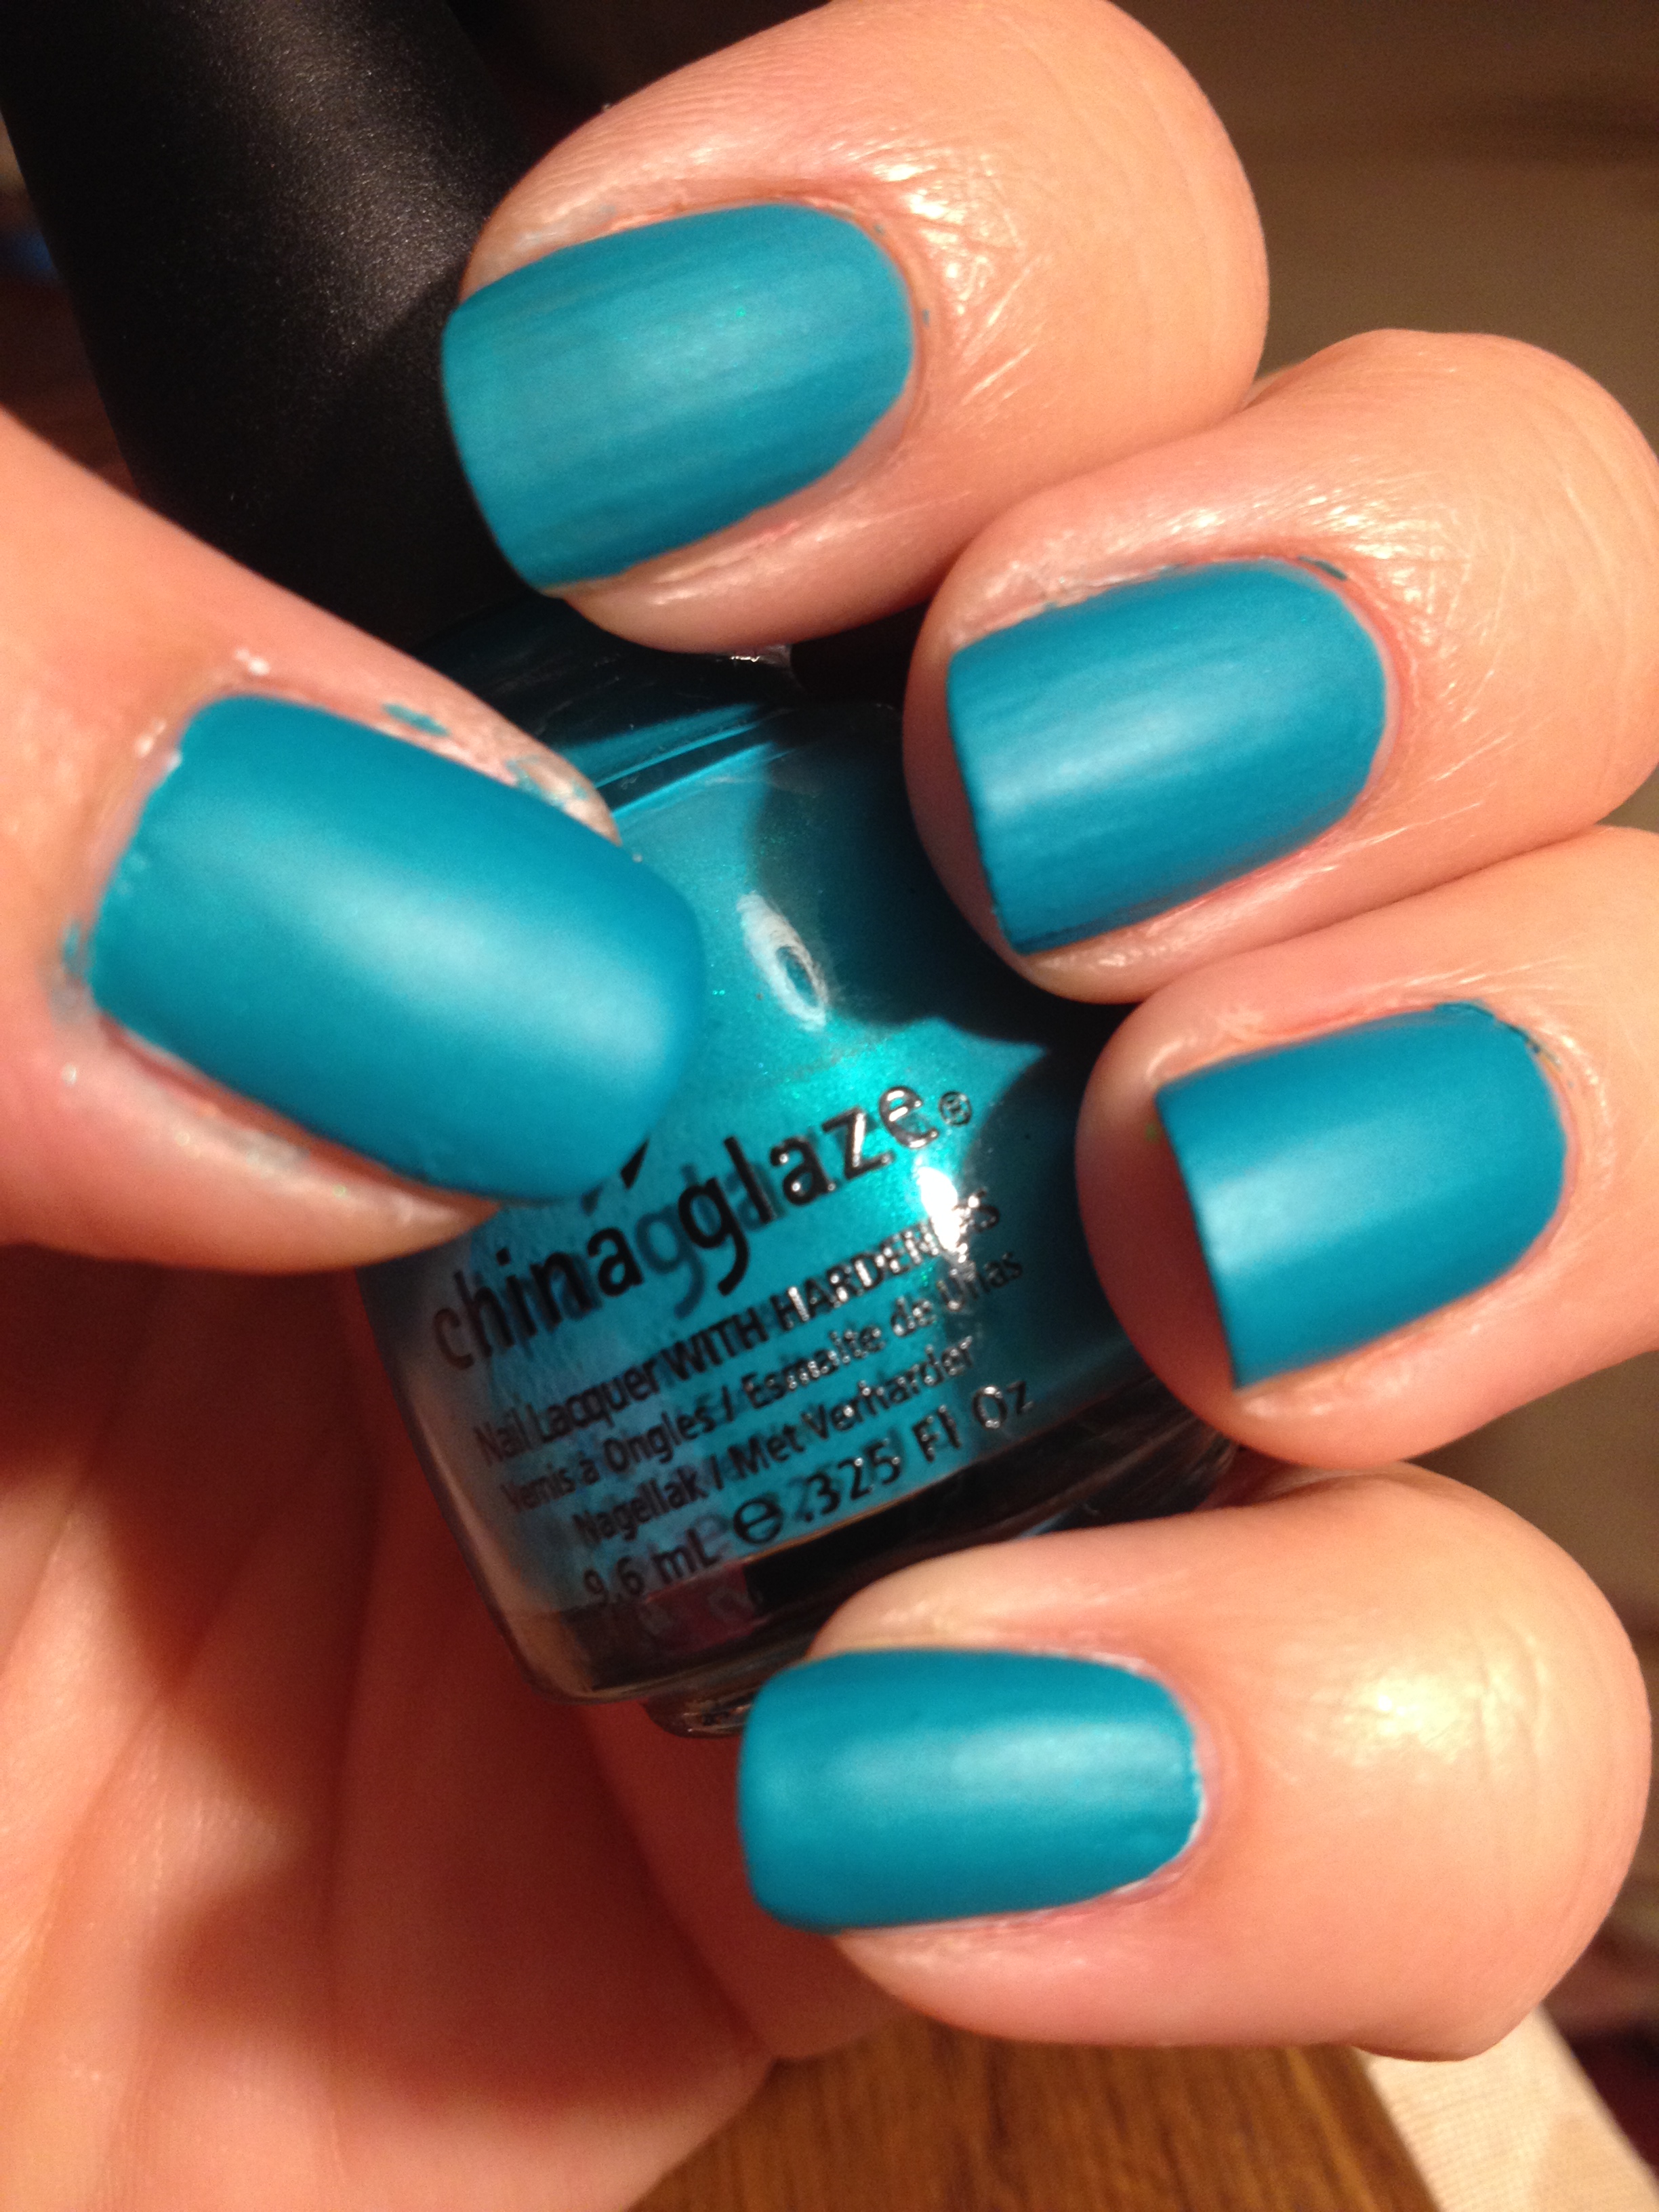
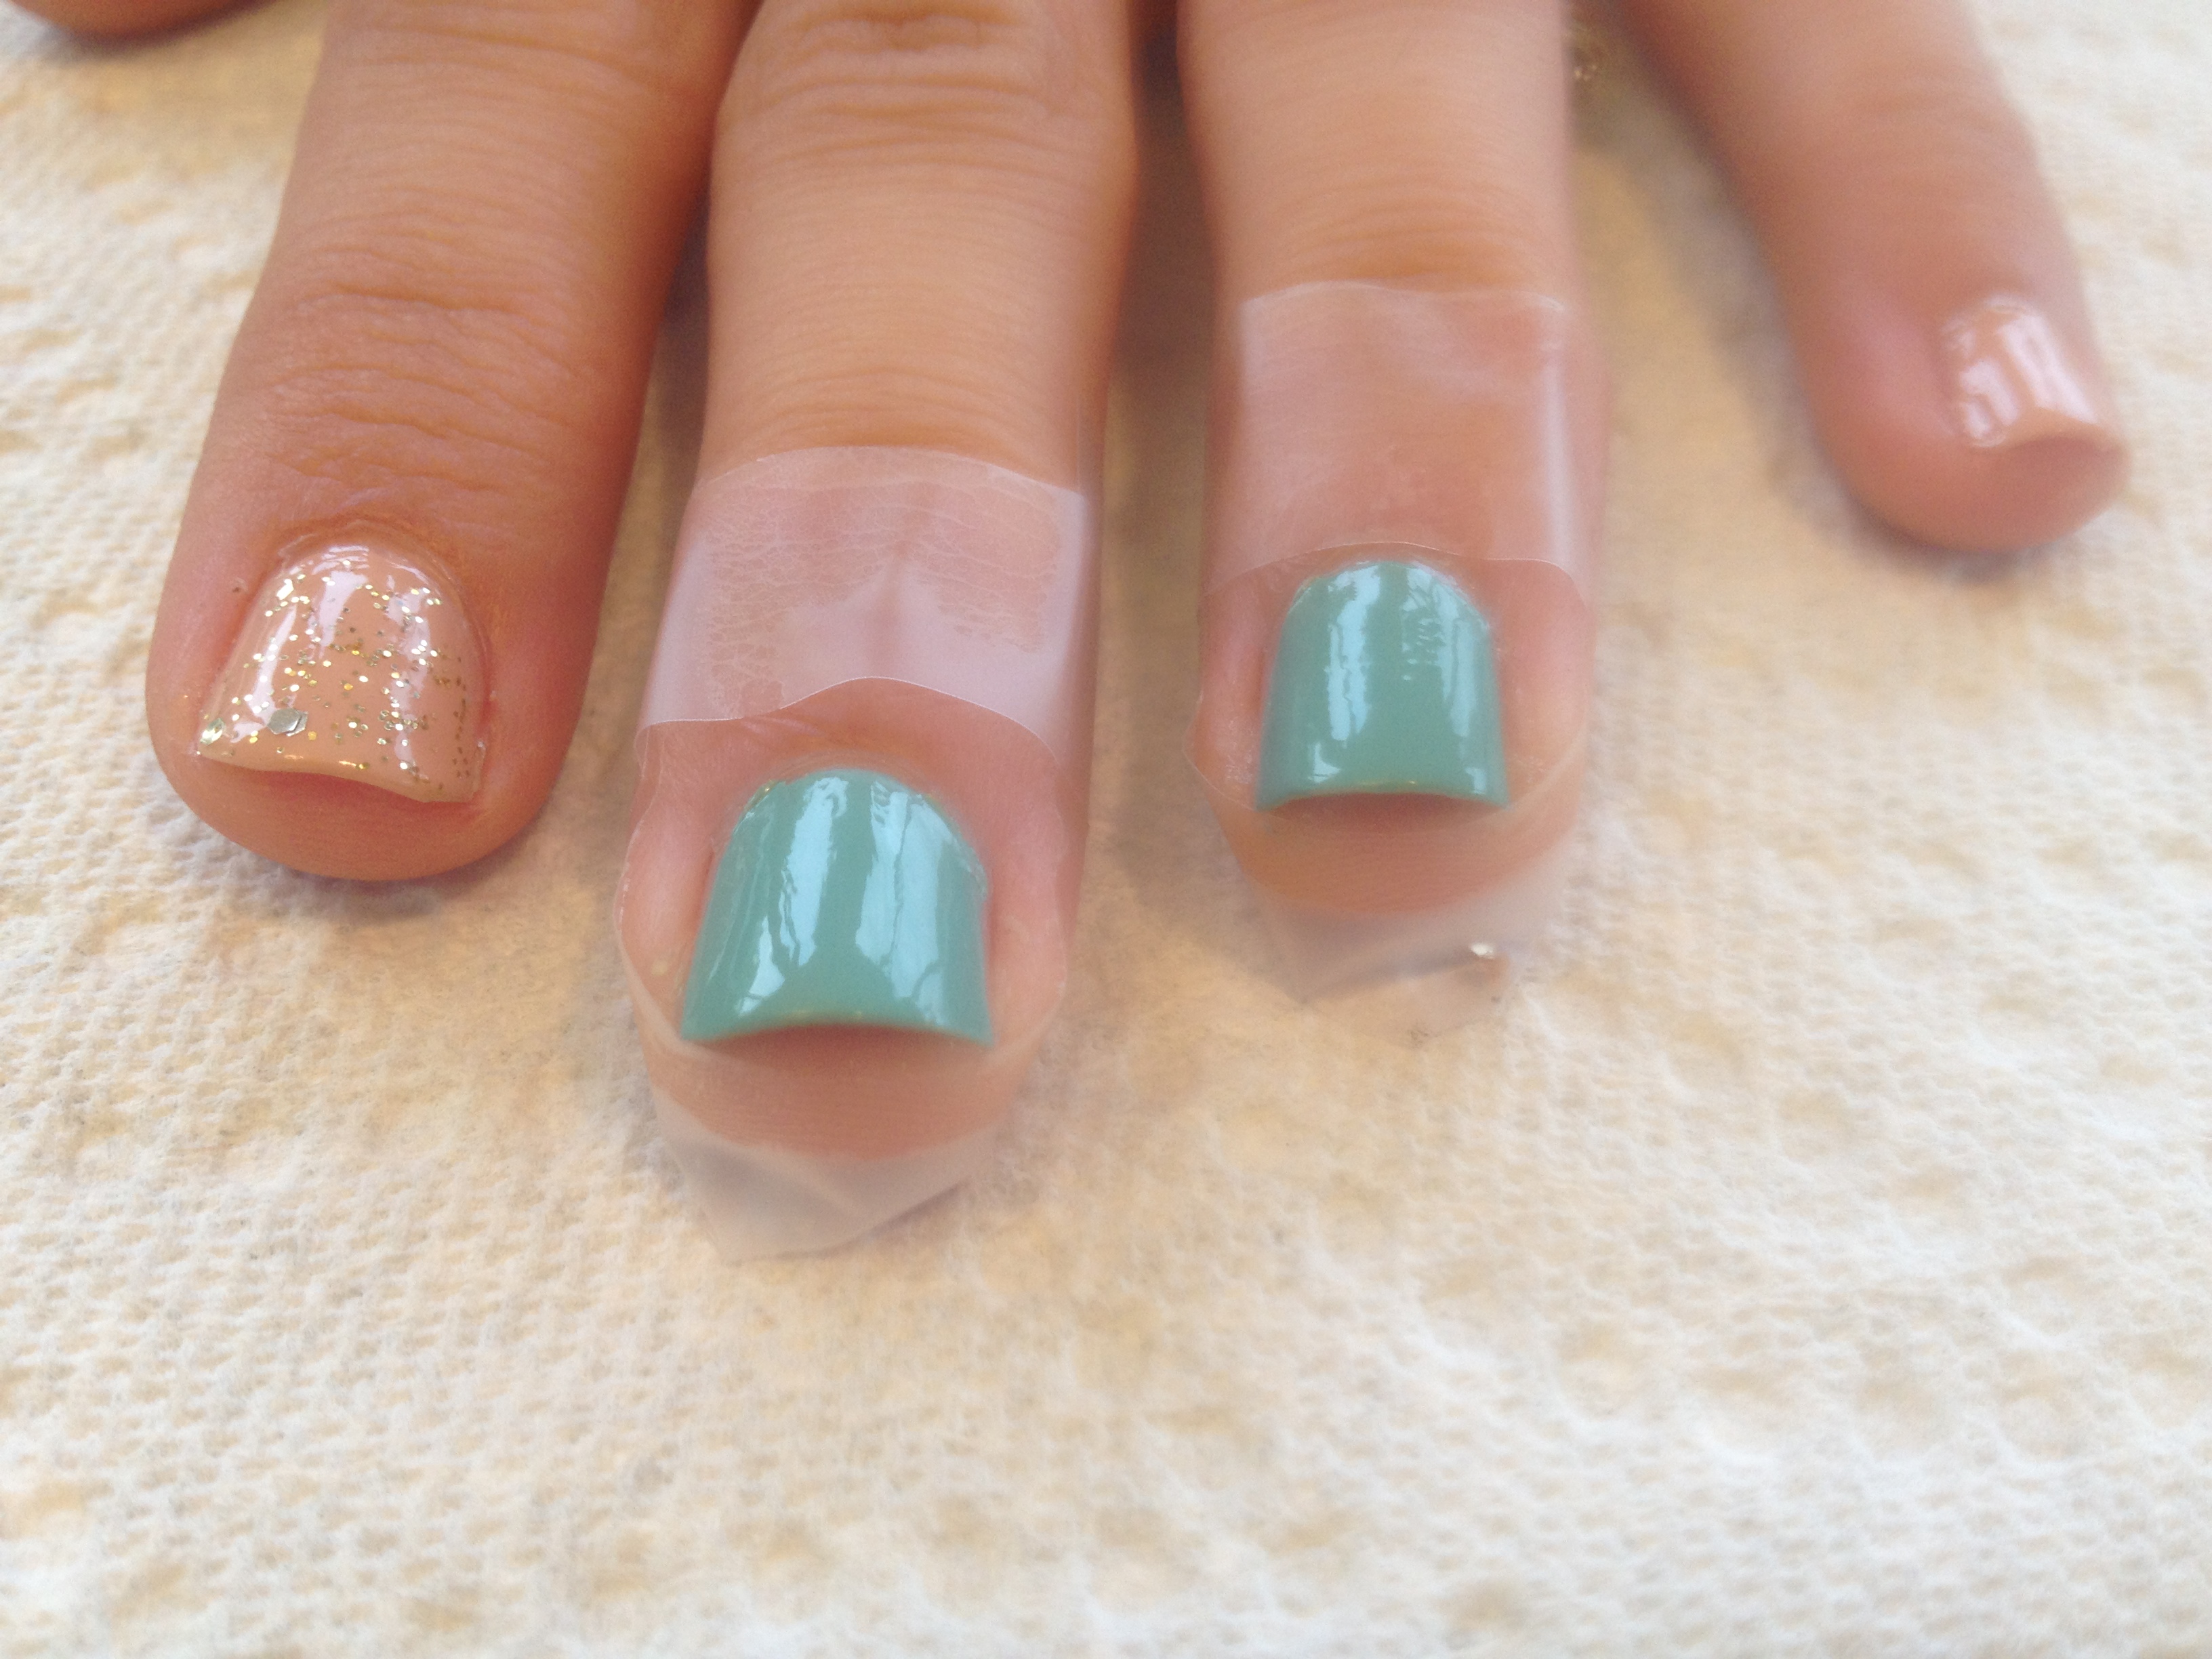
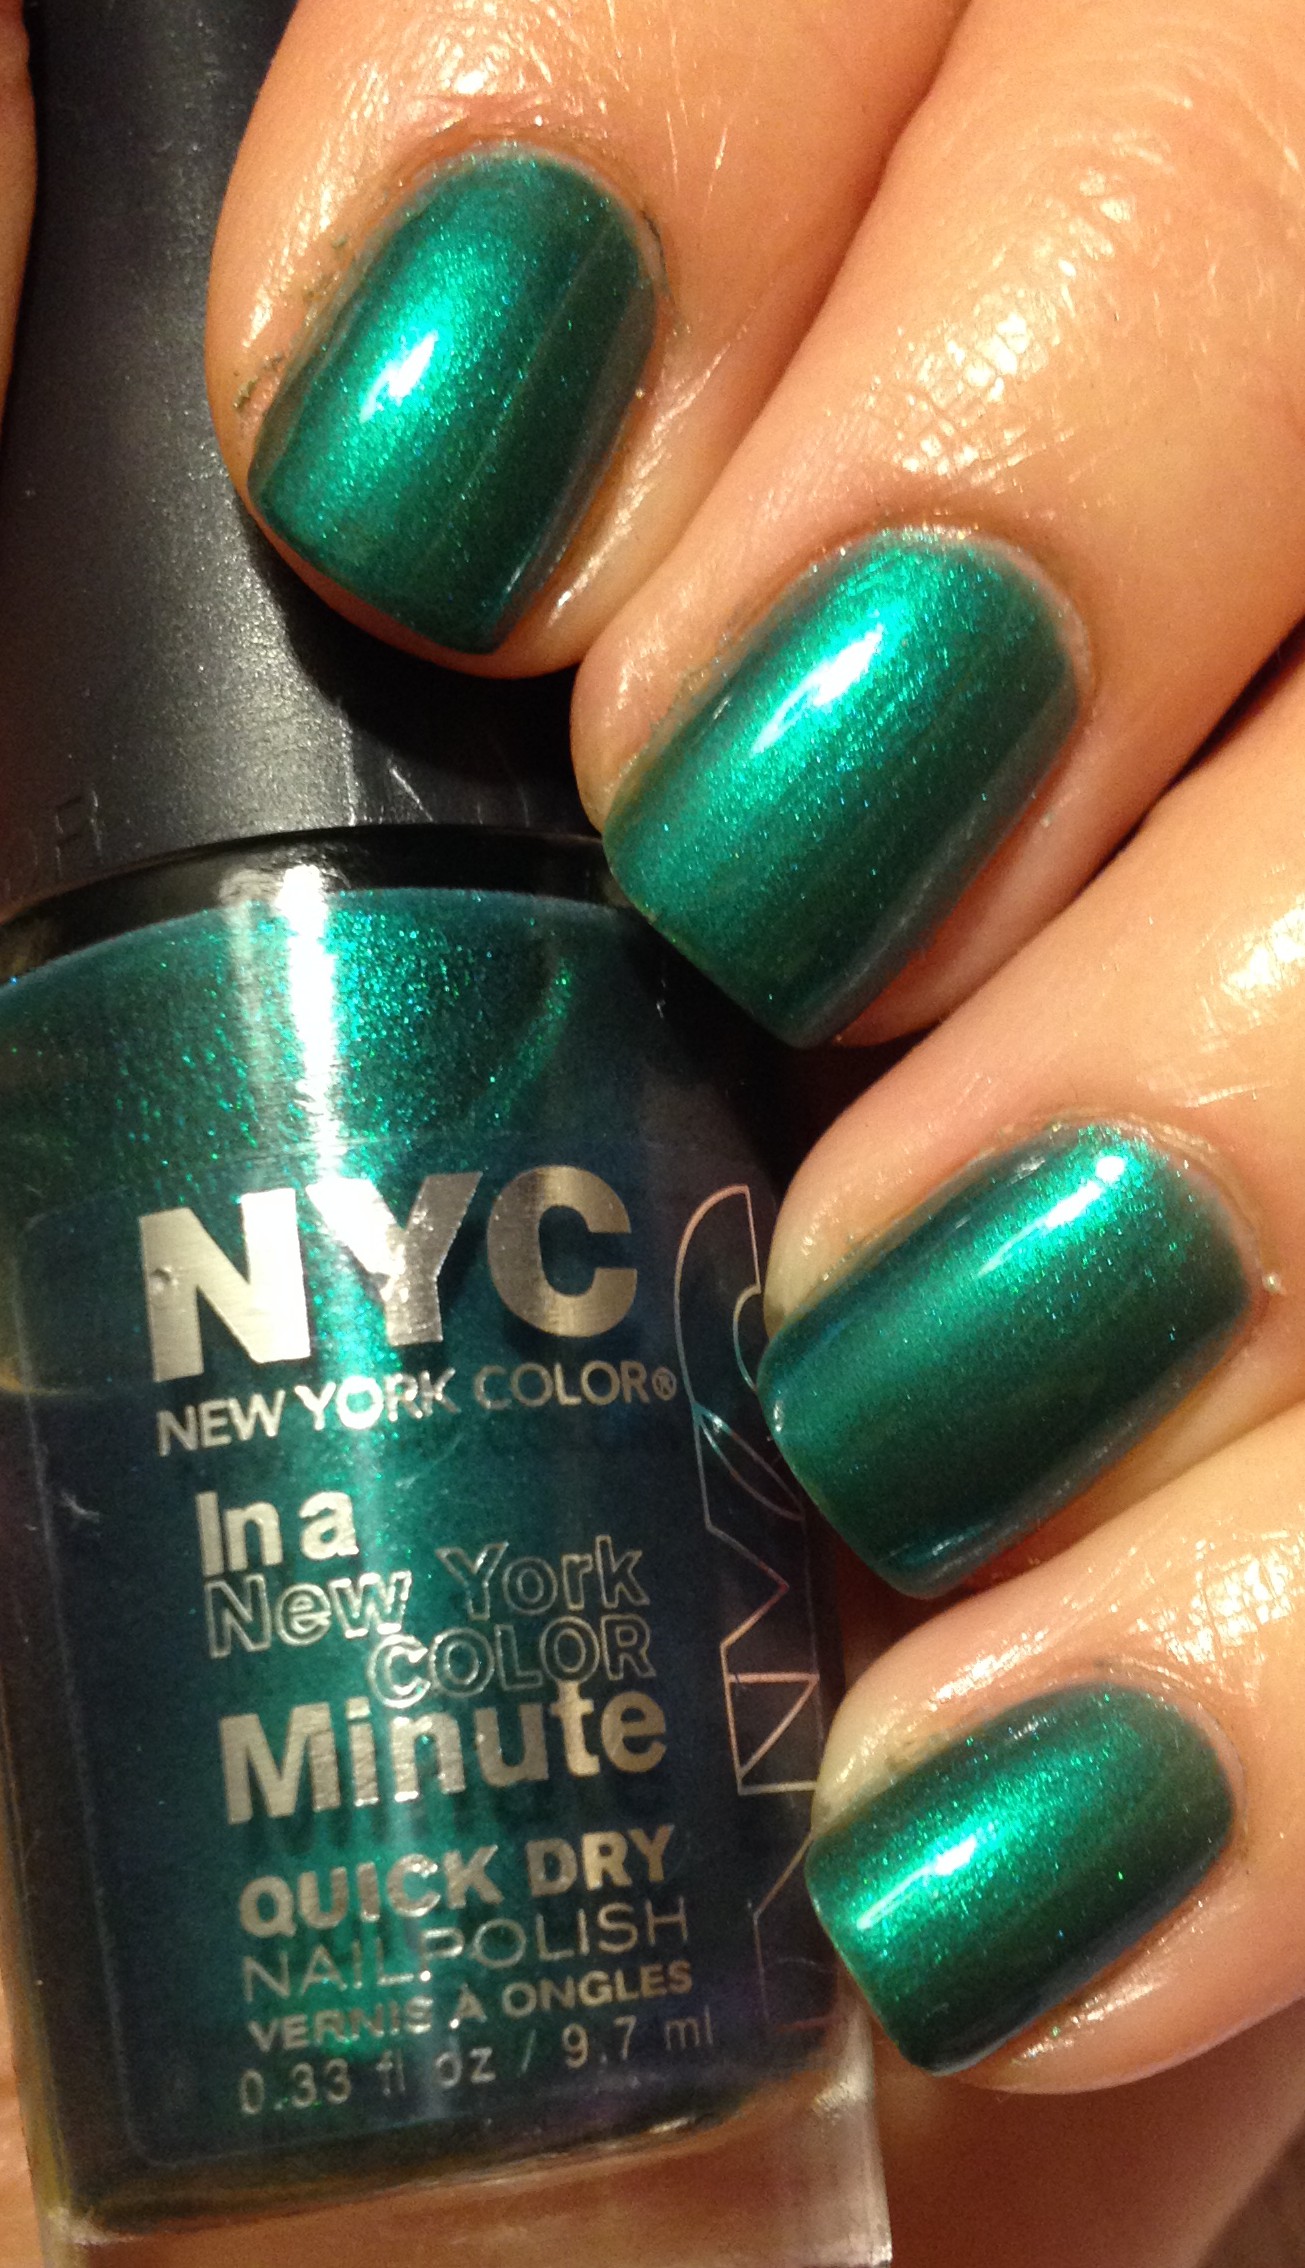
I’ve seen at least 3 different bottle shapes, which is sort of unique for a nail polish line.  Anyway, I had been eying Made to Envy for a few months.  I’m a real sucker for teal polishes.  I have a good half a dozen shimmery teal polishes, so I had been telling myself that I didn’t need this one, too.  I can’t remember exactly how or why or when I finally caved and bought this, but am I glad I did!  the thing that makes it unique to my collections is that it is a one-coater!  And the color is just so rich and beautiful!  And it’s only $2.49, so I’d definitely recommend picking this baby up, if you can.

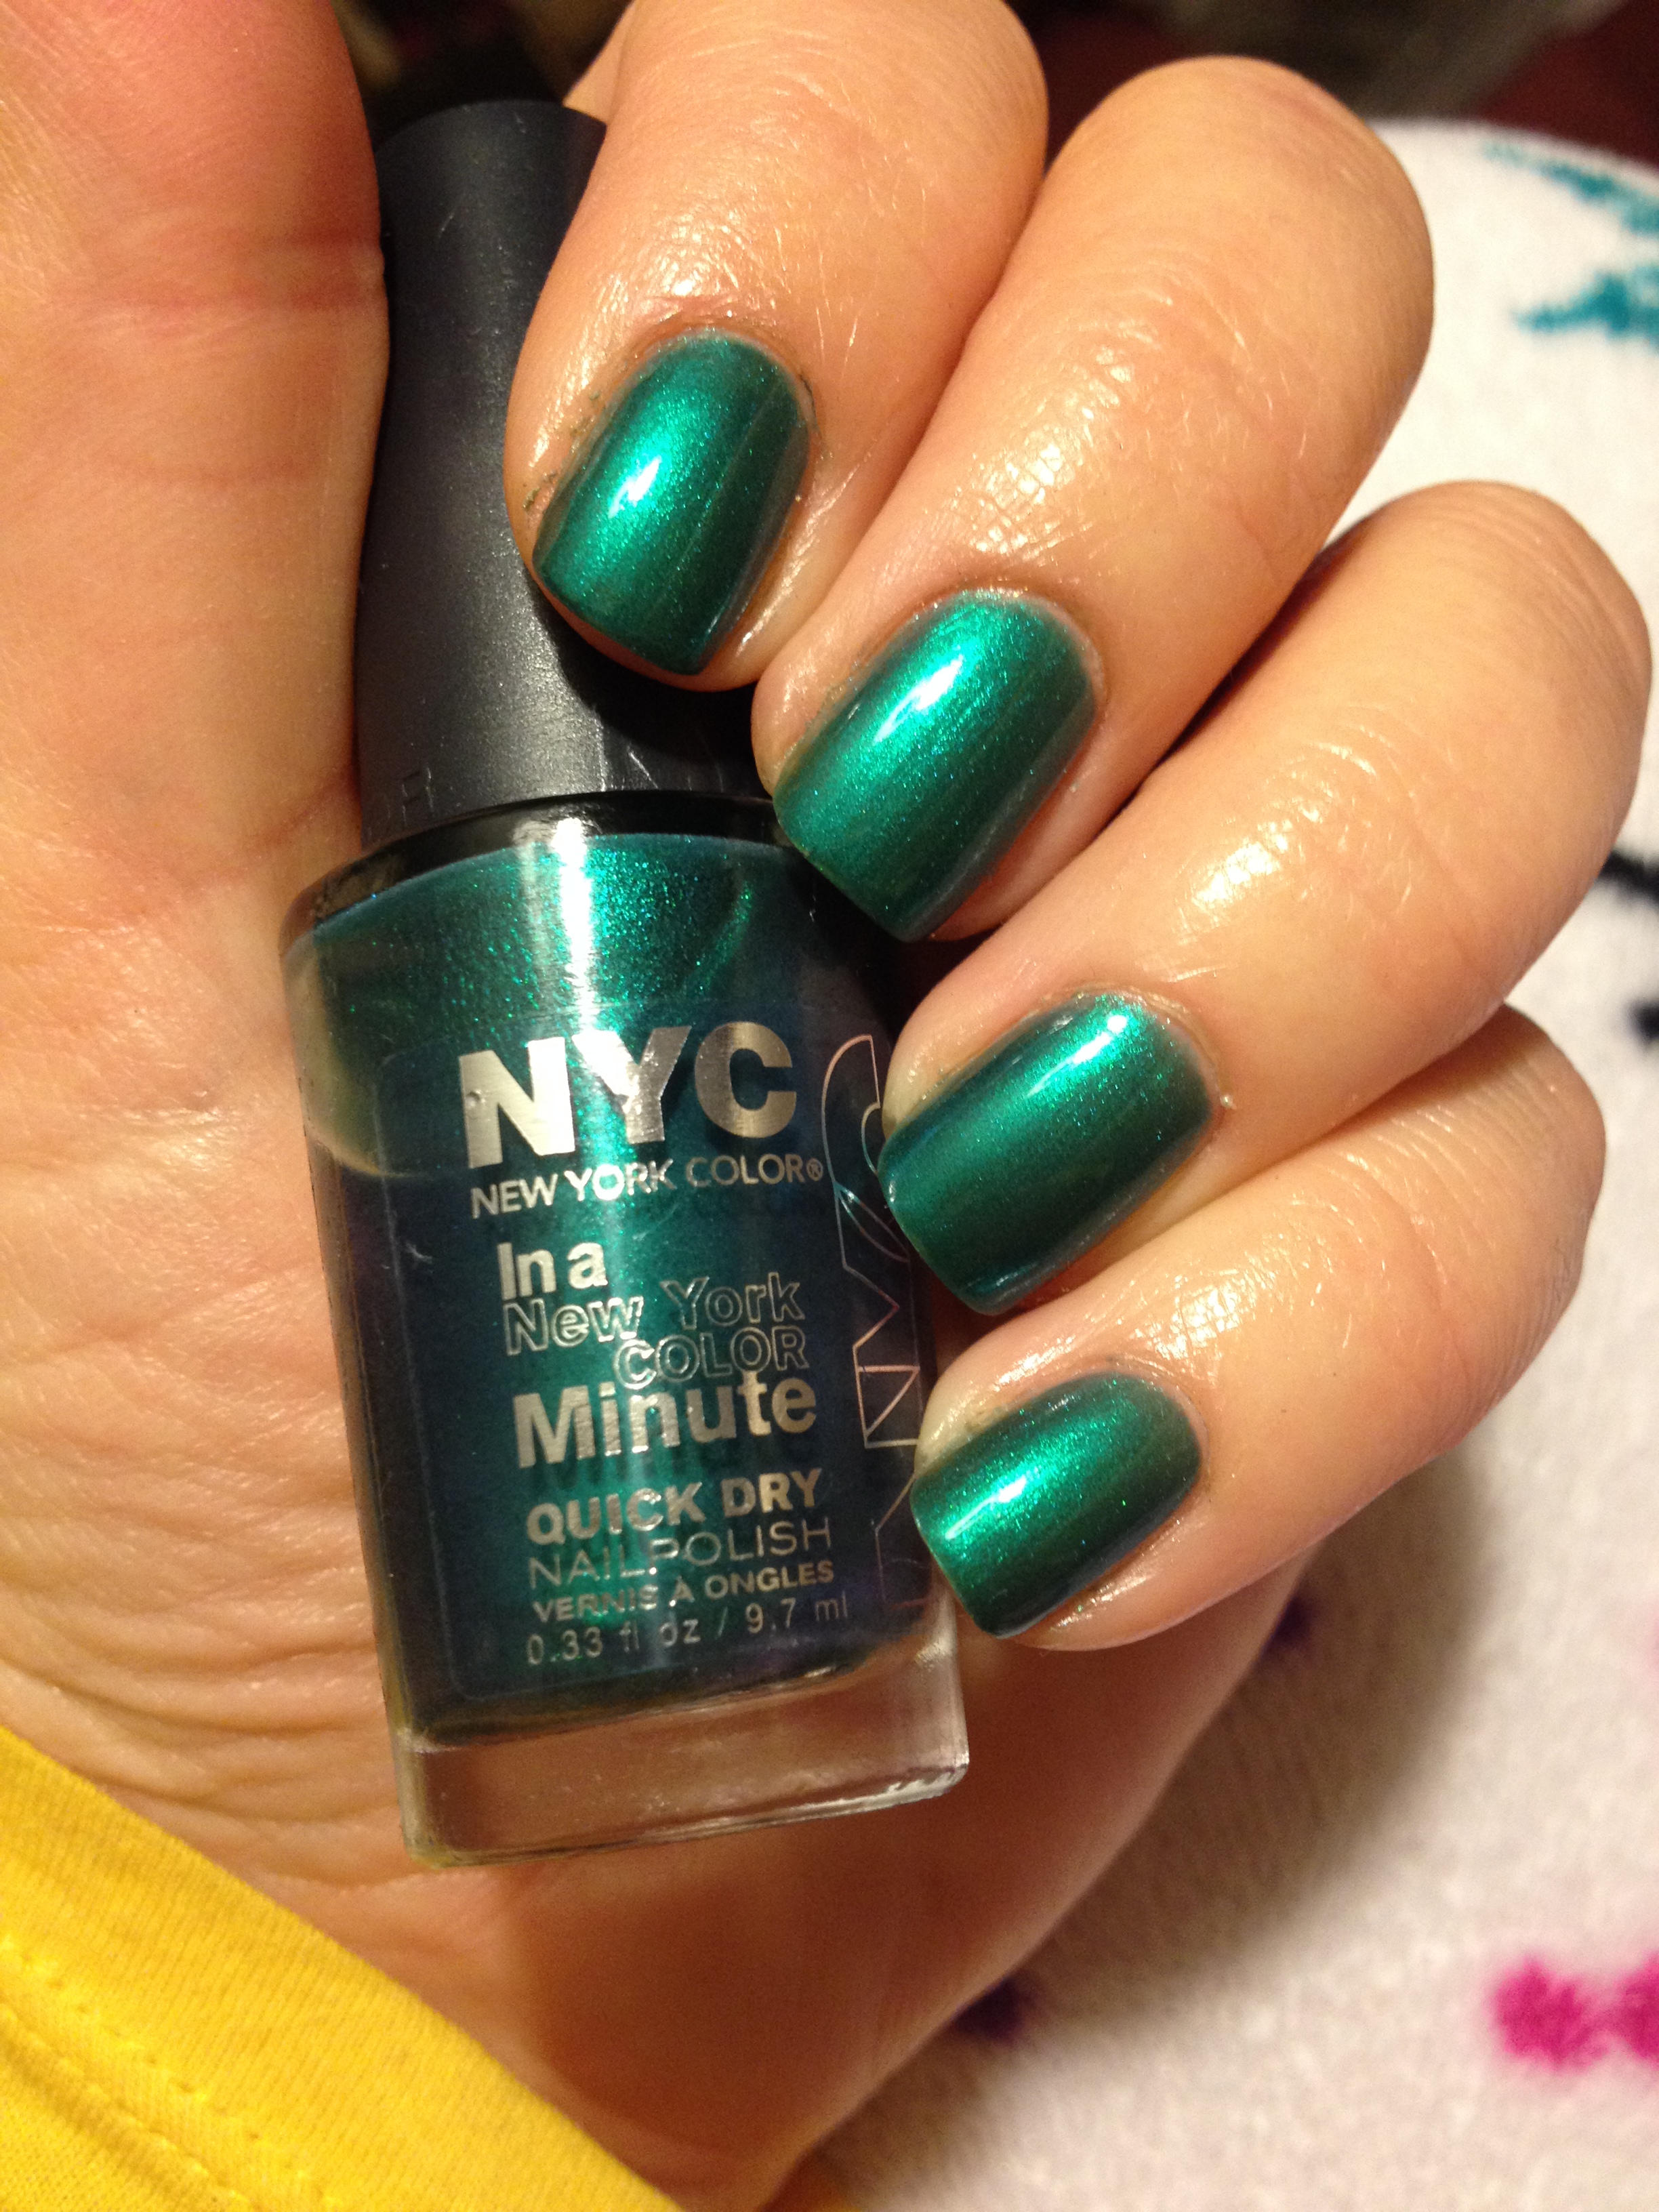
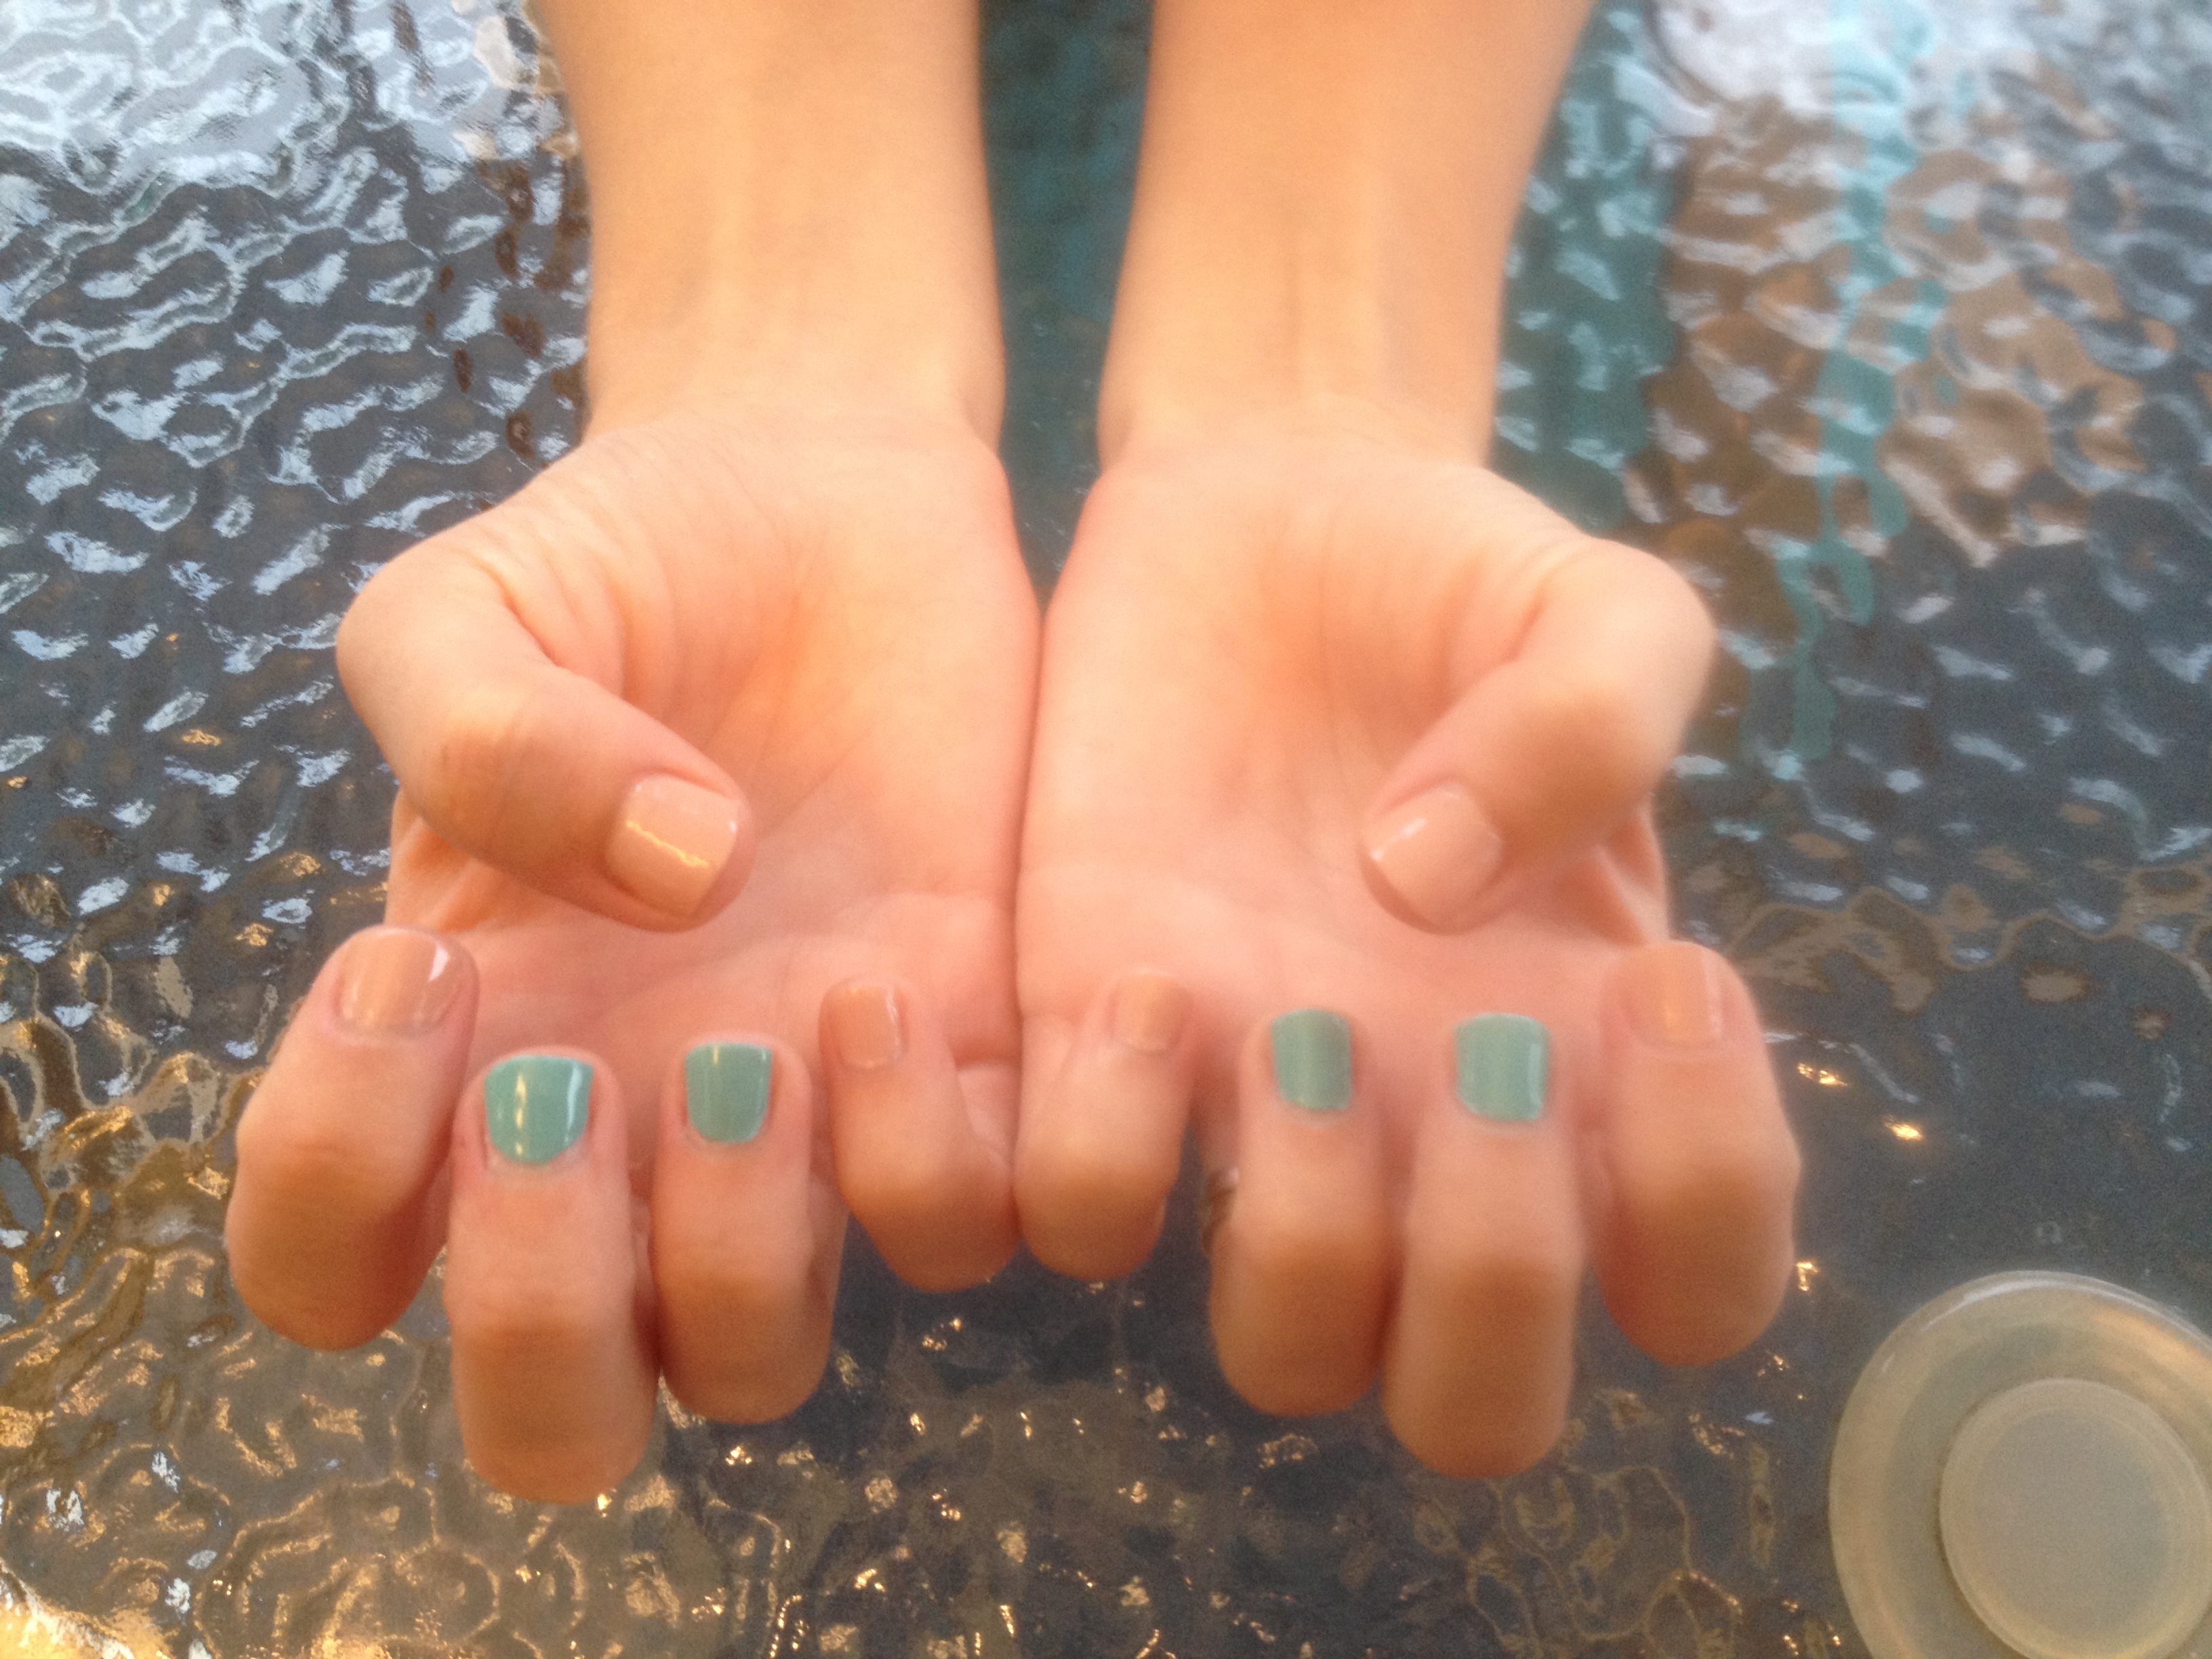
Just for comparison, here on the left is NYC – Precious Peacock.  Although it looks much more green in this picture than Made to Envy, they really are super close in color in real life.  This is four coats of Precious Peacock.  Four coats.  Ain’t nobody got time for that.

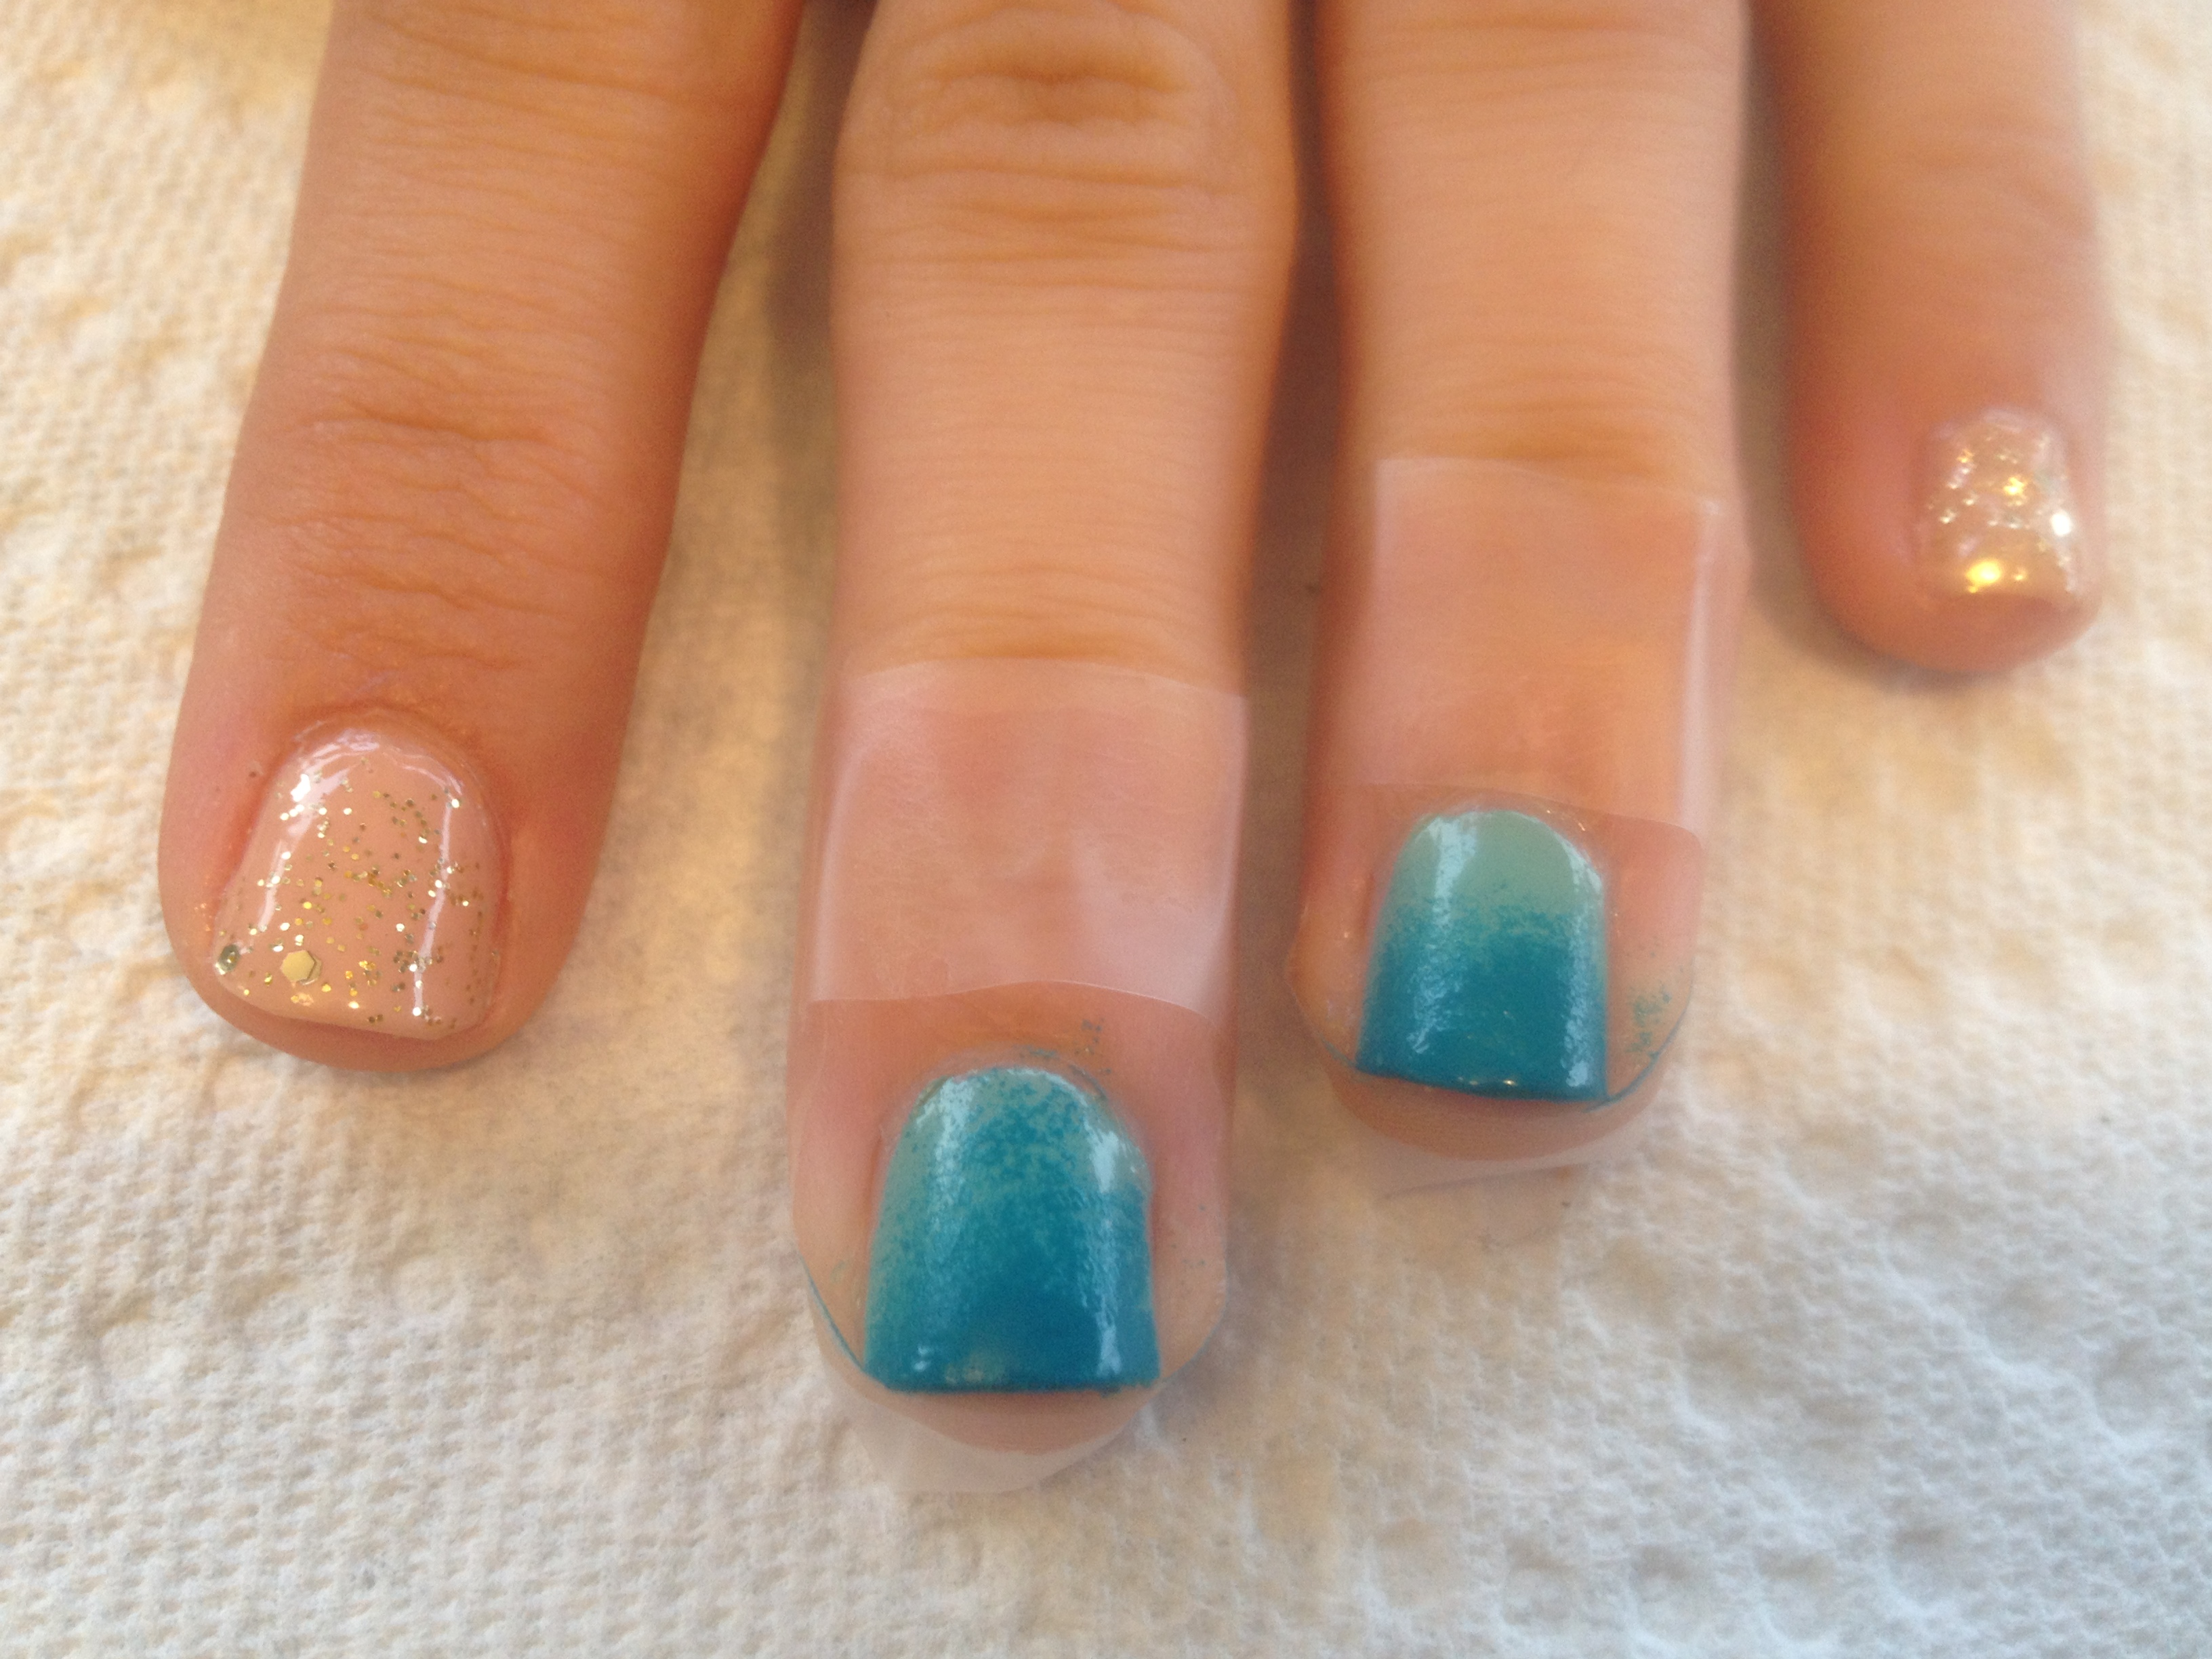
Back to Made to Envy… It’s just so pretty. Sometimes I just hold this polish and stare at it lovingly.   P.S.  My hubby really likes this one.

Next we have NYC Prospect Park Bloom.  After wearing a lot of bright polishes, I was craving something neutral.  This one was in my untried stash. IMG_4728  
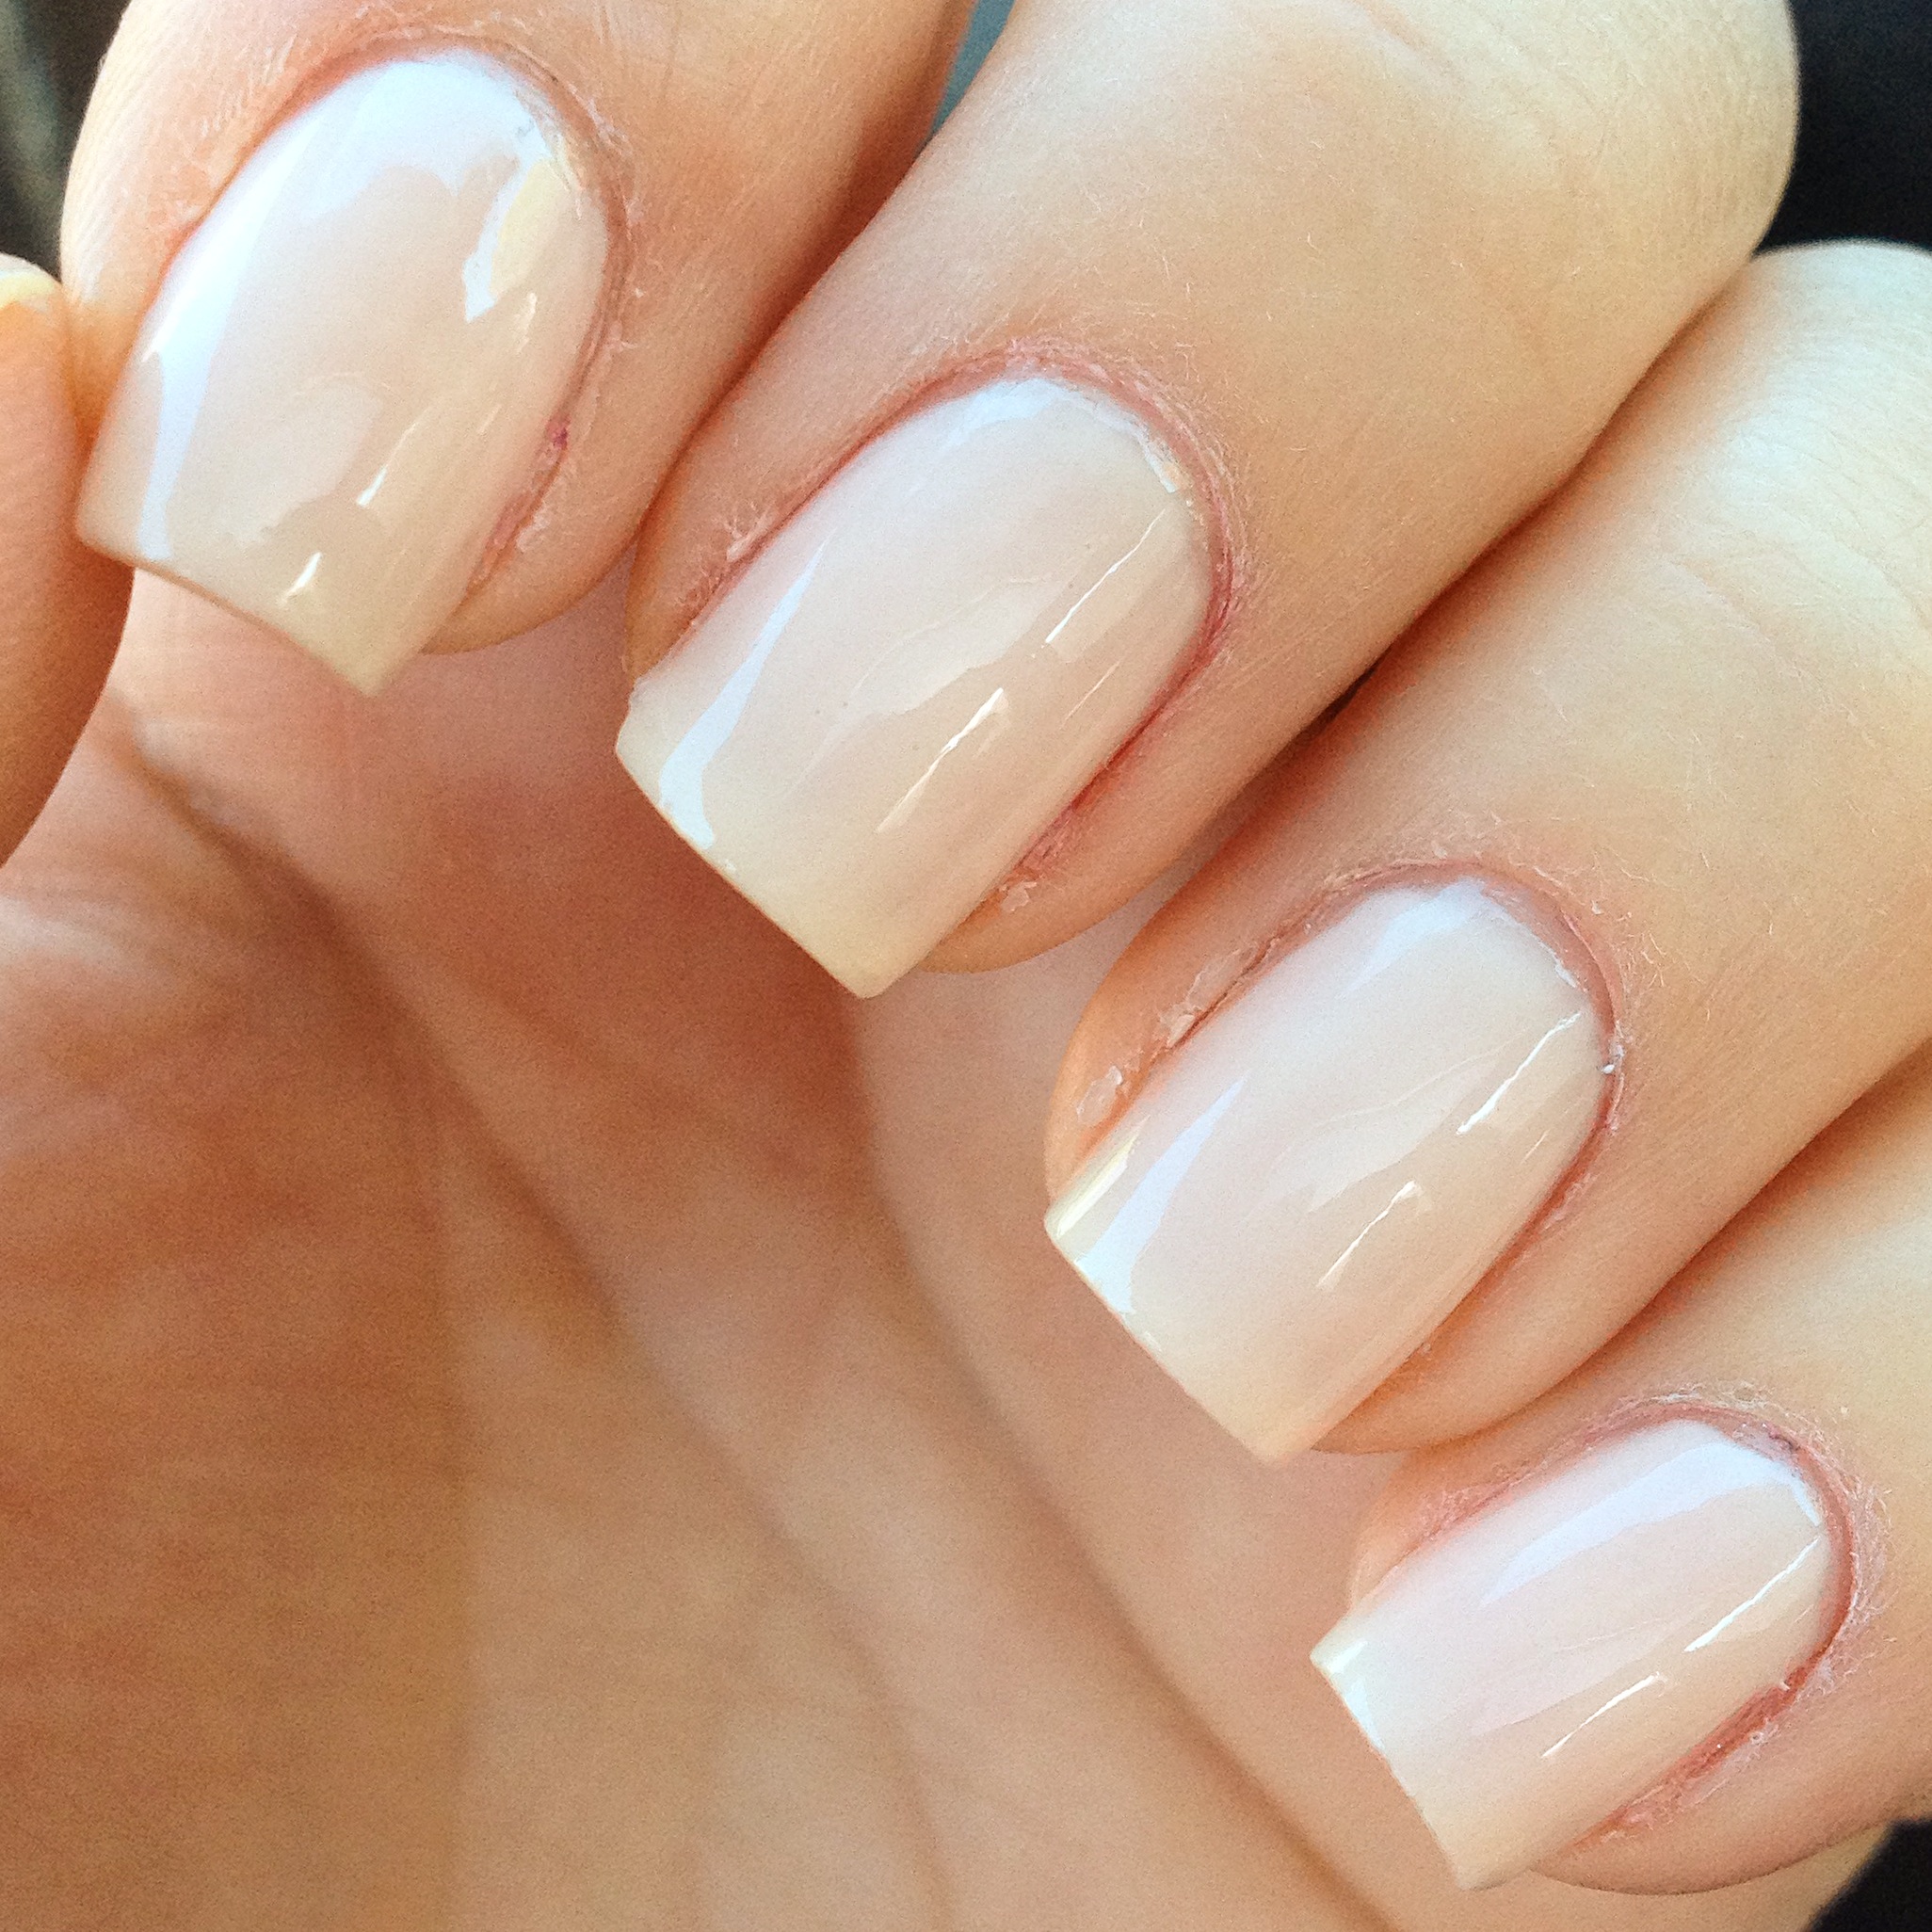
This polish is pretty sheer, so I think this took 3 coats.  I just love how shiny it is and how soft the color is!  Neutral colors like this are really forgiving if your application isn’t perfect.  Heck, there could be all sorts of polish gunked on my cuticles, but you wouldn’t even be able to tell.  The best thing about colors like this is you really can’t tell when they start to wear or chip a little.   I’m not sure how this polish would look on someone with darker or more olive-toned skin, but if you are a bit on the pasty white side like me, this will work well for you.

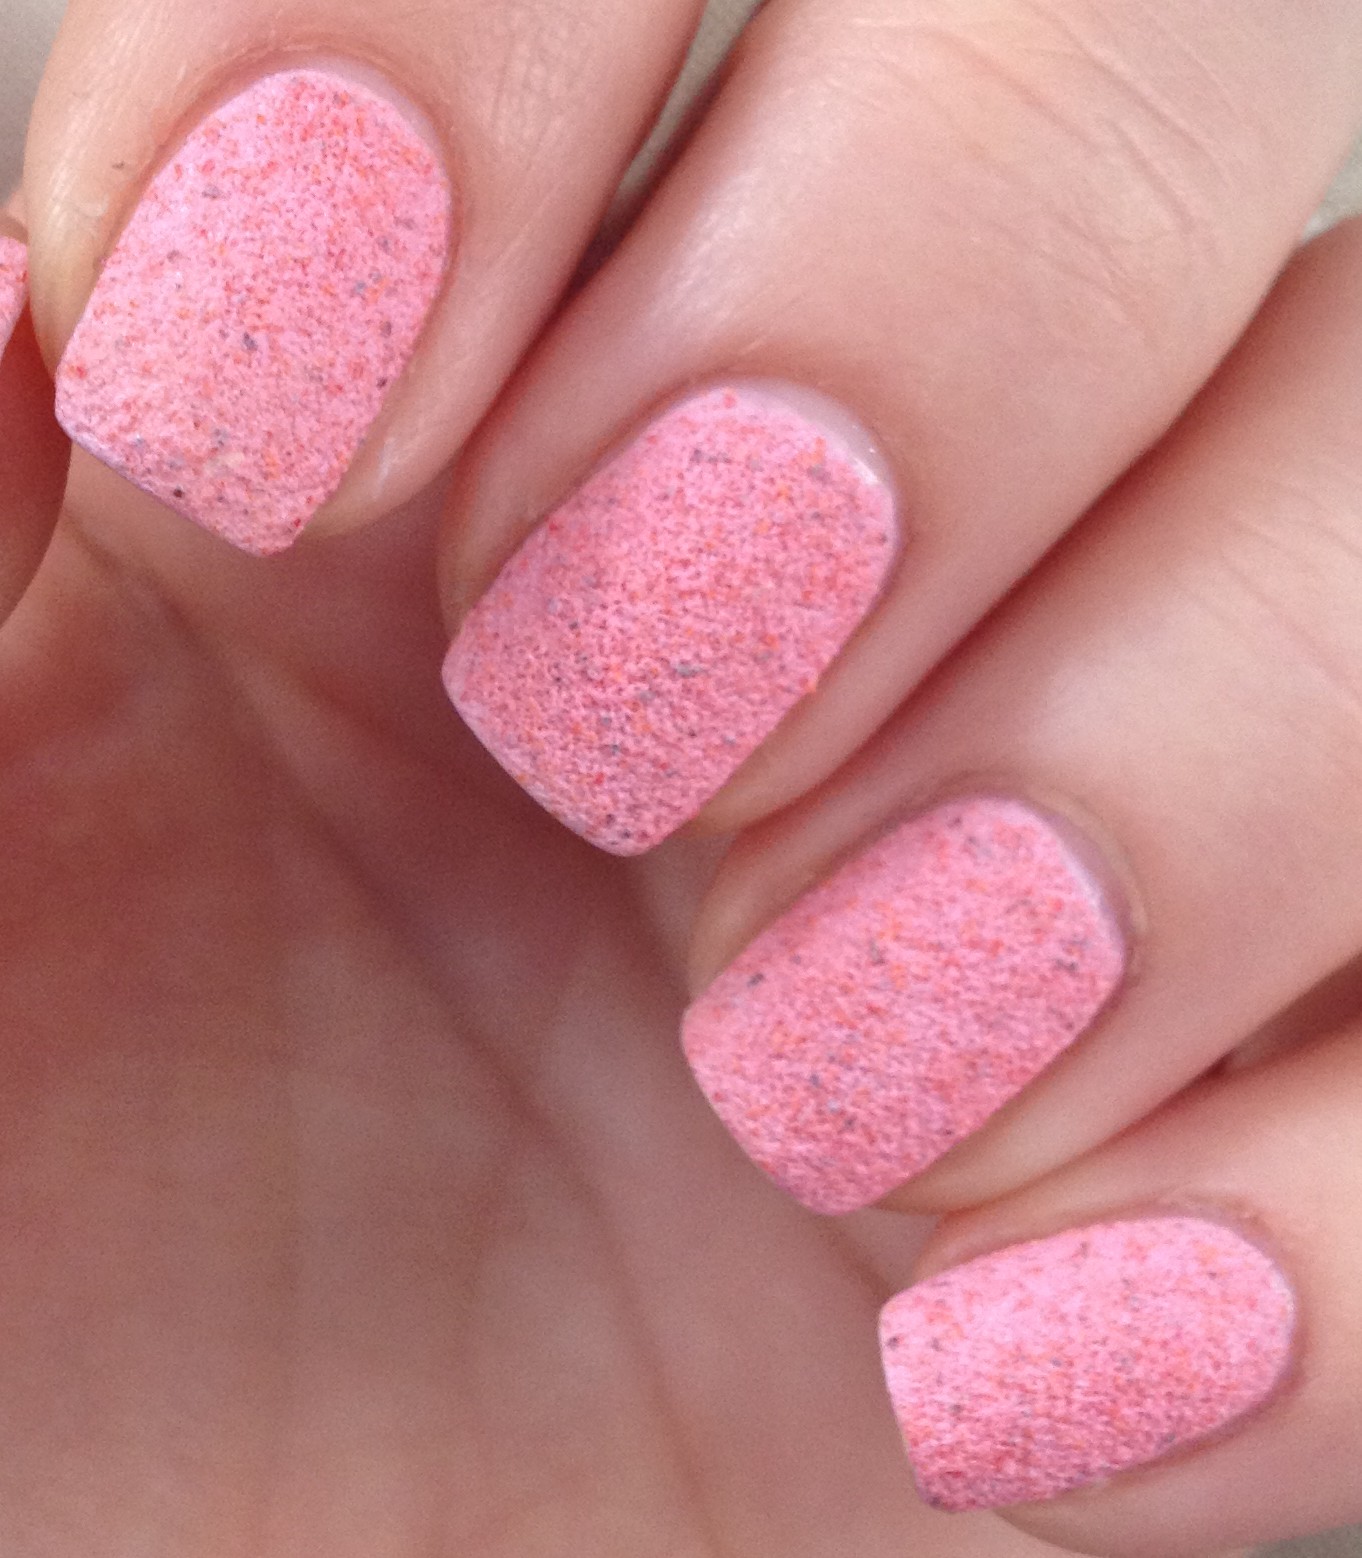
Next is Fresh Paint – Honeydew.  Really, I’m kind of embarrassed to even put this polish in my favorites.   This was in both my February and March favorites.  When I’m looking to pick out my Monthly Favorites, I don’t really look at (or remember) what polishes I picked the month before.  I just look back through my instagram account for the past month and pick out the polishes that I really liked and/or used a lot.   Apparently, I’ve been fixated on this polish for at least 3 months.  I specifically picked it as an April favorite because I used it for both of my Easter manis.  This polish is one of those neon pastel type colors that is all the rage these days.  I realize that this polish is exclusive to Five Below, which is not really convenient for lots of you.  Sorry about that.

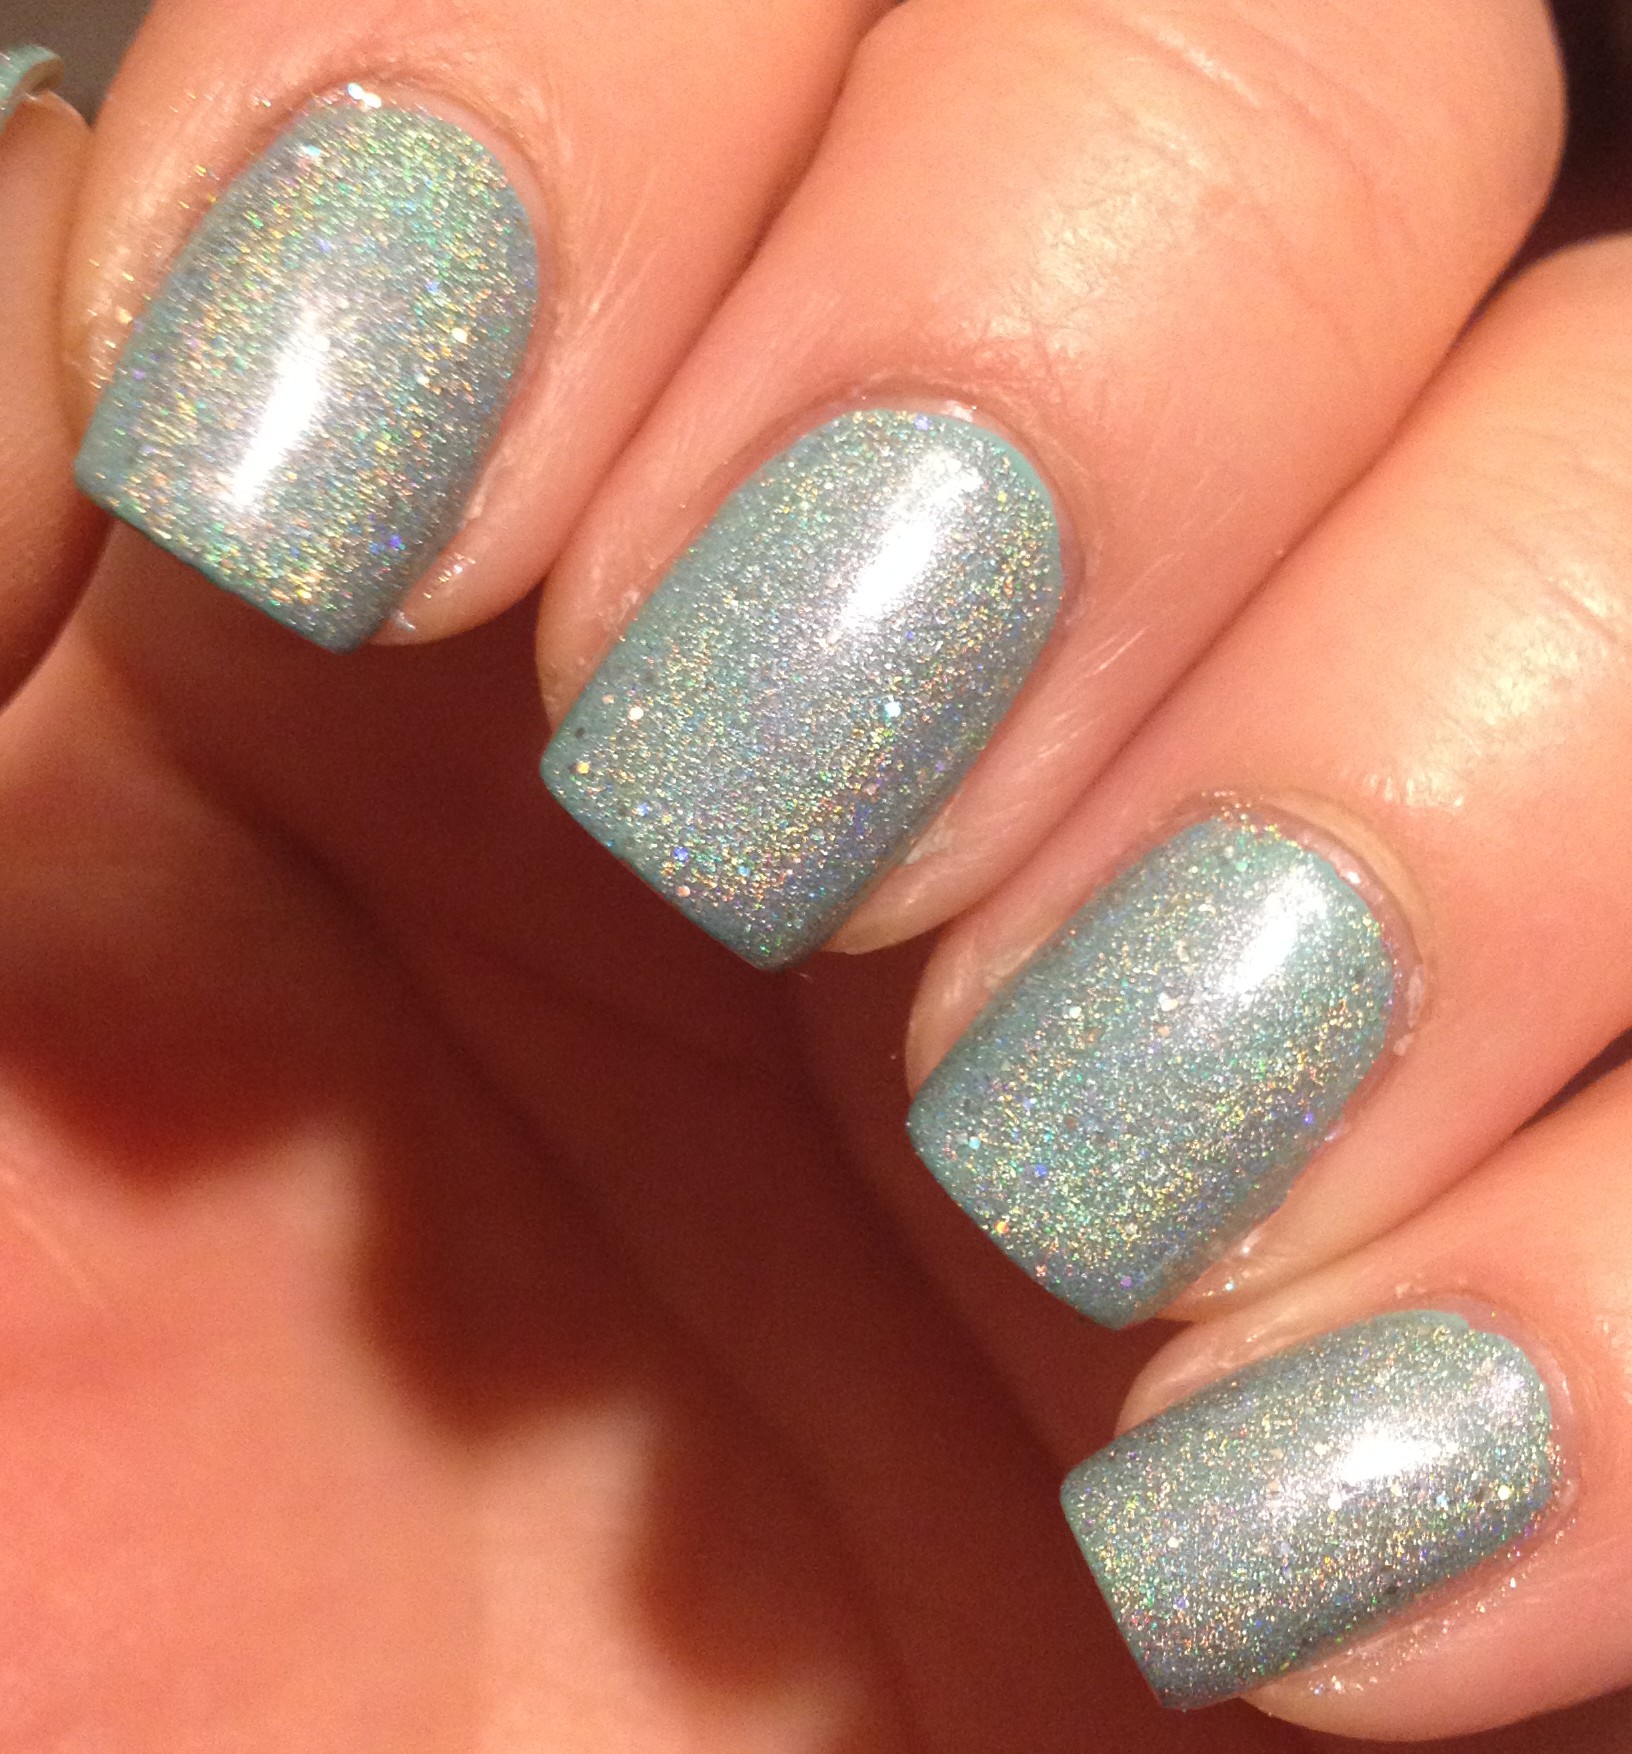
Next up is NYC – Sidewalkers.  This is just a plain old grey polish.  (I like “grey” better than “gray”.  I feel like the spelling with an “e” just looks nicer.)IMG_4688   
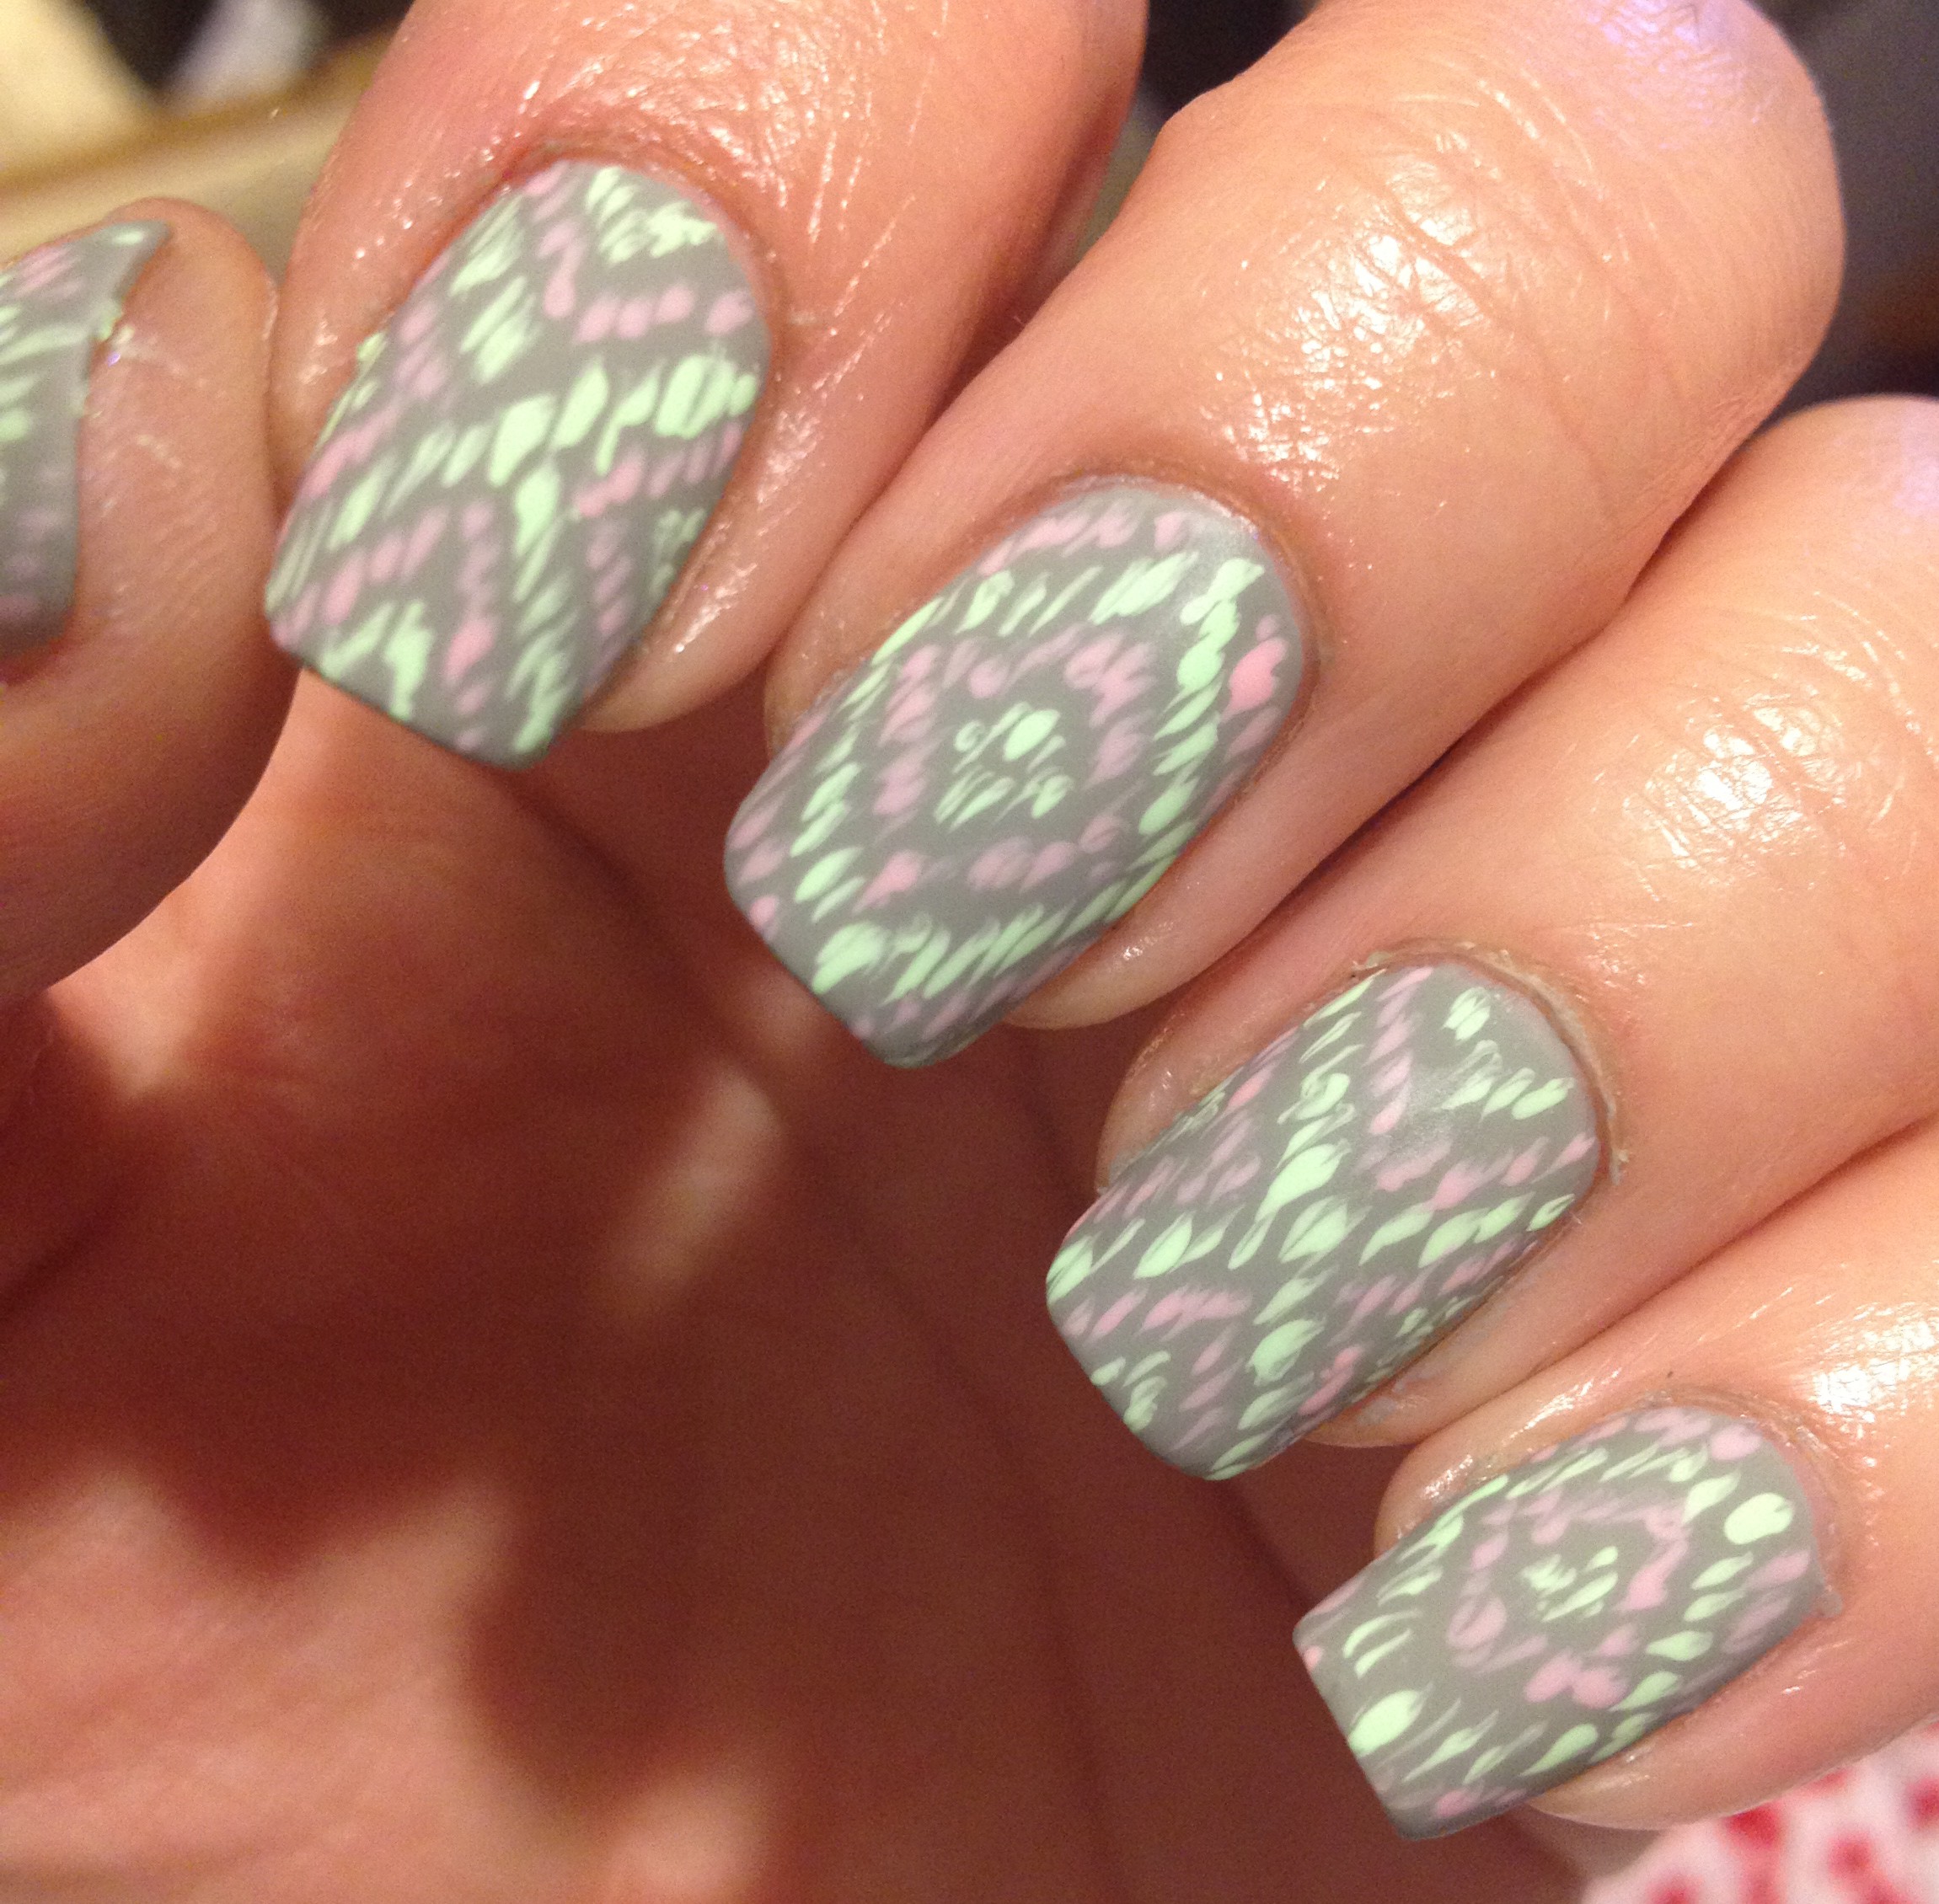
Anyway, I went through a phase 3 or 4 years ago where I wore this polish all the time, but in recent months, it’s just been sitting on my shelf, unloved.  I pulled it out to use as a base for my pastel ikat nails for a nail art challenge (#wnac2015) on instagram.   It made me remember how much I like this polish!  It’s such a pretty cool-toned polish that works well for pale people.  I’m sorry if I’m not much  help to you darker skinned people.  Maybe I should just do a post on the colors that look awful on my, assuming that would mean they would look good on darker people.  Not sure if that’s solid logic or not.  P.S.  My hubby does not like this color.

My final polish China Glaze – Sun of a Peach.  That name just cracks me up!  I used this polishIMG_4667 in one of my Easter manicures, and it was just so bright and pretty!  In general, I can’t really pull of orange, but this shade is one shade in the orange family that I can actually wear pretty well on my nails.  I had been wanting this polish for a while, and I found a little mini bottle at Sally Beauty Supply for like, $1.29 or something, so I couldn’t really turn that down.  Mini bottles are just the best, aren’t they?  I mean, they don’t cost as much as a full size bottle, they don’t take up much room on my nail rack, and really, it’s a rarity that I finish a full size bottle of nail polish anyway.

So, that’s that.  Thanks for reading!  Seriously, I appreciate all of your comments and “likes”.

March Favorites

March.  For those of us in the eastern half of the US, it was one more month of winter weather when it should have been feeling like spring.  It was a heck of a lot better than February, though.  Am I right?

Anyway, onto what you are actually here for: my favorites from March.

IMG_4691Again March I participated in the Weekly Nail Challenge (#wnac2015) on instagram, and the theme for the month was holographic.  For that reason, a lot of my monthly favorites were holographic polishes.  Let’s start with the top left…

This is IMG_4587Nicole by OPI – Rock the Look from the Roughles collection.  This came out awhile ago on clearance… I’m thinking it was last spring or summer.  This was one that sat in my untried pile for months.  I haven’t been big into the textured polish thing, but I figured I should finally try it.  The longer I wore it, the more it grew on me!  It was just so soft looking and different from anything else I wear on a regular basis.  The feel of the textured polish took a little getting used to, but I really liked it!  I think I’ll be wearing this one again!

IMG_4633Next is Nicole by OPI – Party Bus.  I got this one on clearance for $149!  I mostly got it for the large flower shaped holographic glitters in it.  These are great to fish out and use for glitter placement manis.  Like most holographic things, it’s hard to catch the true beauty and sparkly-ness of these glitters. IMG_4642

The next two polishes become a monthly favorite when they are paired together.  Pictured is Revlon – Matte Pearl Glaze over NYC – Lexington Yellow.  I love yellow, but like most light-haired white girls, yellow doesn’t love me back.  I can’t tell you how many times I’ve picked happy yellow clothing of the rack while shopping only to discover in the dressing room that it makes my complexion look sickly.  It’s so sad.

When I first put on Lexington Yellow, it really didn’t look that great with my skin tone, but then I added Matte Pearl Glaze, and it transformed it into this soft yellow with a pinkish glow that was actually wearable for me!  Plus, my nails reminded me of Belle from Beauty and the beast.

IMG_4592Next we have Orly – Mirrorball.  Here’s the story with this polish.  Back before Christmas, when this polish came out, I stared at it in the store.  I held it.  I caressed the bottle.  Then I practiced some self control and put it back on the shelf.  I had been regretting that decision ever since.  Then one day last month, I was down in York, PA and I stopped in the Sally’s there.  Lo and behold, they had two bottles of Mirrorball in their clearance bin!  I couldn’t believe my good fortune!  My only regret is that I only bought one bottle.

IMG_4603Mirrorball has a fairly sheer formula, so it actually works really well as a topper to other polishes.  Here it is layered over Wet n Wild -I Need a Refresh-Mint.  (By the way, the current version of I Need a Refresh-Mint is a much brighter blue than the version I own.  The older version is pretty much a dead on dupe for China Glaze – For Audrey.)  I can’t wait to layer Mirrorball over all sorts of neon colors this summer.

IMG_4646The next polish is just like camping… It’s in tents.  (In tents… Intense.  Get it?)  Polish Me Silly – Tealing No Lies is the most holo of the holo polishes that I own.  The linear rainbow is just so strong.  Someday I’ve got to order me some more Polish Me Silly polishes.   IMG_4647Here’s some really simple flower nail art I did using Tealing No Lies as a base.  (I just used my biggest dotting tool to make 5 petaled flowers with a really light blue polish, and then I made slightly smaller petals with a deep blue polish over the light petals.  Then I used a little dotting tool to add some dots to the centers. Super easy and no artsy skills required!)

IMG_4341The last polish that was  monthly favorite was Fresh Paint – Honeydew.  I used this in several Easter manis, and I’ll show you those pictures in a separate post.  I’m pretty sure this polish qualifies as pastel neon.  It’s light and bright at the same time.  It water marbles well, and you can get away with almost one coat.  I think it will look great in the summer when I’ve got a bit of a tan.  (I’m foundation shade “fair” in the winter, but with a tan I’m can wear “light” colored foundation.)

So, that’s all I have for you today.  Thanks for reading!  I do post realy regularly on instagram, so follow me there if you want to see my nails as I do them and not a month after the fact.  Happy Spring to you all!

My 14 Favorite Polishes of 2014

It seems like pretty much every blogger and YouTuber has listed their 14 favorites from 2014.  I’m totally jumping on that bandwagon.  This was tough, but I did it.  There were a few polishes that it pained me to leave out, but I finally narrowed it down to the 14 polishes that I just couldn’t stop reaching for last year.  Here they are:

IMG_4262Aren’t they so pretty?

Starting in the upper left corner we have Funky Finger – Sand & Stilettos.

IMG_2698IMG_2695IMG_3219

This is just the best sparkly polish ever.  It’s available exclusively at 5 Below.  I’ve seen it at my local 5 Below within the past few weeks, so you can still grab this stunner for yourself for a mere $2.

Next, also available exclusively from 5 Below is Fresh Paint – Guava.  Fabulous color, fabulous formula.  A must-have for summer.  Here it is paired with Sand & Stillettos:

IMG_2727IMG_2681

It’s just the perfect neon peachy color, and a perfect dupe for China Glaze – Flip Flop Fantasy.  I just couldn’t get enough of this color over the summer.

Next, we have one more 5 Below polish: Fresh Paint – Sugar Crush.  This is the first true flaky polish that I’ve ever owned.

IMG_3560

This polish is a show-stopper over any dark color.  It’s mind blowing over black, teal, or dark purple, and I don’t know if I love it better shiny or matte.  You just can’t go wrong with this one.  I’m not sure if you can still find this at 5 Below or not, but if you see it there.  GRAB IT!

Next, I loved China Glaze – Turned Up Turquoise.

IMG_2594IMG_3228

The intense color and the shimmer make me swoon!  I don’t have a picture of it with a shiny top coat, but when you do put a shiny top coat on, the shimmer really pops.  Such a perfect color!

Yes, I’m a sucker for turquoise.  Next is Jordana – Boy Oh Boy.

IMG_3446IMG_3218IMG_2790

It almost looks green in the middle picture, but it’s not.  It’s a deep, beautiful turquoise.  And the formula on this baby is wonderful!  Almost a one coater!

Next we have Ulta – Joined at the Hippo.

IMG_4090IMG_4091IMG_4092

This is one of my more recent favorites.  Actually, I just talked about this polish in my December Favorites.  It’s got a great formula, and while it is a really deep blue, it never looks black.  Just a beautiful polish!

Then there’s Broadway Nails – Space Flight, a really deep blue jelly.

IMG_3335IMG_3321IMG_3262

I’ve actually got this on my nails right now, as you’ll see in a post later this week. This is an amazingly beautiful polish and it only costs $1!  You can find this at Dollar General.

Now we come to the first indie polish that I ever owned: Valley Girl Lacquer – Fantasm.

IMG_21552014-02-03 21.23.44

Even in a really ugly jelly sandwich , I still love this polish:

001

This was my first exposure to the super huge round glitters that are pretty common in indie polishes and they really blew my mind when I first used them. Heck, they still blow my mind!

Next is Wet n Wild – Deception. This was my first really great jelly polish.

IMG_3111IMG_3384

This was in a limited edition collection from the spring, so I’m pretty sure you won’t be able to find this anywhere and I’m very sorry about that.  I’ve used about 1/4 of this bottle already, and I’m going to be heartbroken when it’s gone.This polish takes 5 or 6 coats to get that perfect jelly look, but it’s so worth it!

Next is China Glaze – Peonies & Park Ave from the 2014 spring collection.

IMG_3218IMG_3004

This almost neon pink really doesn’t seem like anything special, but it’s the pink that I reached for repeatedly back in the summer.  I feel like it works well with my fair skin.

Next is a polish that I’ve talked about so many times: Wet n Wild Fergie – Gold Album.

IMG_3149IMG_4023

This is the best gold polish that I’ve ever used!   I love the stuff!  It’s perfect and beautiful every time.

Next is Broadway Nails – Hot & Sexy.  This is a dupe for China Glaze – Ruby Pumps.

IMG_3986IMG_3988

So beautiful and red and sparkly!  I stare at my nails a lot when I’m wearing this! Also available at Dollar General for $1.

Now we have the polish that I loved the most in the fall.  NYC – Royal Chic.  This was from a limited edition collection, but really, there are lots of great browns out there.

IMG_3867IMG_3895

Sadly, these pictures really don’t capture the chocolaty brown goodness that is this polish.  It’s just so pretty and rich looking on the nail.

Last, but certainly not least is Polish me Silly – Tealing no lies.  This is my first indie holographic polish, and wow, it’s amazing.

IMG_4114

I just got this guy for Christmas, so I’ve only worn it once so far, but I pretty much couldn’t stop staring at my nails while it was on.  And I forced my husband to admire my nails so many times while I was wearing this.  It’s really, really amazing, especially in the sun.

So that’s it!  My 14 favorite polishes of the past year!  Thanks for reading!  What were some of your favorite polishes in 2014?  I’d love to know!

November Favorites

Wow, it’s December 1st already!  That means it’s time to talk about November favorites.  Here are the polishes that I was loving last month:

IMG_3980

The first one is Wet n Wild Fergie – Gold Album.  This is just the prettiest, sparkliest gold polish.  I love it more every time I use it!  Here I used it for the leaves in this my Golden Leafy Nails.

IMG_3895

The base for these nails is NYC – Royal Chic.  I am seriously in love with this polish right now.  I know I’ve said this before, but it is just the perfect chocolate brown.  It’s such a rich color.  So dark, but it never looks black.  I also used Royal Chic as the base for these next nails:

IMG_3978

The polish I’m holding is one of my favorites for November also.  It’s Spoiled – Vitamin C.  These polishes are available exclusively at CVS for $1.99.

Vitamin C is pretty sheer on its own.  It takes about 4 coats to be opaque.  It’s almost an orange jelly base with tons of orangey-gold shimmer.  I’ve  layered it over orange polish in the past, but this is the first time I’ve ever tried to layer it over a darker polish.  I was actually really surprised with the results!  I fully expected it to add a bright orange shimmer to my nails, but it it really more of a golden – almost greenish – shimmer.  I always love to discover that  polish I have owned for a while can be worn some new and different way.

Here’s another one of my favorites:

IMG_3940

This is NYC – Precious Peacock.  This was really sheer and took 4 coats to be opaque, but the results were totally worth it!  Such a beautiful shimmery teal polish!  Most of the time this polish looked teal on my nails, but there were times when I felt like it was an emerald green.  Such a perfect color for this time of year!

I was also a huge fan of this polish:

IMG_3902

This is Fresh Paint – Let the Games Begin.  In this picture it looks almost navy, but in real life it’s not quite that dark.  It’s just a really beautiful creamy blue, and it’s opaque in one coat!  I don’t know how much I’ll be wearing this color this month, since I plan to hit the red and green Christmas colors pretty hard, but I’m sure I’ll wear this a bunch in January and February.   By the way, the white crelly polish with the colored matte glitter is Funky Fingers – Jawbreaker.  The formula is just a little too thick and gloppy for me to call it a favorite.

Lastly, I loved this pale blueish-grey polish last month:

IMG_3905IMG_3981

The base for this mani is Fresh Paint – Firefly.  The second picture shows it on the right next to a white polish, just to prove that firefly isn’t actually white.  Firefly’s formula is a little on the thick side, but it is a one coat polish, which is pretty amazing for a light polish!  It’s a great color to us as a base for nail art if you don’t want to use a really stark white.  I’m not sure how this color compares to OPI – My Boyfriend Scales Walls, but I think it might be close.

So, those are my favorites for last month!  I plan to dive head first into Christmas nail art next.  ‘Tis the season!

Water Marble Turkey Nails

I thought it was about time that I give water marbling another go.  I sort of did a bunch of experimenting, and as a result, every finger looks pretty different.  I’ll just say that’s what I was going for.

IMG_3965

And here are select fingers from my other hand:

IMG_3967IMG_3964

I think the polishes I was using were not really in the mood to be marbled with, because they were not very good spreaders.  I was using bottled room temperature water, so I don’t think my water was the problem…. You know, these close up pictures really show what a pain clean up is after water marbling.  Ugh.

Anyway, here’s another untried that got tried:

IMG_3960IMG_3961

This is NYC – Rule the City.  It’s a gunmetal shimmer with red micro glitter in it.  The red glitter sticks to the sides of the bottle, but not a whole lot of it transfers to the nail.  It’s still an interesting polish and I’m glad I have it in my collection, but it didn’t change my life or anything.

That’s all for now.  Have a blessed Thanksgiving, fellow Americans!  Everyone else, have a good forth week of November.

Peacocks, Gum Wrappers, and Crochet

I’ve turned two more of my “untrieds” into “trieds”.  I know, those aren’t even words.

Here’s NYC – Precious Peacock:

IMG_3940

This polish is pretty sheer, so it took either 3 or 4 coats to get it opaque like this, but it’s so pretty!  The color is just so rich!  Sometimes I felt like my nails were an emerald-y Christmas green, and other times I felt they looked more turquoise.  Such a good color for the cooler months!  My hubby even liked it, and as a rule, he hates anything that has to do with peacocks.

I’m sure you are all dying to know why my hubby, Mike hates peacocks, right?  Okay, I’ll tell you.  The first apartment we lived in after we were married was out in the country in redneck territory.  One particular redneck owned a peacock that he just let roam around the country side.  I don’t even know if that’s legal.  Anyway, the peacock, who our little-old-lady-landlord called “George” liked to sit in the tree right outside our bedroom window.  Well, every morning from April to August, George would sit in that tree at do his mating call, starting at about 4:00am.  Here’s a youtube clip of what it sounds like.  I’m a pretty sound sleeper, but Mike is not.  He assaulted George with tennis balls, golf balls, rocks, a super soaker,….  George would just hop to a branch that was out of Mike’s reach.  George would not be deterred.  Anyway, we moved from that apartment after about 3 year when we bought our home.  After we moved, we heard that George was hit by a car.  We were not sad.

Back to nail polish.  I played with my gum wrapper in church and came up with this:

IMG_3944

Did you know that you can actually peel the foil off of the paper part of the wrapper?  It takes a little bit of work, but then you are left with a really thin foil layer that has a little adhesive on the back.

Here’s another untried that I finally used:  L.A Colors – Berry Red

IMG_3945

This is a jelly formula.  This is four coats and you can still see my nail line a little bit, and the color is still not as rich as it is in the bottle.  It is nice and shiny and I’ve actually gotten multiple compliments on this one.  I think I’ll have to do some jelly sandwiching with this one in the future.

You may or may not be wondering why I have not been posting as much lately.   Well, I’ll tell you.  It’s crocheting season for me.  I mostly make hats.  I do a handful of craft fairs this time of year, and I’ve been working to bulk up my inventory a little bit.  Here’s one that I jut finished yesterday:

IMG_3951

The “hair” is a whole bunch of loops like a Cabbage Patch Kid!  And the eye patch is removable/adjustable.

I actually have a little etsy shop, but I don’t have any items listed for sale now since I’m offering them at craft fairs.  I’ll let you know when I have some items back up for sale in my shop, just in case any of you are interested.

My Fall 2014 Limited Edition Polishes

I just sort of realized that I’ve picked up a few limited edition nail polishes recently that I haven’t shared on here, so… Shame on me.  These are all drugstore polishes that cost about $2 each.  Really, I love a good polish, but I’m no snob.

I haven’t gotten around to wearing all of these on my nails yet, but if I wait until that day comes, these will be long gone.  The swatches that are next to the bottles are all two coats.

Let’s start with the Wet n Wild Megalast Matte collection.  There are 6 polishes in this collection, but I just grabbed the two that spoke to me the most.

This is Careful, It’s Vine-tage:

IMG_3924

This is a beautiful dusty purple in the bottle, but it does dry a good bit darker.  My swatch looks REALLY dark, but when it’s on the nail, it’s still clear that it’s purple, not black.

This is Echo Dark:

IMG_3913

This is a beautiful deep blue in the bottle, but on the swatch it really does look almost black.  The formula is a jelly, which seems weird for a polish with a matte finish.  I’m a little disappointed that it dries so dark.  I haven’t done a full mani of this yet, but I’m pretty sure that it will just look black once I have it on.  I wonder if I could make a jelly sandwich with this…  If I try that, I’ll let you know.

Next I have two polishes from the NYC Fashion Queen collection.  This collection of six polishes has been around for a few months, and I didn’t think I wanted any of the polishes…. Until I got a $1 off coupon.  That prompted me to pick up two.

Here’s Royal Chic:

IMG_3918

I highly suspect that this is a dupe for Essie – Little Brown Dress, but I don’t know for sure.  This looks like Hershey’s Syrup when it’s wet.  It’s such a rich chocolate brown!  It’s dark, but it is definitely brown, not black.  I used this as a base for my recent Golden Leafy Nails. I’m a little bit in love with this polish right now.

I also have Rule the City:

IMG_3925IMG_3928

This is a gunmetal grey micro-glitter polish with slightly larger red hex glitter.  The red glitter tends to stick to the sides of the bottle, so on the nail it looks like it has less glitter than it does in the bottle.  The finish is a little bit textured.  I have yet to wear this, but I’ll bet it would look super pretty with a shiny top coat…. It might even look awesome with a matte top coat.

Last I have Sinful Colors  – Prosecco.

IMG_3929IMG_3930

This is from the Sinful Shine line of polishes and the collection is called Shining Bright Off the Runway.  There are 8 polishes in the collection.  The display said, “5x more glossy that patent leather shoes!”  Who the heck comes up with stuff like that?  What kind of gloss-o-meter is used to determine that sort of thing?  Anyway…

After I bought this polish, I found out that it’s kind of the big deal color from this collection.  People out there are searching high and low to find it.  I found mine at Rite Aid, by the way.

I have actually worn this polish, but I was a dork and deleted, so you’ll have to check it out on my instagram.  I think I had to apply three coats to get good coverage.  It really is super shiny!  Because it’s sheer, you can sort of slop it on and it will still look good.  I actually didn’t love the color at first, but it really grew on me!  It’s a perfect color to wear when you need to look a little more professional for work or an event or whatever.

Okay, so that’s the end of that!

I’m looking for a little feedback from you.  Would you rather see a series of posts that are color themed (my favorite reds, my favorite pinks,…) or would you rather see posts that are brand themed (my favorite Sinful Colors, my favorite Wet n Wild,…)?  Or do you mostly just care about nail art?  Any feedback is appreciated!  Thanks for reading!

Golden Leafy Nails

Right now I’m spending a good chunk of my free time raking up all of the leaves in our yard, so it seems like the appropriate time to sport some leafy nails. Here they are:

IMG_3868IMG_3865

I just can’t make my right hand pose nicely.  It’s all awkward or something.  Anyway, the base for these nails is NYC – Royal Chic.  I sort of think this is from a collection that was out not that long ago, so it might be a little hard to find now.

IMG_3867

The wet polish looks just like Hershey’s Syrup.  I feel like this polish should smell like chocolate.

Then I added some leaves with Wet n WIld Fergie – Gold Album.  Every time I use that polish I can’t believe how beautifully gold and sparkly it is.

I was sort of tempted to just “leaf” my mani like that, but since I had already pulled all of my fall colored polishes off my rack, I decided to go ahead and add some color.  I used polishes that tend to to be sheer so that the gold would show through.  I just used a little brush and added a little bit of color to each leaf.  I topped it off with a shiny top coat.

After four days of wear, I had no major chips, just some tip wear.  I touched up the tips of my nails with the brown polish and then for kicks I added a matte top coat.

IMG_3895

I really like how this looks with a matte top coat!  The metallic leaves just really pop off of the brown background!  I think I’m going to get a full week’s wear out of these.  Hooray for that!

Thanks for reading!

September Favorites

Doing the 31 day challenge in September led me to use a lot of polishes in my collection that I either had never used much before or had sort of forgotten about.  And because I did my nails every single stinking day of September, my list of favorites for the month was really long!  As I put all of my favorites in a pile, I had 4 or 5 polishes that were in limited edition collections that are pretty tough to find now.  I pulled them out of the pile, because I thought it would be pretty mean to be like, “Oh, this is the most awesome polish ever!  You can’t get it anywhere, though.  Sorry about your luck.”

So here’s the pile of my favorites:

IMG_3536

They are left to right, starting with the top row: Wet n Wild – I Need a Refresh-Mint, NYC – High Line Green, Sinful Colors – Cinderella, Orly – Tropical Pop, Broadway Nails – Space Flight, Wet n Wild – Bubblegum Pop, Jordana – Boy Oh Boy.

I’m going to start with Orly – Tropical Pop.  This one kind of breaks my own rule because it was part of the Baked summer 2014 collection.  I still think you will be able to find this with a little bit of searching, though.  I used this orange as my base color for my Day 2: Orange Nails.  This color is such a fun, light neon orange.  It seemed a little shockingly bright at first, but it really grew on my as I wore it.

NYC – High Line Green is one of the very few polishes that I bought for a specific day of the challenge.  I used this color as the base for my Day 4: Green Nails.  It is just the prettiest “ugly” green!  I loved this color so much on its own that I was a little sad to cover it up with the camo pattern.  It’s a fun green for springtime, but I’m definitely going to wear in here in the fall, too.

The name of this next polish was actually the inspiration for my Fairy Godmother nails for  Day 5: Blue Nails.  Sinful Colors – Cinderella has this beautiful pinkish-gold micro shimmer that just makes my heart skip a beat.  It is SO BEAUTIFUL in the sun!  Love it!

Nails – Space Flight is a dark blue jelly polish that bought back in the summer.  It seemed to dark to use then, but once September rolled around, it finally seemed appropriate.  I used it for both Day 17: Glitter and Day 18:Half Moons even though they were back to back days.  My creativity was waning a little at that point, and I was more interested in just using a particular polish that coming up with some ground-breaking design.  I can’t wait to use this for some more jelly sandwiches in the future!  I’ve only ever seen this line of polish at old exclusively at Dollar General and Family Dollar stores.  They are generally in these stand-alone displays that are like big, tiered clear plastic bowls.

Wet n Wild – Bubblegum Pop is a cool pink color.  Cool as in “it leans blue”, not cool as in “awesome”.  Actually, it is a little bit awesome.  I used this polish for my Day 20: Water Marble. This polish actually marbled beautifully with Sally Hansen – Pacific Blue (original formula).  It made the whole process much less painful than I had anticipated.  Although the Wet n Wild Megalast line is available at most grocery stores and drug stores, this color (along with another 15 colors or so) are also sold exclusively at Dollar General and Family Dollar stores.  I know, that’s such a weird place to go for exclusive polishes.

Jordana – Boy Oh Boy is SO AMAZING!  Sigh.  It just makes my knees weak.  It’s this perfect turquoise color, it’s pretty much a one-coat polish, and it’s SO shiny.  Trust me, you need this polish in your life.  I used this polish for Day: 12 Stripes and Day 26: Inspired by a Pattern.  I know Jordana cosmetics are available at K-Mart.  I’m not sure where else you can get them.  I can tell you for sure that they are not available at Wal-Mart, Target, CVS, and Rite Aid stores, at least in south-central PA.   Jordana also makes some really pretty glitter polishes, too.

Okay, the last polish in my favorites is Wet n Wild – I Need a Refresh-Mint.  I used this polish as the base color for Day 15: Delicate Print and Day 23: Inspired by a Movie.  I also used it as the light blue on my ring finger for Day 27: Inspired by Artwork, but you can barely see it on those nails.  I’ve gotta say, I’m a sucker for this color.  Exhibit A:

IMG_3538

From left to right: Wet n Wild – I need a Refresh-Mint, Sinful Colors – Nice Stems, China Glaze – For Audrey.

I can usually justify owning similarly colored polishes, but even I can admit that nobody really needs all three of these.  For Audrey is a tiny hair darker than the other two, and Nice Stems has a barely discernible shimmer, but really… They’re pretty much the same.  All three polishes have a good formula that is opaque in 2 coats.  The Wet n Wild Megalast polishes come with a wider brush, which I like, but I know some people don’t.  You can pretty much get four Sinful Colors or Wet n Wild polishes for the cost of one China Glaze, so that sort of makes For Audrey totally not worth the price tag for me.

I have one last polish that I used pretty much every single day of the challenge: NYC – Grand Central Station.

IMG_3537

This polish is under $2 and it dries so quickly and leave such a great shine!   It’s just such a great quick-dry top coat for the price.  It doesn’t do that shrinkage thing that Seche Vite does, although I do think Seche Vite is just a hair more shiny.  I really can’t tell a difference in quality between NYC and Out the Door.  I still have not tried the HK Girl top coat, but until I get around to trying that, I think I’m going to stick with this stuff.  It’s just just a great value.  I think I’m on my 3rd or 4th bottle.  Can’t really remember.

That’s it for my September favorites!  Have you used any of these polishes?  What are your current favorites!  I love getting your feed back here, on facebook, and on instagram.  Thanks for reading!


Beach Inspired Nail Art

Here in PA, we have about one more month to sport overtly beachy nails, so let’s get to it!  I am still digging my current mani, so I asked my little sis if I could borrow her nails for this little tutorial.  Here’s the finished product:

IMG_2790

For this look, you will need polishes in these colors: White, light blue, darker blue, coral, nude, gold glitter.

IMG_2795

Specifically, I used (left to right):  Wet N Wild -French White Creme, Wet n Wild Megalast – I Need a Refresh-Mint, Jordana – Boy Oh Boy, Wet n Wild – Blazed, NYC – Fashion Safari, La Colors – Dizzy.  (Yeah, my bottle of Blazed got into a fight with a bottle of grey polish inside my suitcase on a flight.  The grey bottle lost.)

You will also need a disposable plastic container like a yogurt cup, Q-tips, a dotting tool, a makeup sponge, acetone or nail polish remover, and a pitcher.   The first thing you want to do is fill the pitcher with a quart of water and let it come to room temperature.   Seriously, that’s a real step in this process, but more about that later.

To begin, paint the thumb, index, and pinky fingers with the nude color to look like sand.  Then paint the middle and ring fingers light blue:

IMG_2760

Let them dry for 5 or 10 minutes.  Then, in order to make clean up easy in the end, tape around the fingers with the blue polish.  You’ll need two pieces of tape per finger: one about 2 inches long, the other about one inch long.  Take the longer piece of tape and place the center of it across the tip of your finger (behind your nail) and then press it down along the sides of your finger.  Then take the shorter piece and wrap it around your finger just below your cuticle.

IMG_2761

Then apply a coat of the glitter polish to your sand-colored nails.

The next thing you’re going to do is give your blue nails an ombre/gradient effect.  Take a makeup sponge and apply some of the darker blue polish to it.

IMG_2762

Then start dabbing the sponge lightly at the very tip of the light blue nails.  As the polish begins to dry on the sponge, continue dabbing about halfway up the nail.  Work carefully and don’t get too crazy here.  It’s easy to add more dark blue polish to the nail if you need to, but if you sponge too vigorously and get too much dark blue polish on the nail, there’s not much you can do to fix it.  Here’s what it should look like after this step:

IMG_2763

Pretty, right?

Next, take your small disposable container and fill it with your room temperature water.  I just pulled a yogurt container out of my recycling bin.   (What you do not want to use is a Styrofoam cup.   Nail polish will eat through Styrofoam and  leave you with a big mess.)

Then, take your white polish and drop a drop of polish onto the surface of the water.  It should spread out like this:

IMG_2766

If your drop of polish falls to the bottom of the container, you are holding your brush too far above the surface of the water.  If your polish doesn’t spread out like this, the problem is either the water or the polish.  If your water is too warm or too cool, the polish won’t spread.  Also, I just used tap water, but I know that some people claim that bottled water works better for this technique because it doesn’t have that extra stuff that can be in tap water.  There’s also a possibility that your polish just doesn’t want to spread.  Different formulas do spread on the water differently.  Any sort of quick dry polish is going to dry on the surface of the water too quickly for you to be able to work with it.  My $1 Wet n Wild worked well, so get yourself a bottle of that.

Now, spritz the polish that is floating on the water with an alcohol based spray from a distance of about 8 inches.  I used some old Bath & Body works stuff.  As you can (hopefully) see (in my crappy picture), this will cause the polish to break up.

IMG_2770

Next, dip your two blue fingers into the container and just hold them there.   I need to mention that this all needs to be done quickly.  The polish will begin to dry really quickly as soon as it spreads out on the water, so as soon as it spreads out, spray it, and within a few seconds of spraying the polish, dip your fingers in there.

IMG_2767

While your fingers are still underwater, blow on the surface of the water to dry the remaining nail polish.  Then while your fingers are still underwater, take a Q-tip and gather up all of the polish that’s still floating on the surface of the water.  You will be able to just sort of spin your Q-tip in the water and it will collect the polish.  Now it’s safe to pull your fingers out.

IMG_2776

Now you can see the reason for the tape.  It’s to keep all of that extra polish for sticking to your fingers, which will make cleanup a lot easier.

Just a little side note: If this whole messing with water thing just seems a little overwhelming, the middle and ring fingers would also look great with some blue, white, or sliver glitter polish instead.

Now it’s time to deal with our sand colored nails.  Take a dotting tool or toothpick dipped in your coral polish and make some starfish.  Use a stippling motion as you make each of the five starfish legs.   Starfish are sort of lumpy and irregular looking, so don’t worry if they don’t look perfect.  When the coral polish dries, go back and add some tiny white dots down each of the legs.

IMG_2771

Now that you’ve given your fingers a little time to dry, carefully take the tape off of your  Tweezers may help here.

Top everything off with a good, shiny quick dry top coat like Seche Vite.  After your nails have had a minute or so to dry, it’s time to clean up the extra white polish around your middle and ring fingers.  I like to use a little brush dipped in acetone.  Pure acetone is strong stuff, and it’s really drying to your hands and nails, but it gets the job done.

IMG_2780

The little brush I use is the e.l.f. concealer brush.  It works really well and it only costs $1.  In a pinch you can use a Q-tip, but it’s harder to get in really close to the edge of the nail.

And here’s the finished look!

IMG_2793

If you give this a try, I’d LOVE to see your recreations!  You can post a picture on our Polish Me Snazzy facebook page, or use the hashtag #polishmesnazzy on instagram so I can see your work!  Thanks for reading!