Rainbow Jelly Sandwich

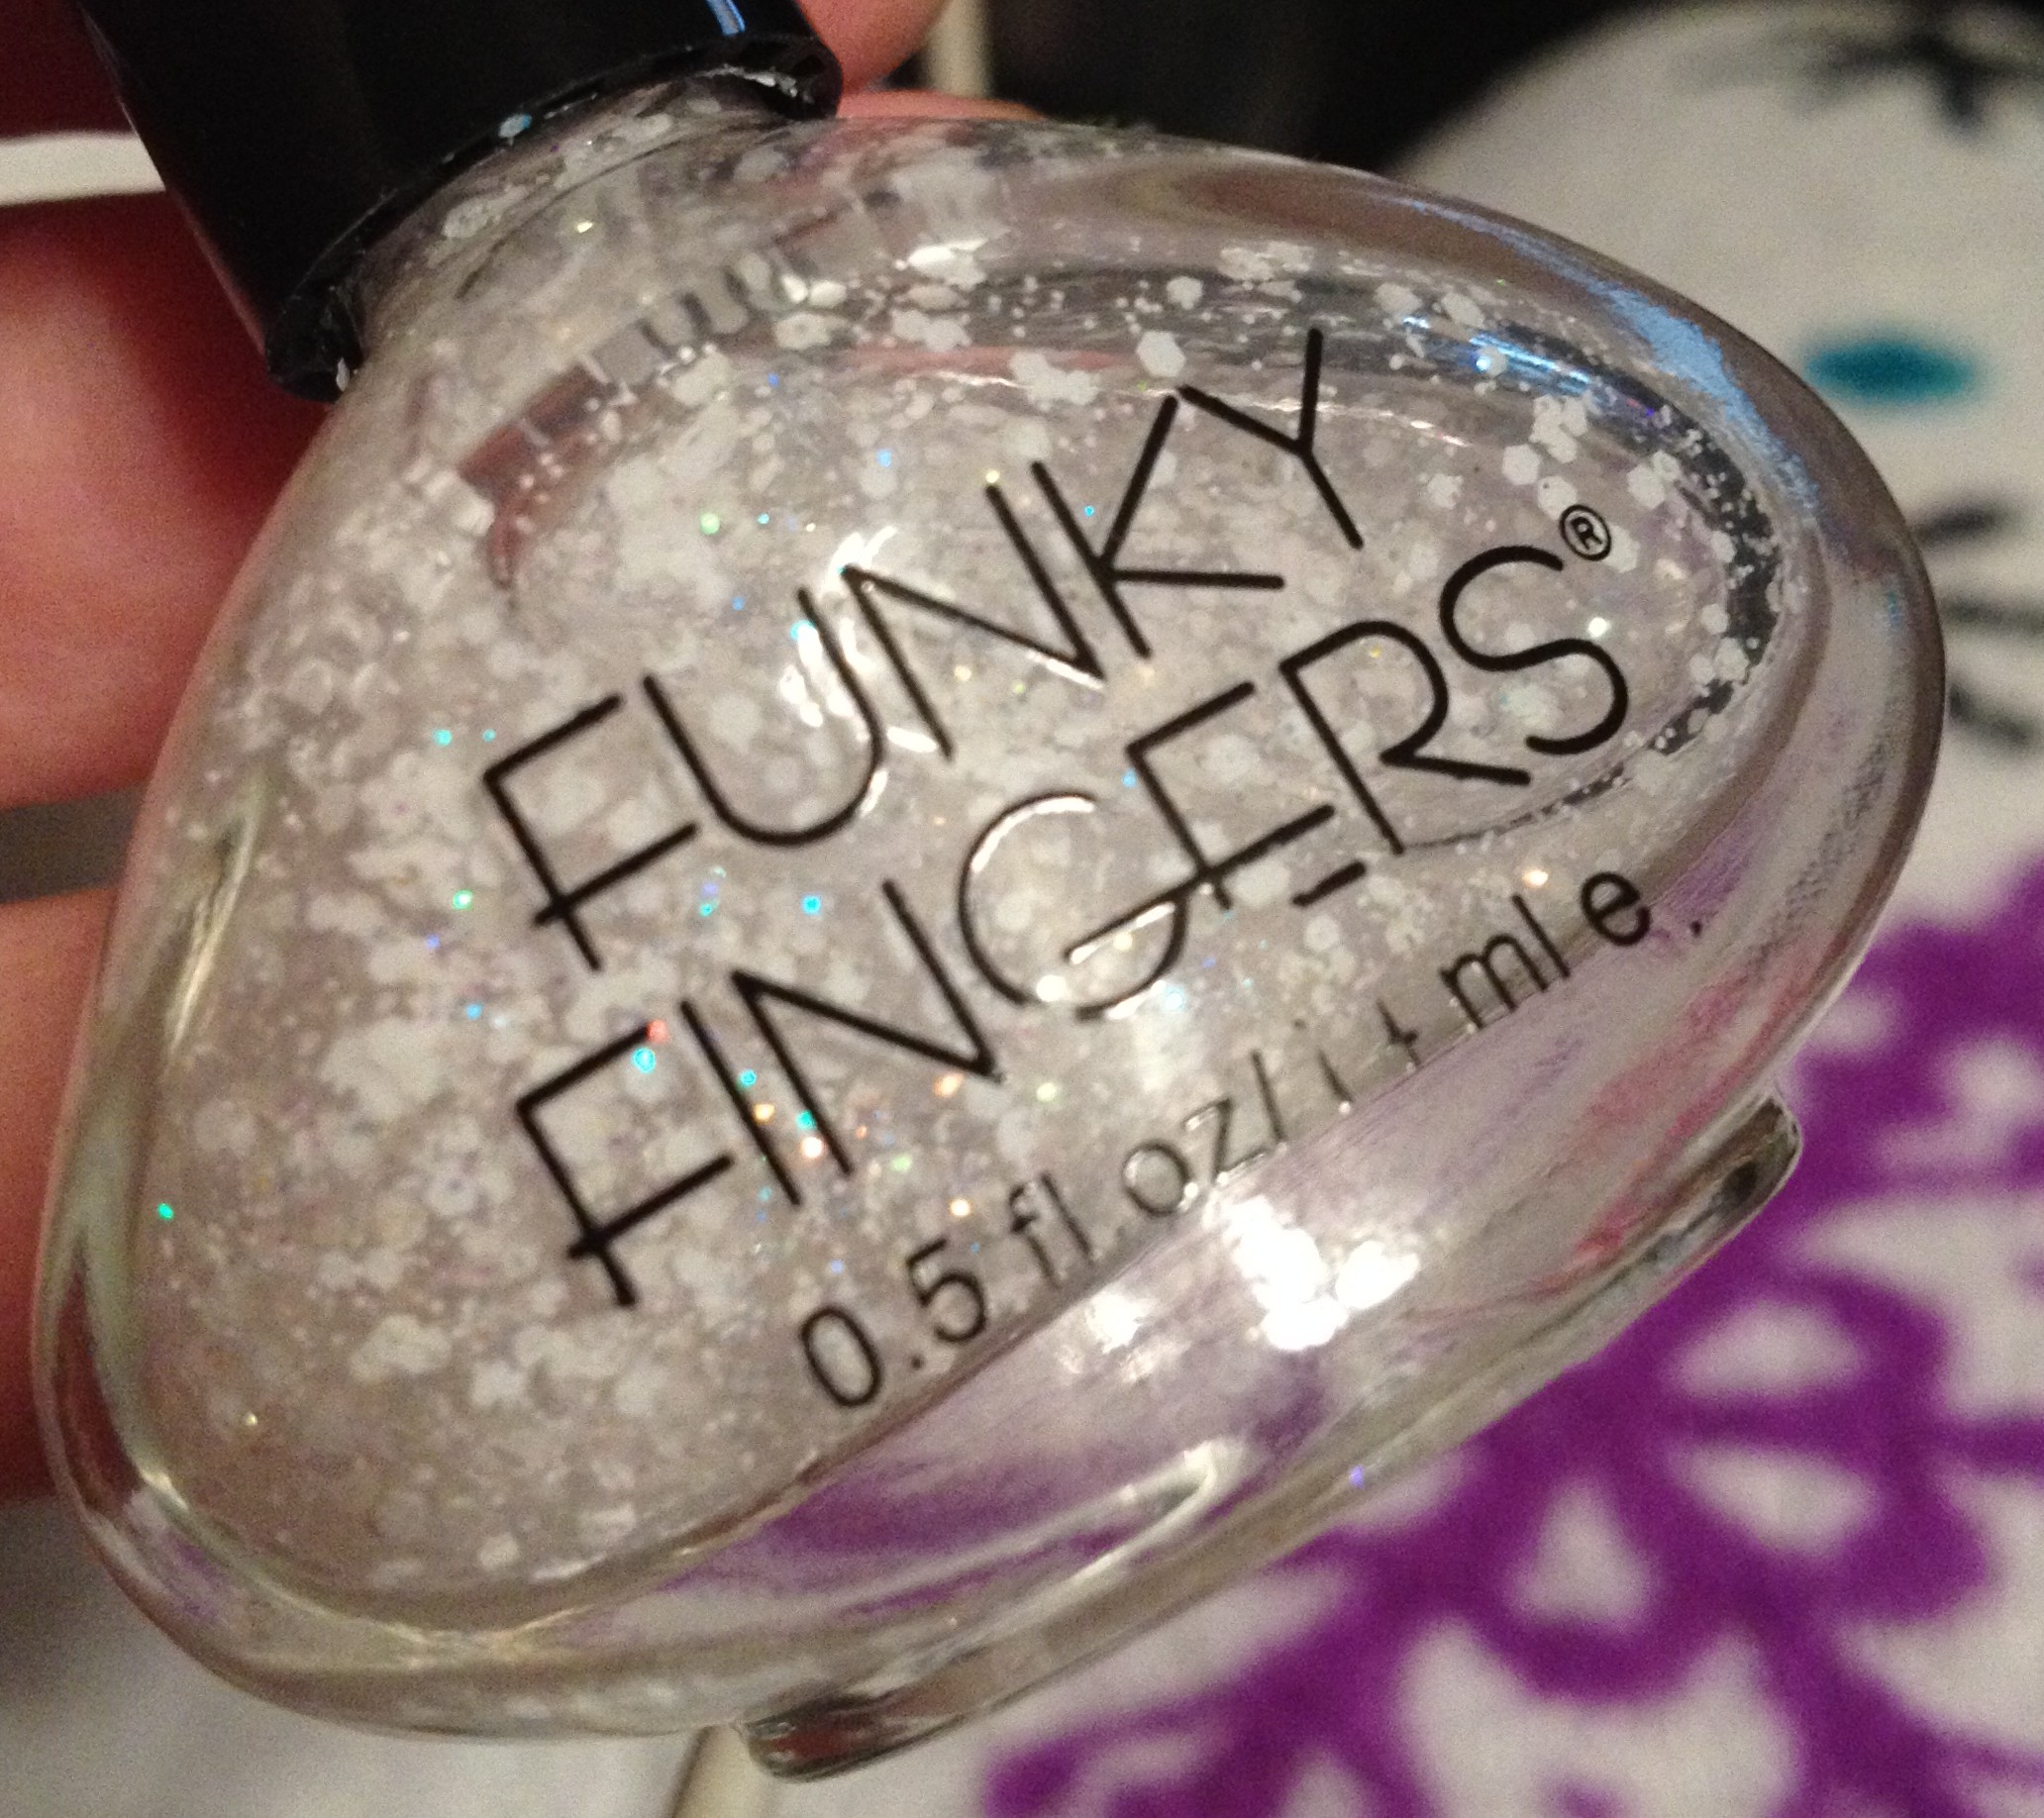
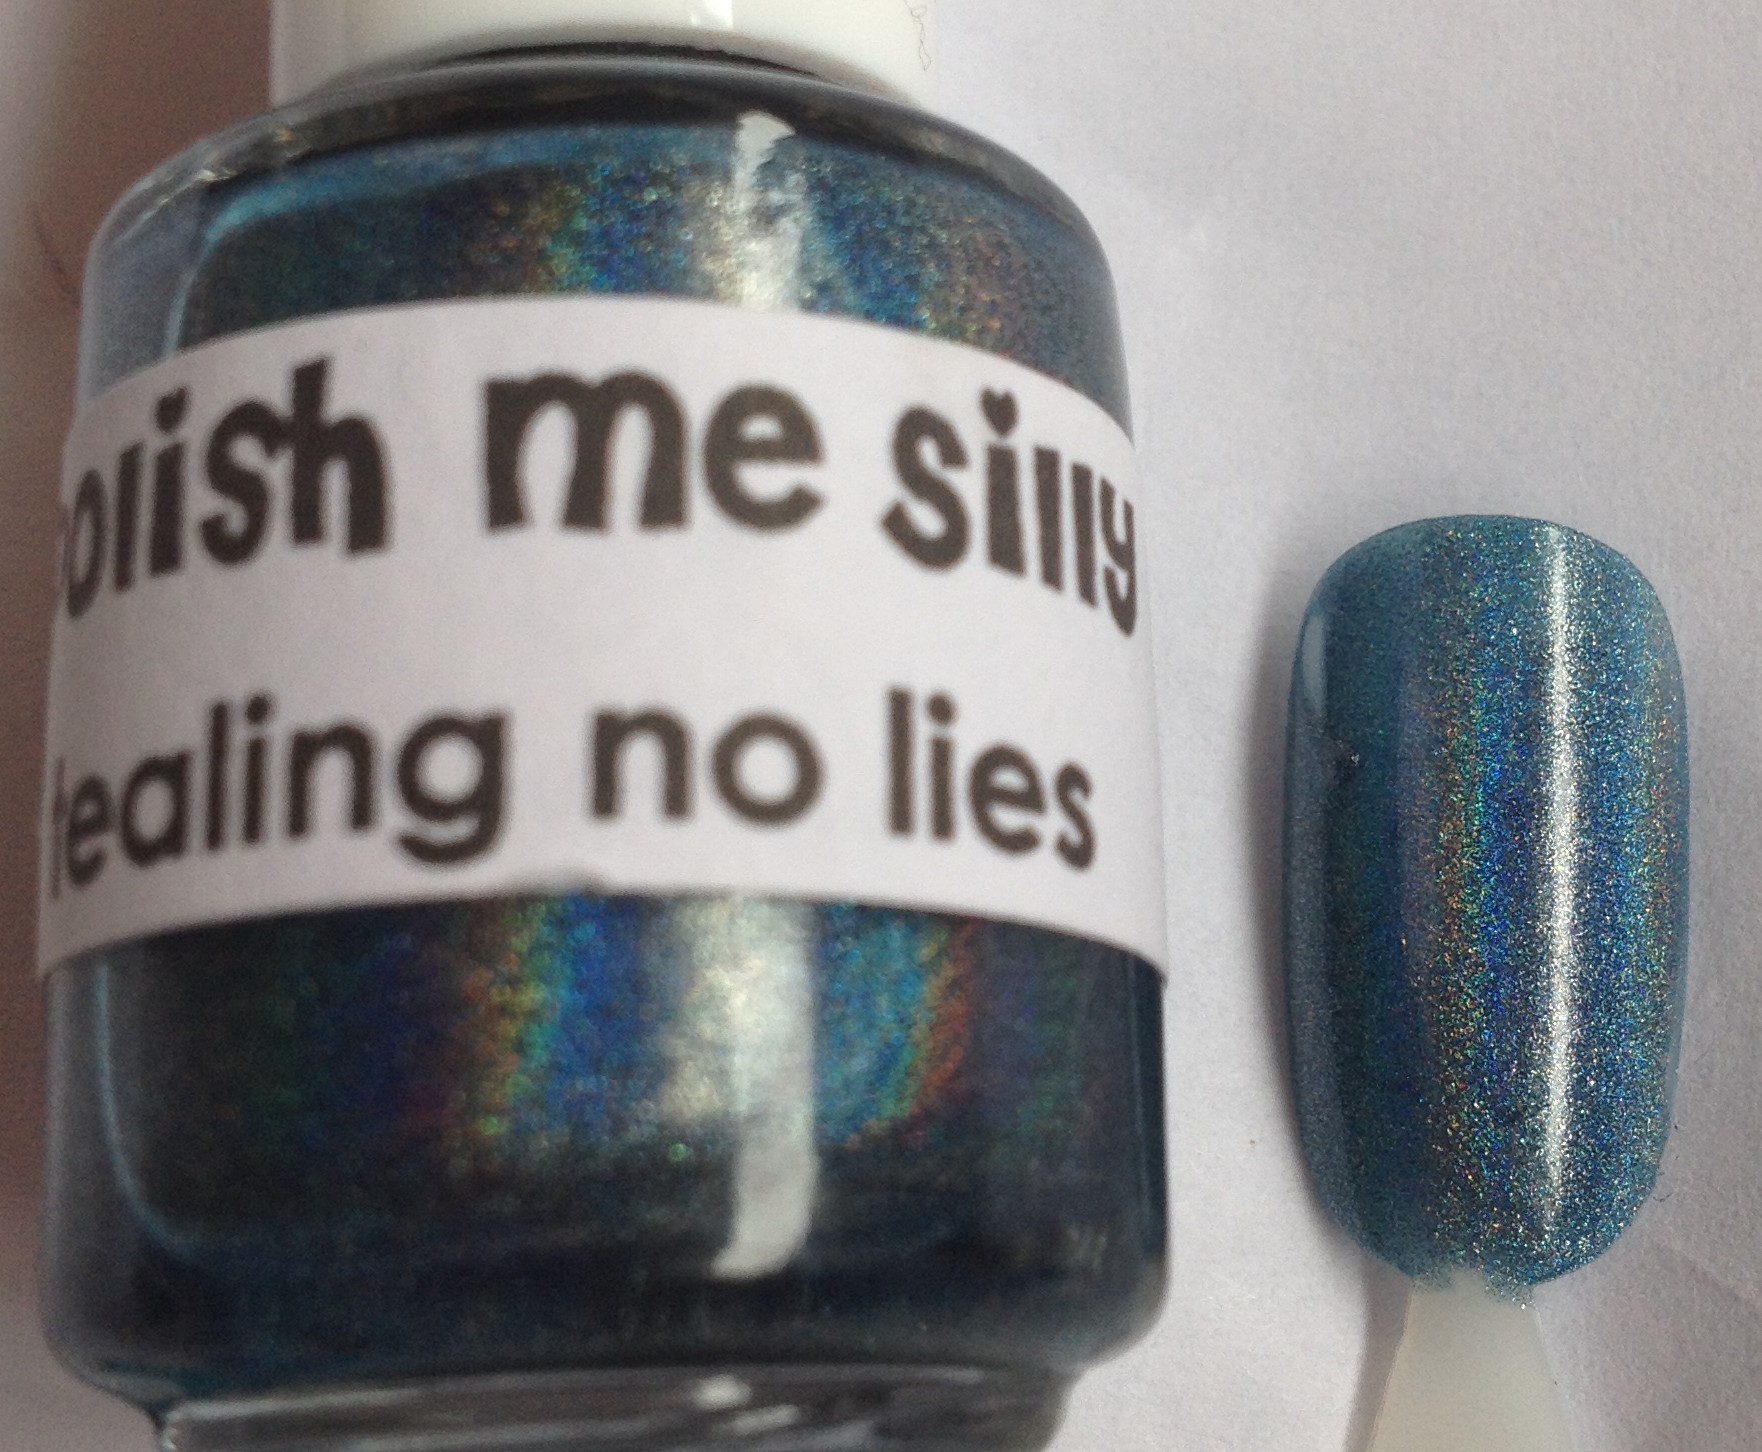
I’m on a jelly sandwich kick.  Ever since picking up Funky Fingers – Olaf, a white glitter topper in a clear base, I can’t stop thinking of ways that I want to use it in jelly sandwiches.  You can read a little about my mad scientist experiments and the first time I used Olaf here.

What I love about this polish is that it’s all white glitter, except for a few tiny iridescent glitters.  That means that you really get the true color of the jelly polish that you use to show on your nail.  It seems like winter/Christmas polish collections where you see the most of these all white glitter toppers.  Please comment below if you know of a white glitter topper that is available as part of a permanent collection.  This particular polish is still available in 5 Below, but I’m guessing that when it’s gone, it’s gone.

IMG_4273
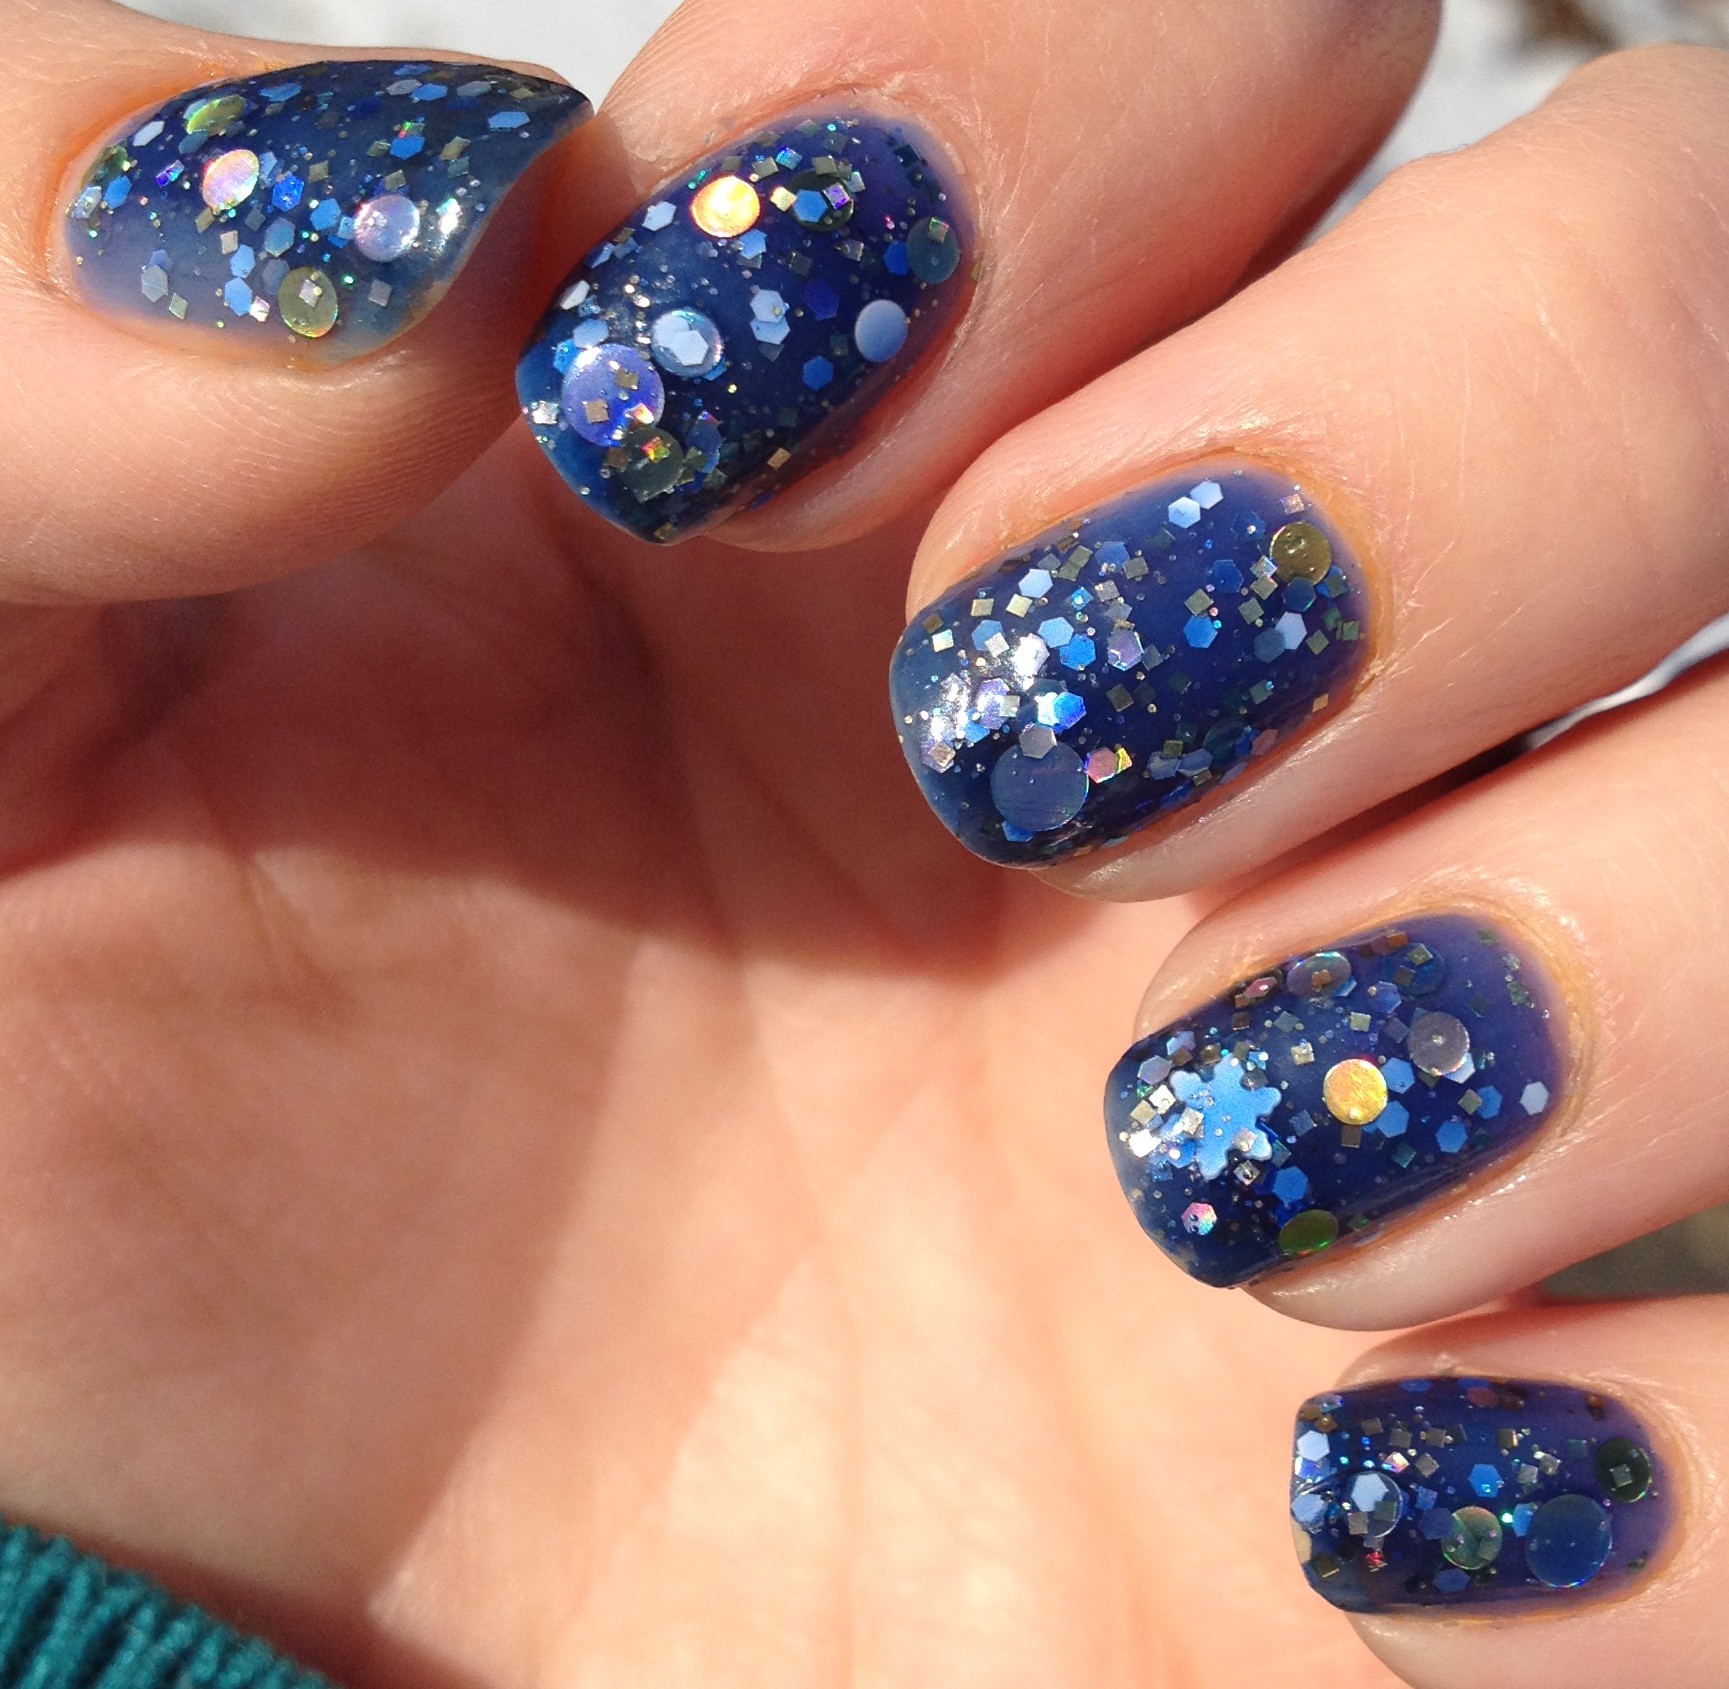
Before making a big mess on my nails, I decided to do a little experimenting. I started by taking the back of a business card and making three horizontal stripes with a black polish, and two other almost black polishes.  When the black/almost black dried, I put an iridescent topper on the left half and Olaf on the right half.  When the toppers were dry, I made vertical stripes of purple, blue, green, and yellow jelly polishes.  I find that doing something like this can help minimize those “this looked better in my head” moments.

What I discovered is that the colors of the jelly polishes really popped when painted over the white glitter, but not so much over the iridescent glitter.   I also confirmed what I suspected: that if the polishes are in “rainbow order”, they blend perfectly when they are overlapped a little bit.  I also discovered that I got the best effect when I used a true black polish for a base.

Tangent:  Were any of you really into putting things in rainbow order as a kid?  When I was a kid, that’s how everything was arranged: Legos, Skittles,… other colored stuff.  Okay, back to the topic at hand.

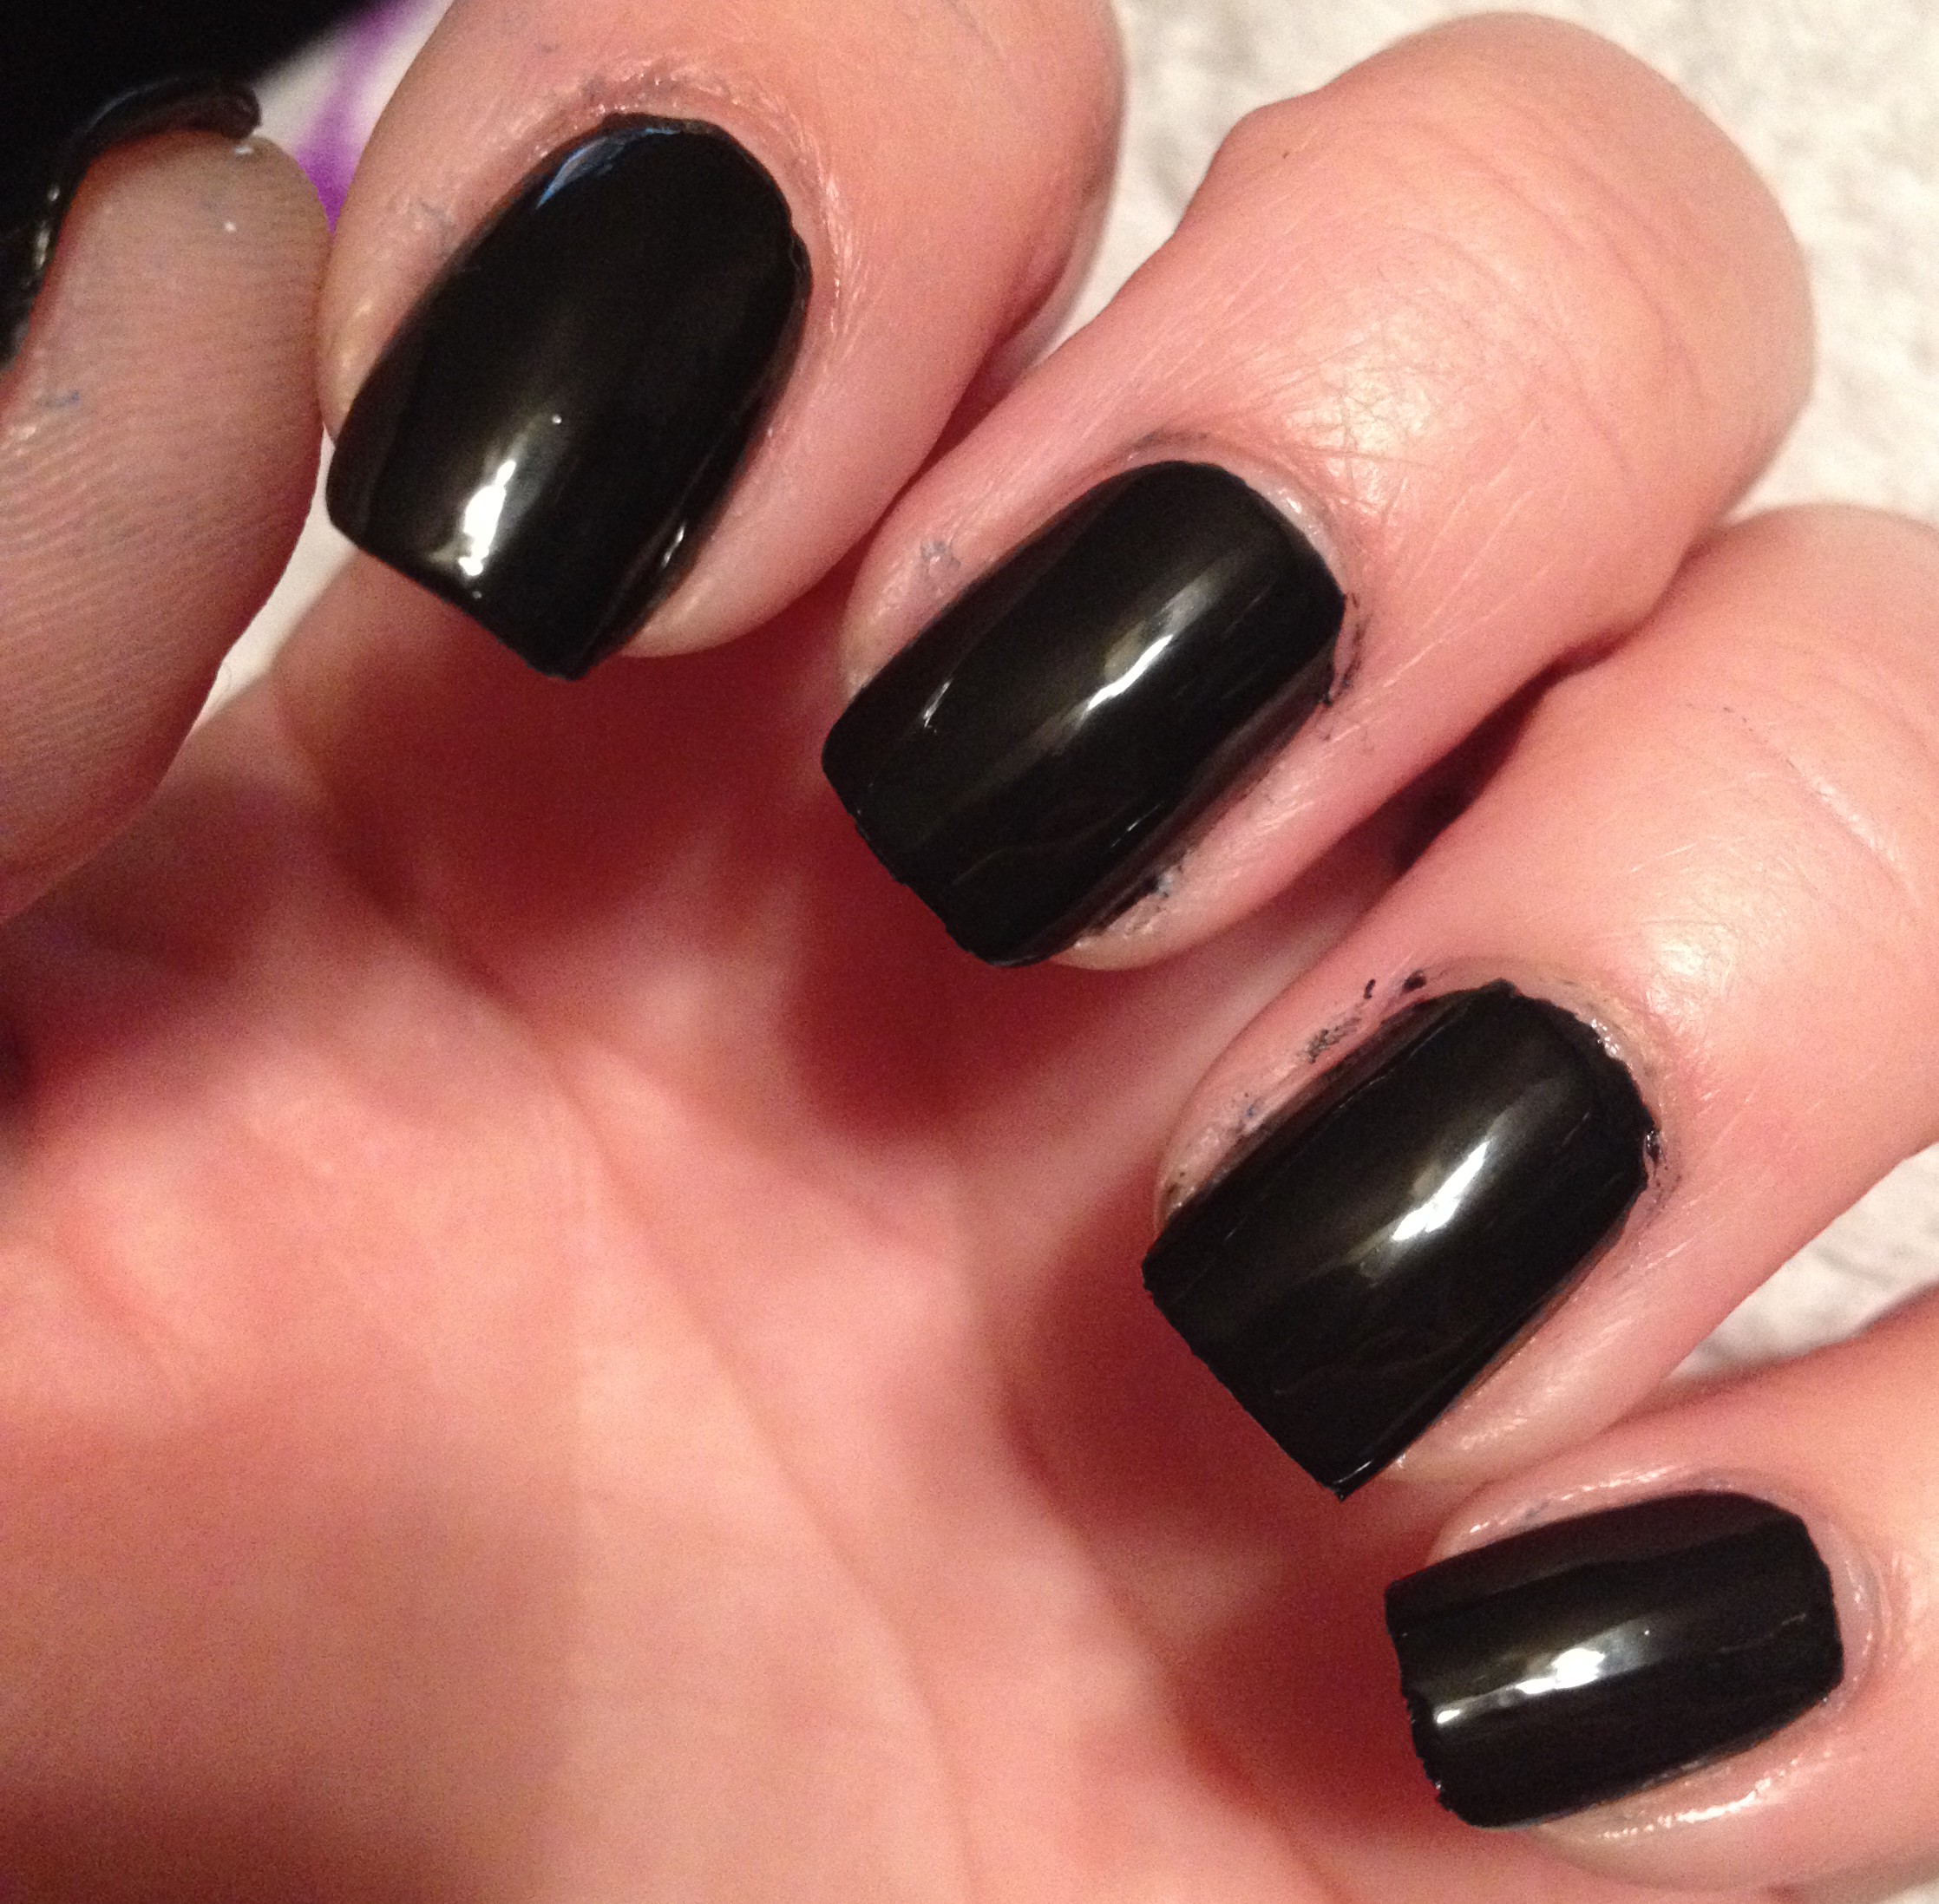
So, i started with two coats of black polish followed by one coat of Olaf.  It took a little bit of “fishing” to get the snowflakes out, but it wasn’t too bad.

IMG_4263IMG_4264

The I started making stripes with these jelly polishes.

IMG_4274

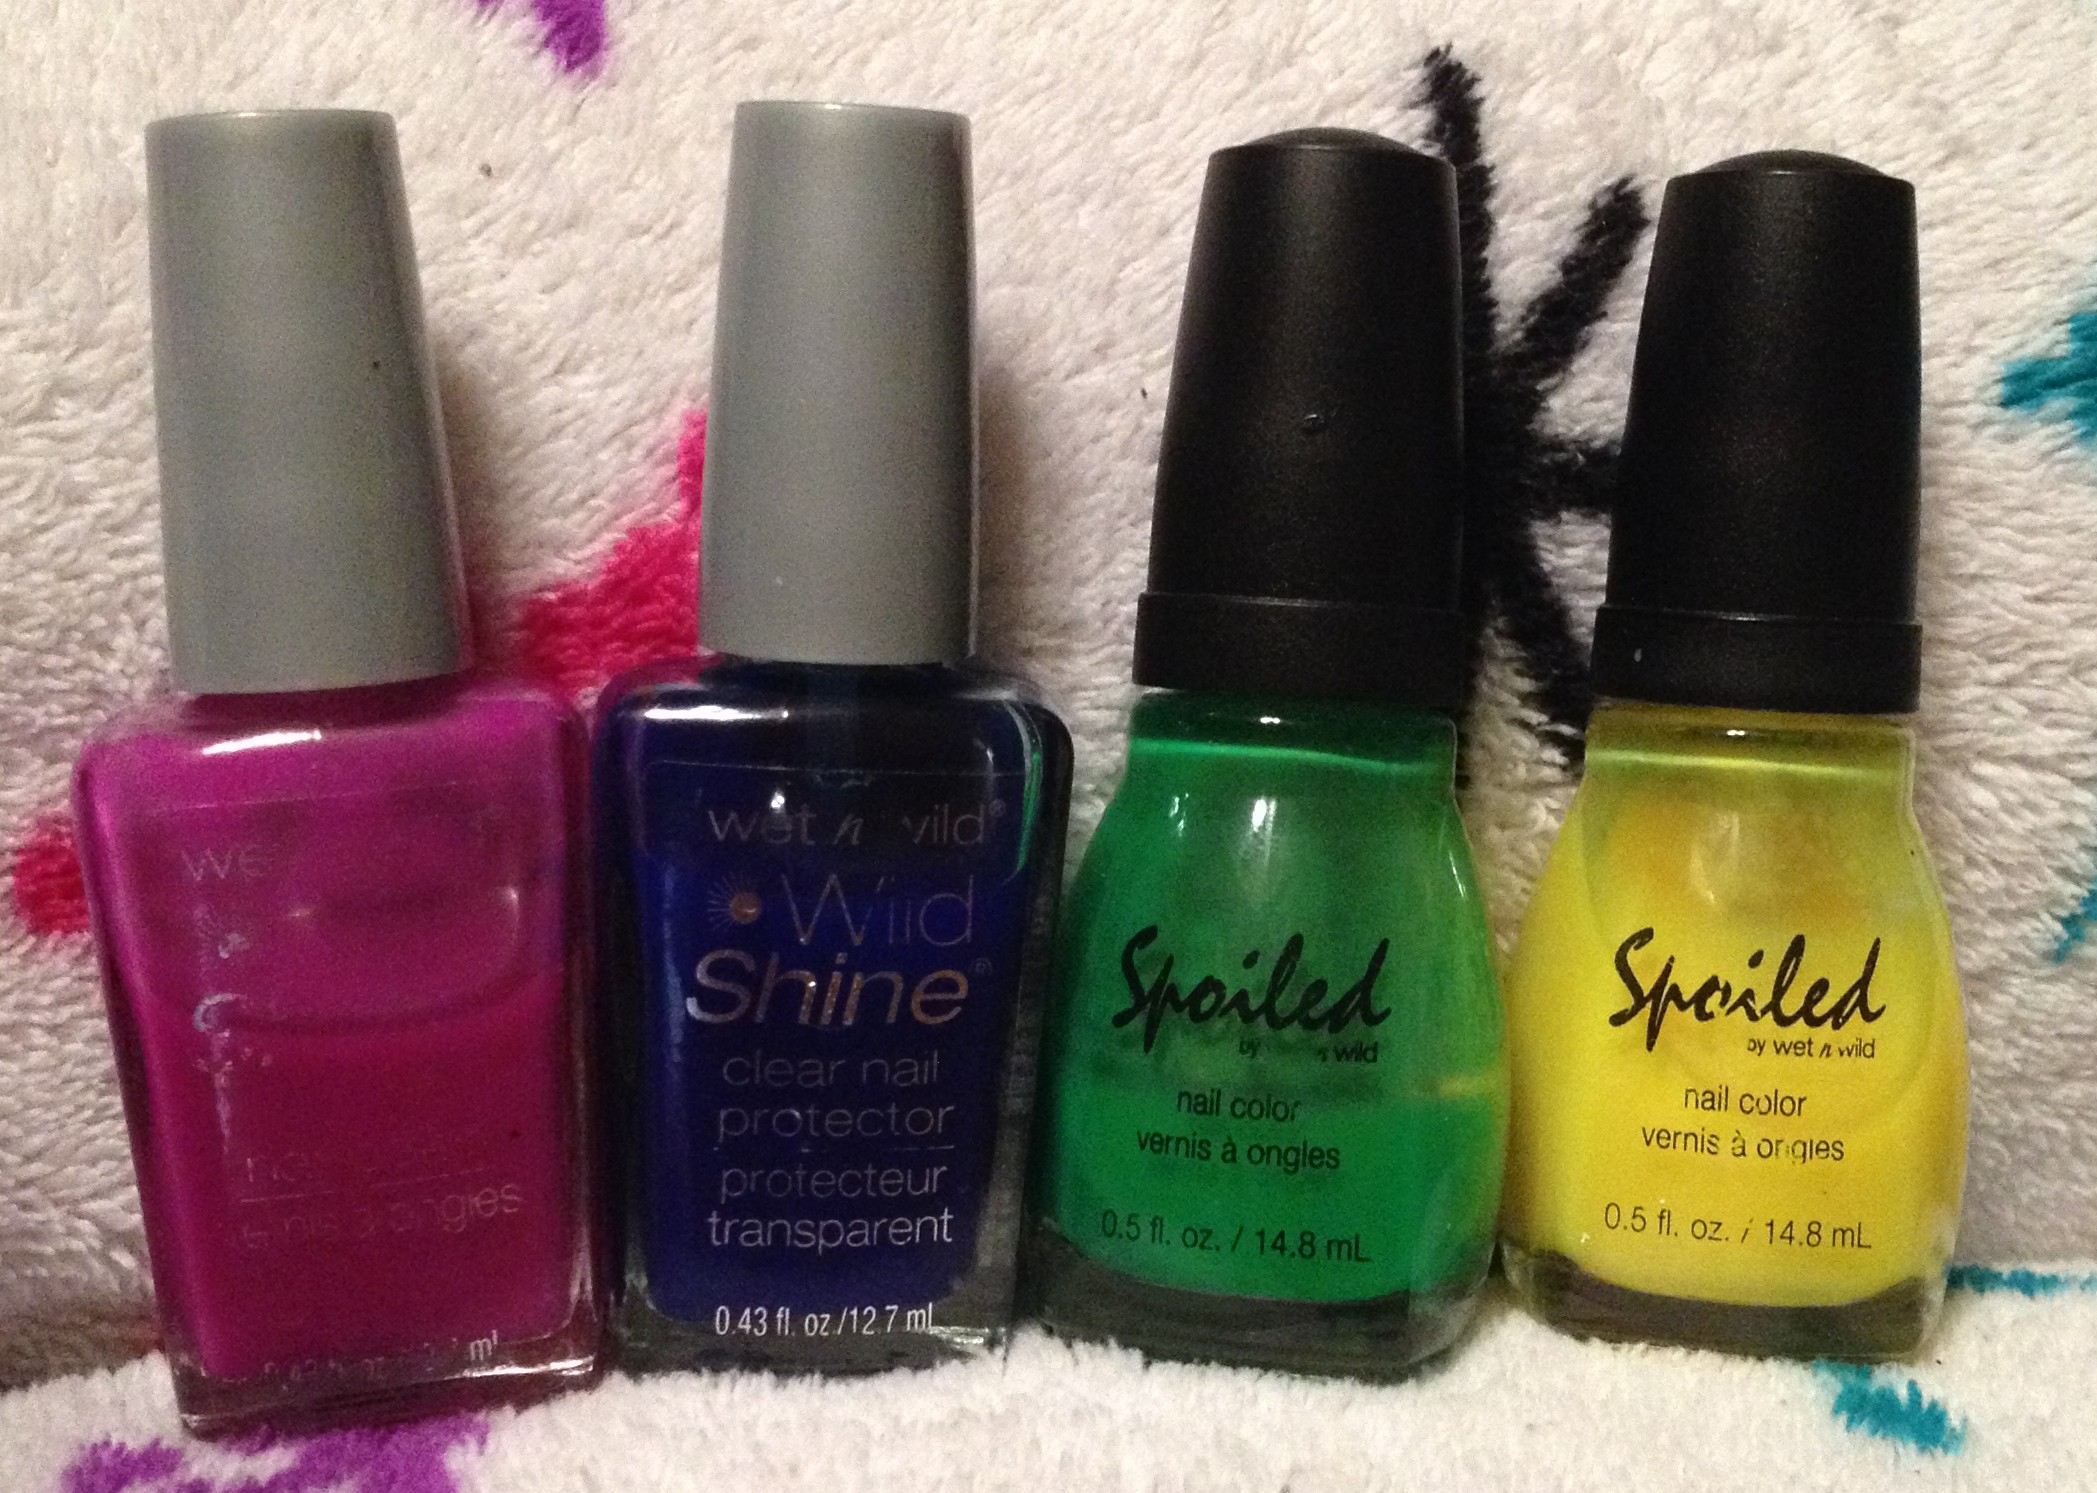
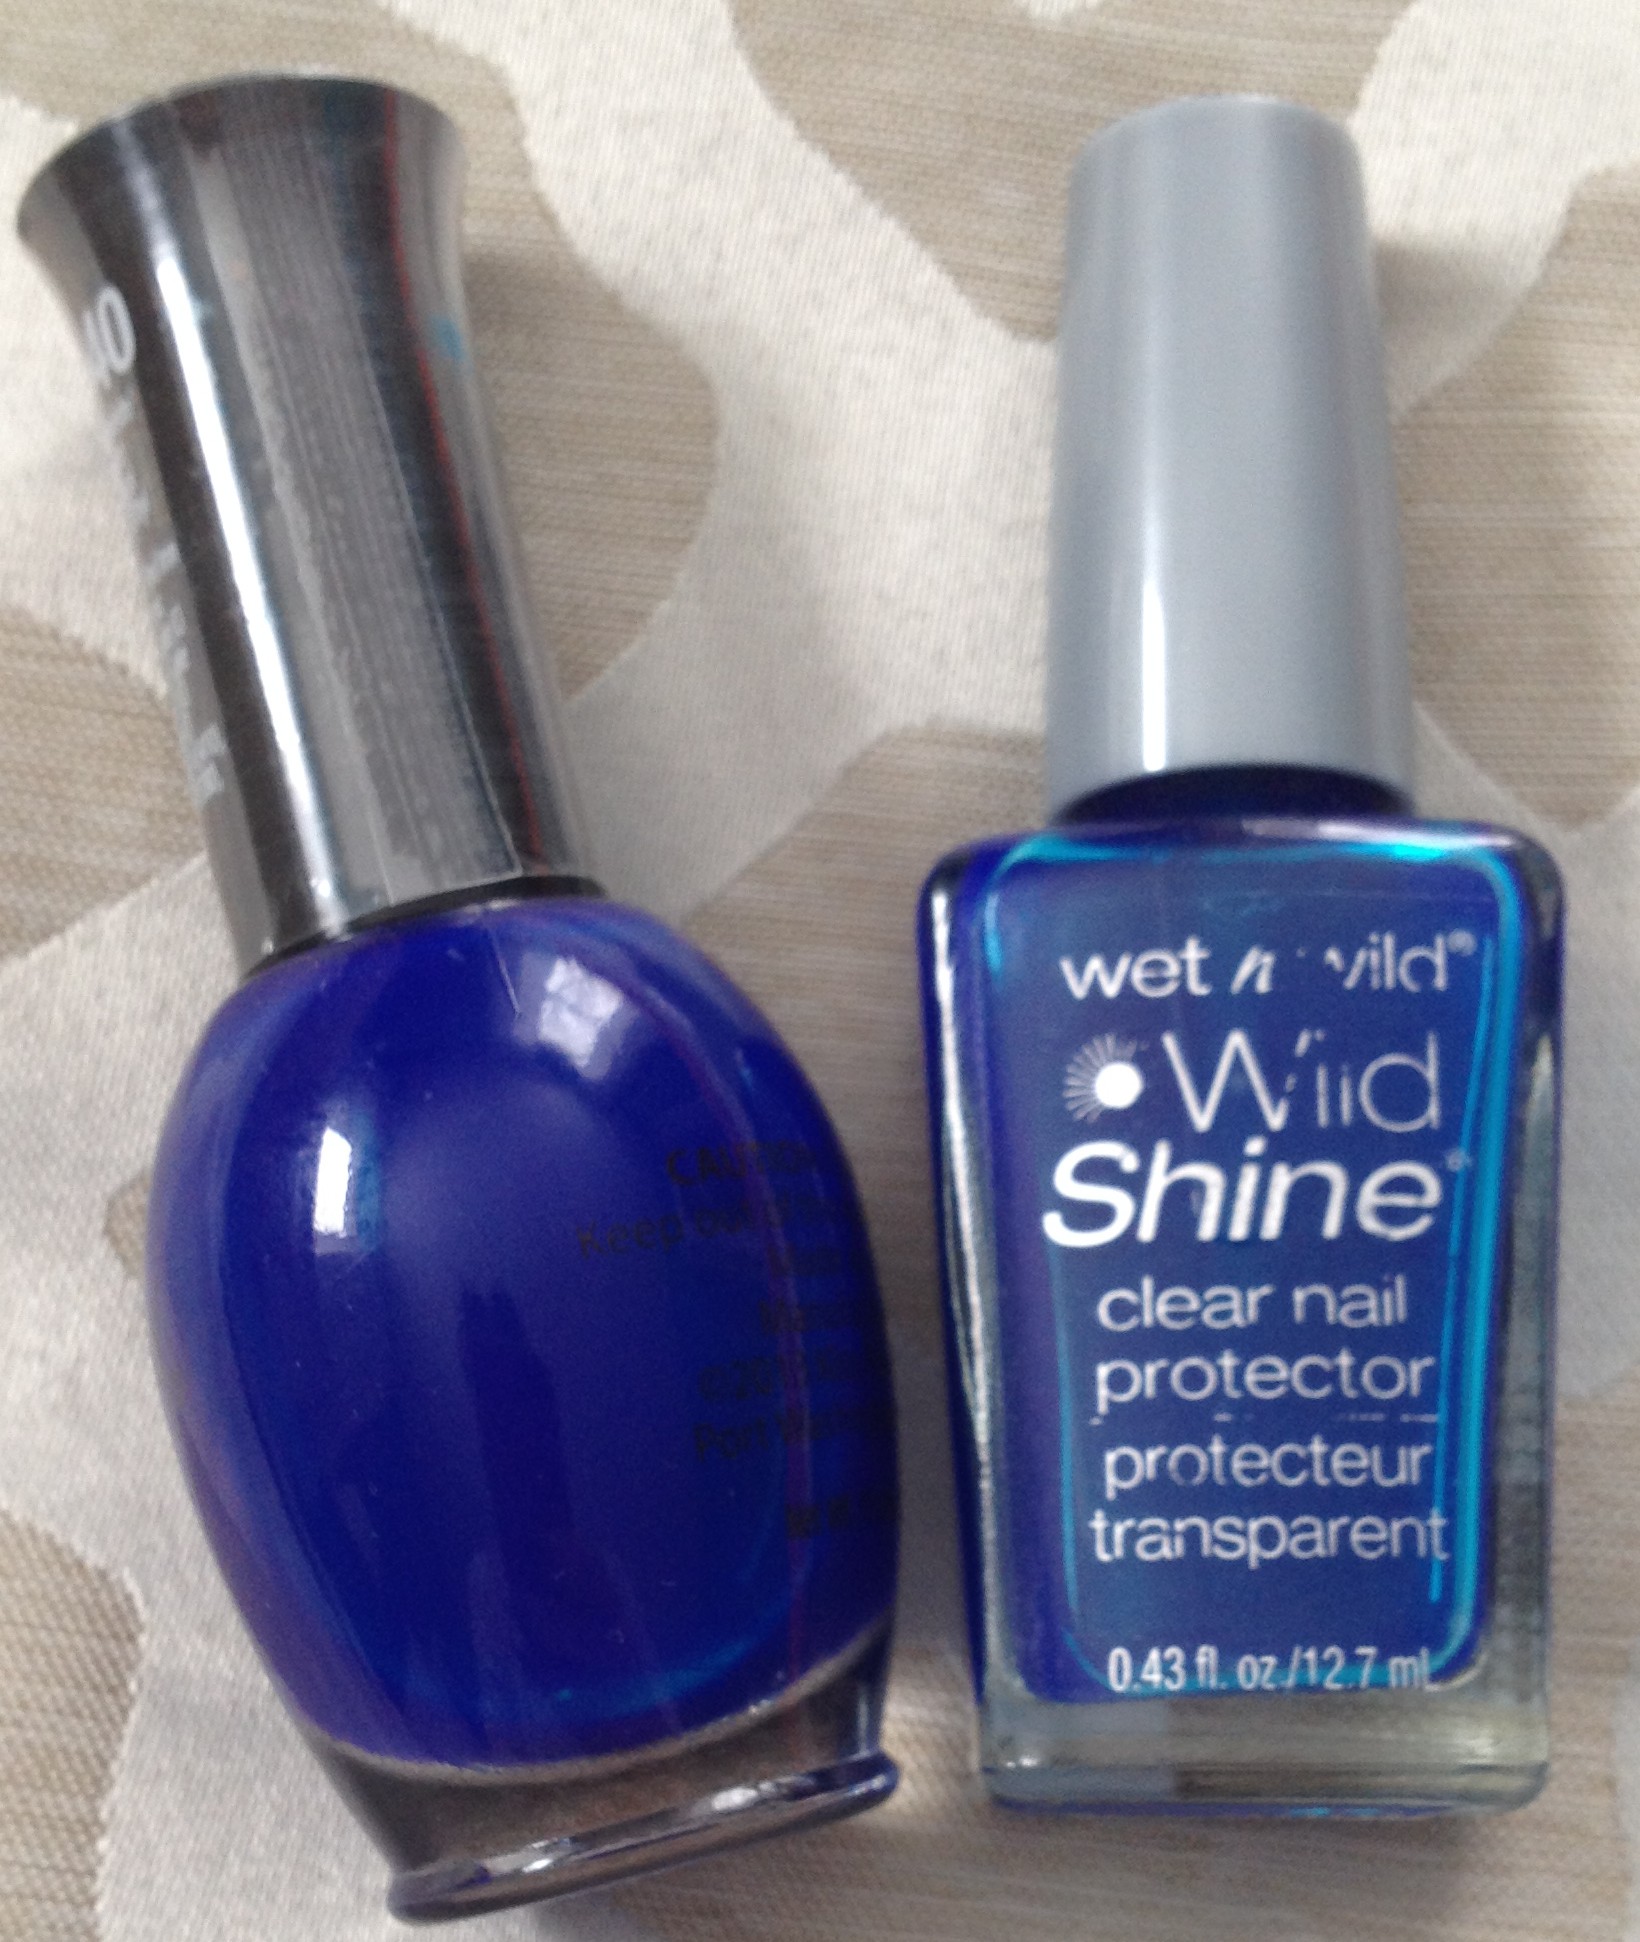
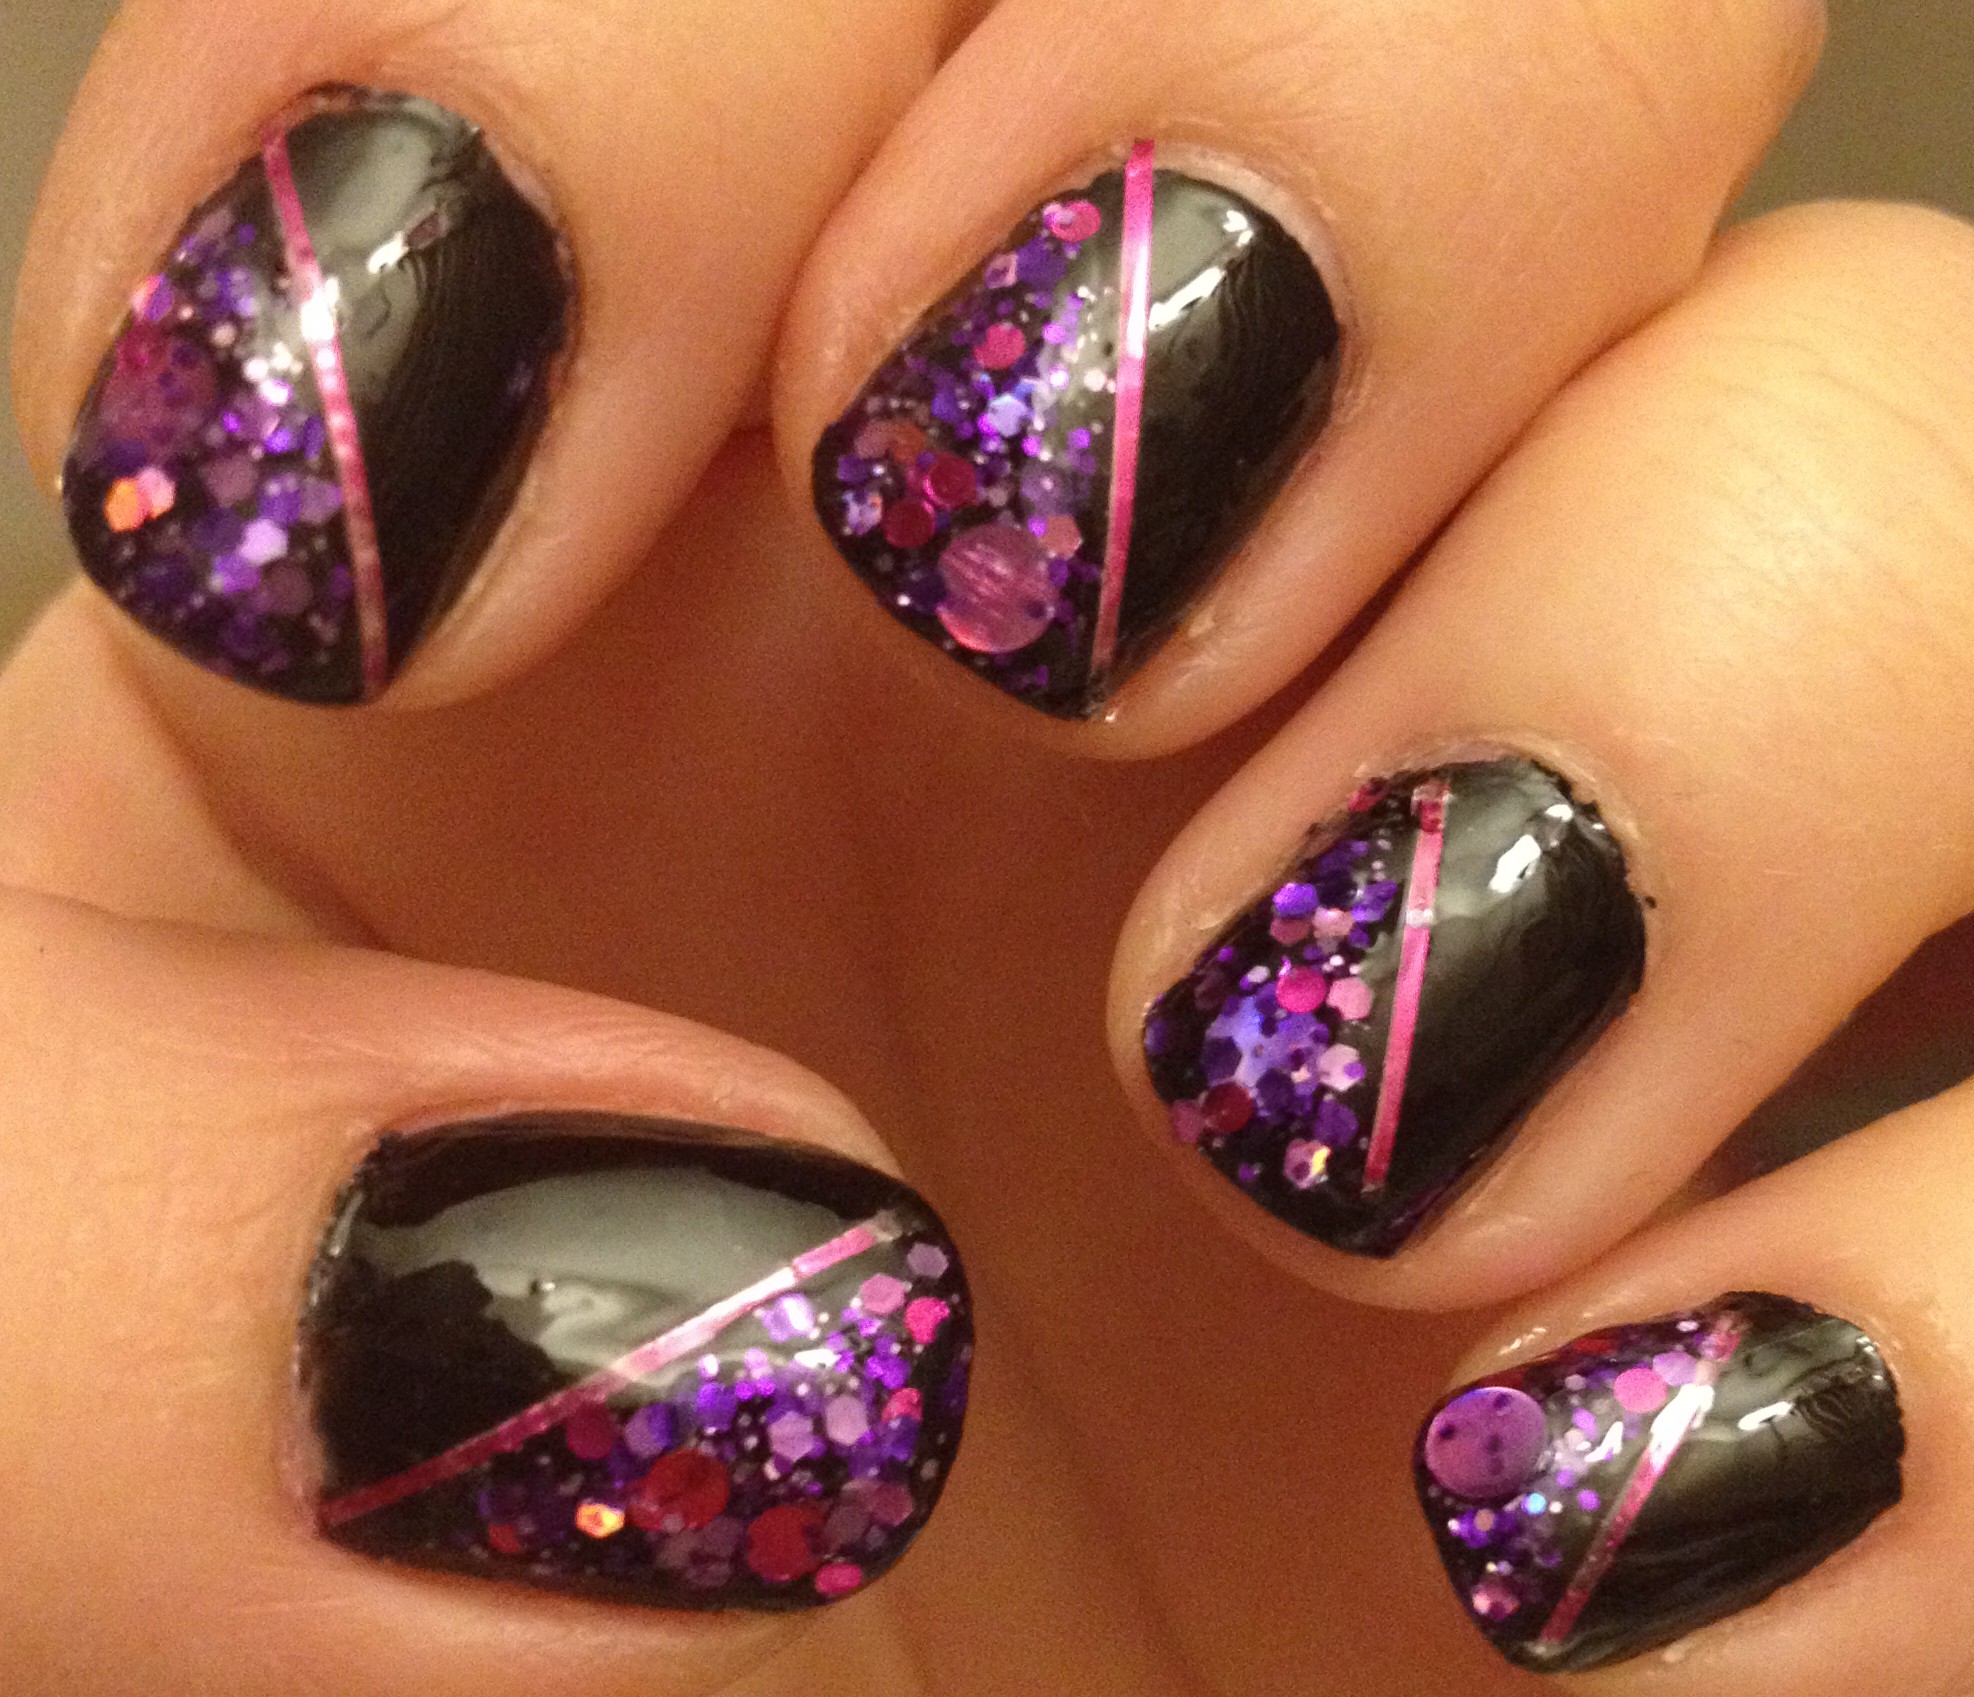
From left to right: Wet n Wild – Deception (No longer available. No one is sorrier than me), my Frankenjelly, Spoiled – Permission to Proceed, Spoiled – Did I Dye It Too Blonde?.  The Spoiled polishes are made by Wet n Wild and are available exclusively at CVS for $1.99.

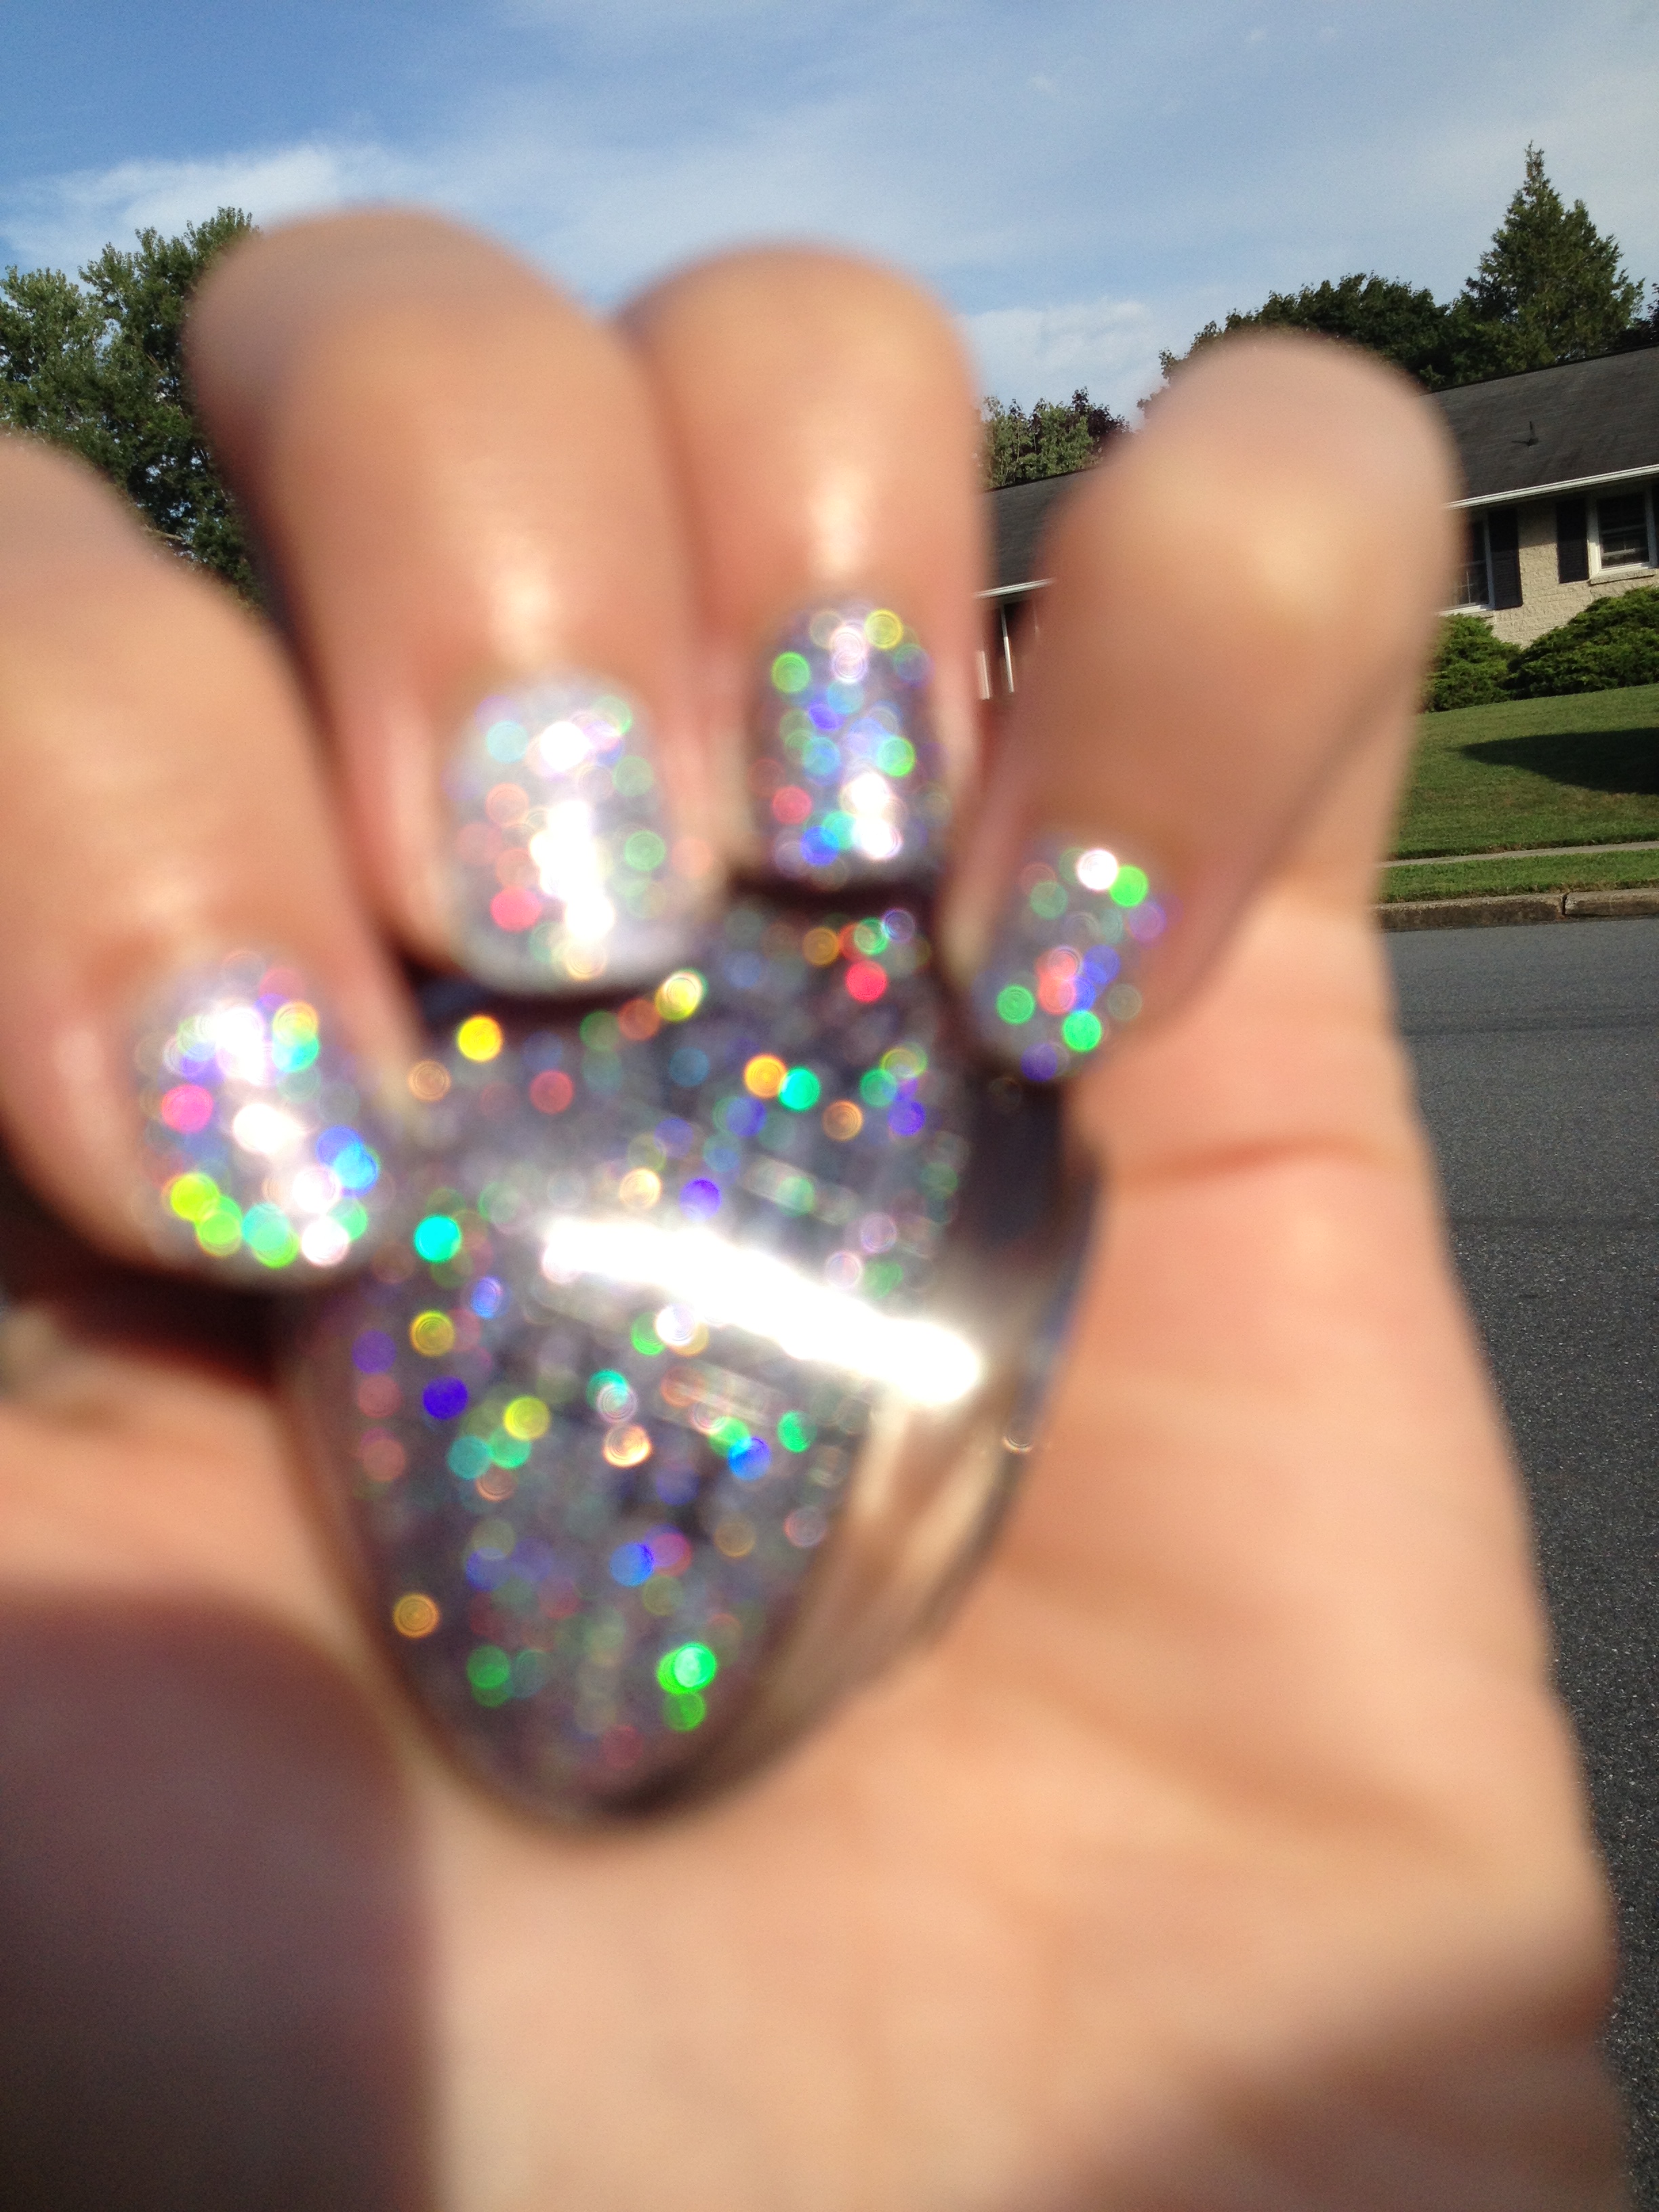
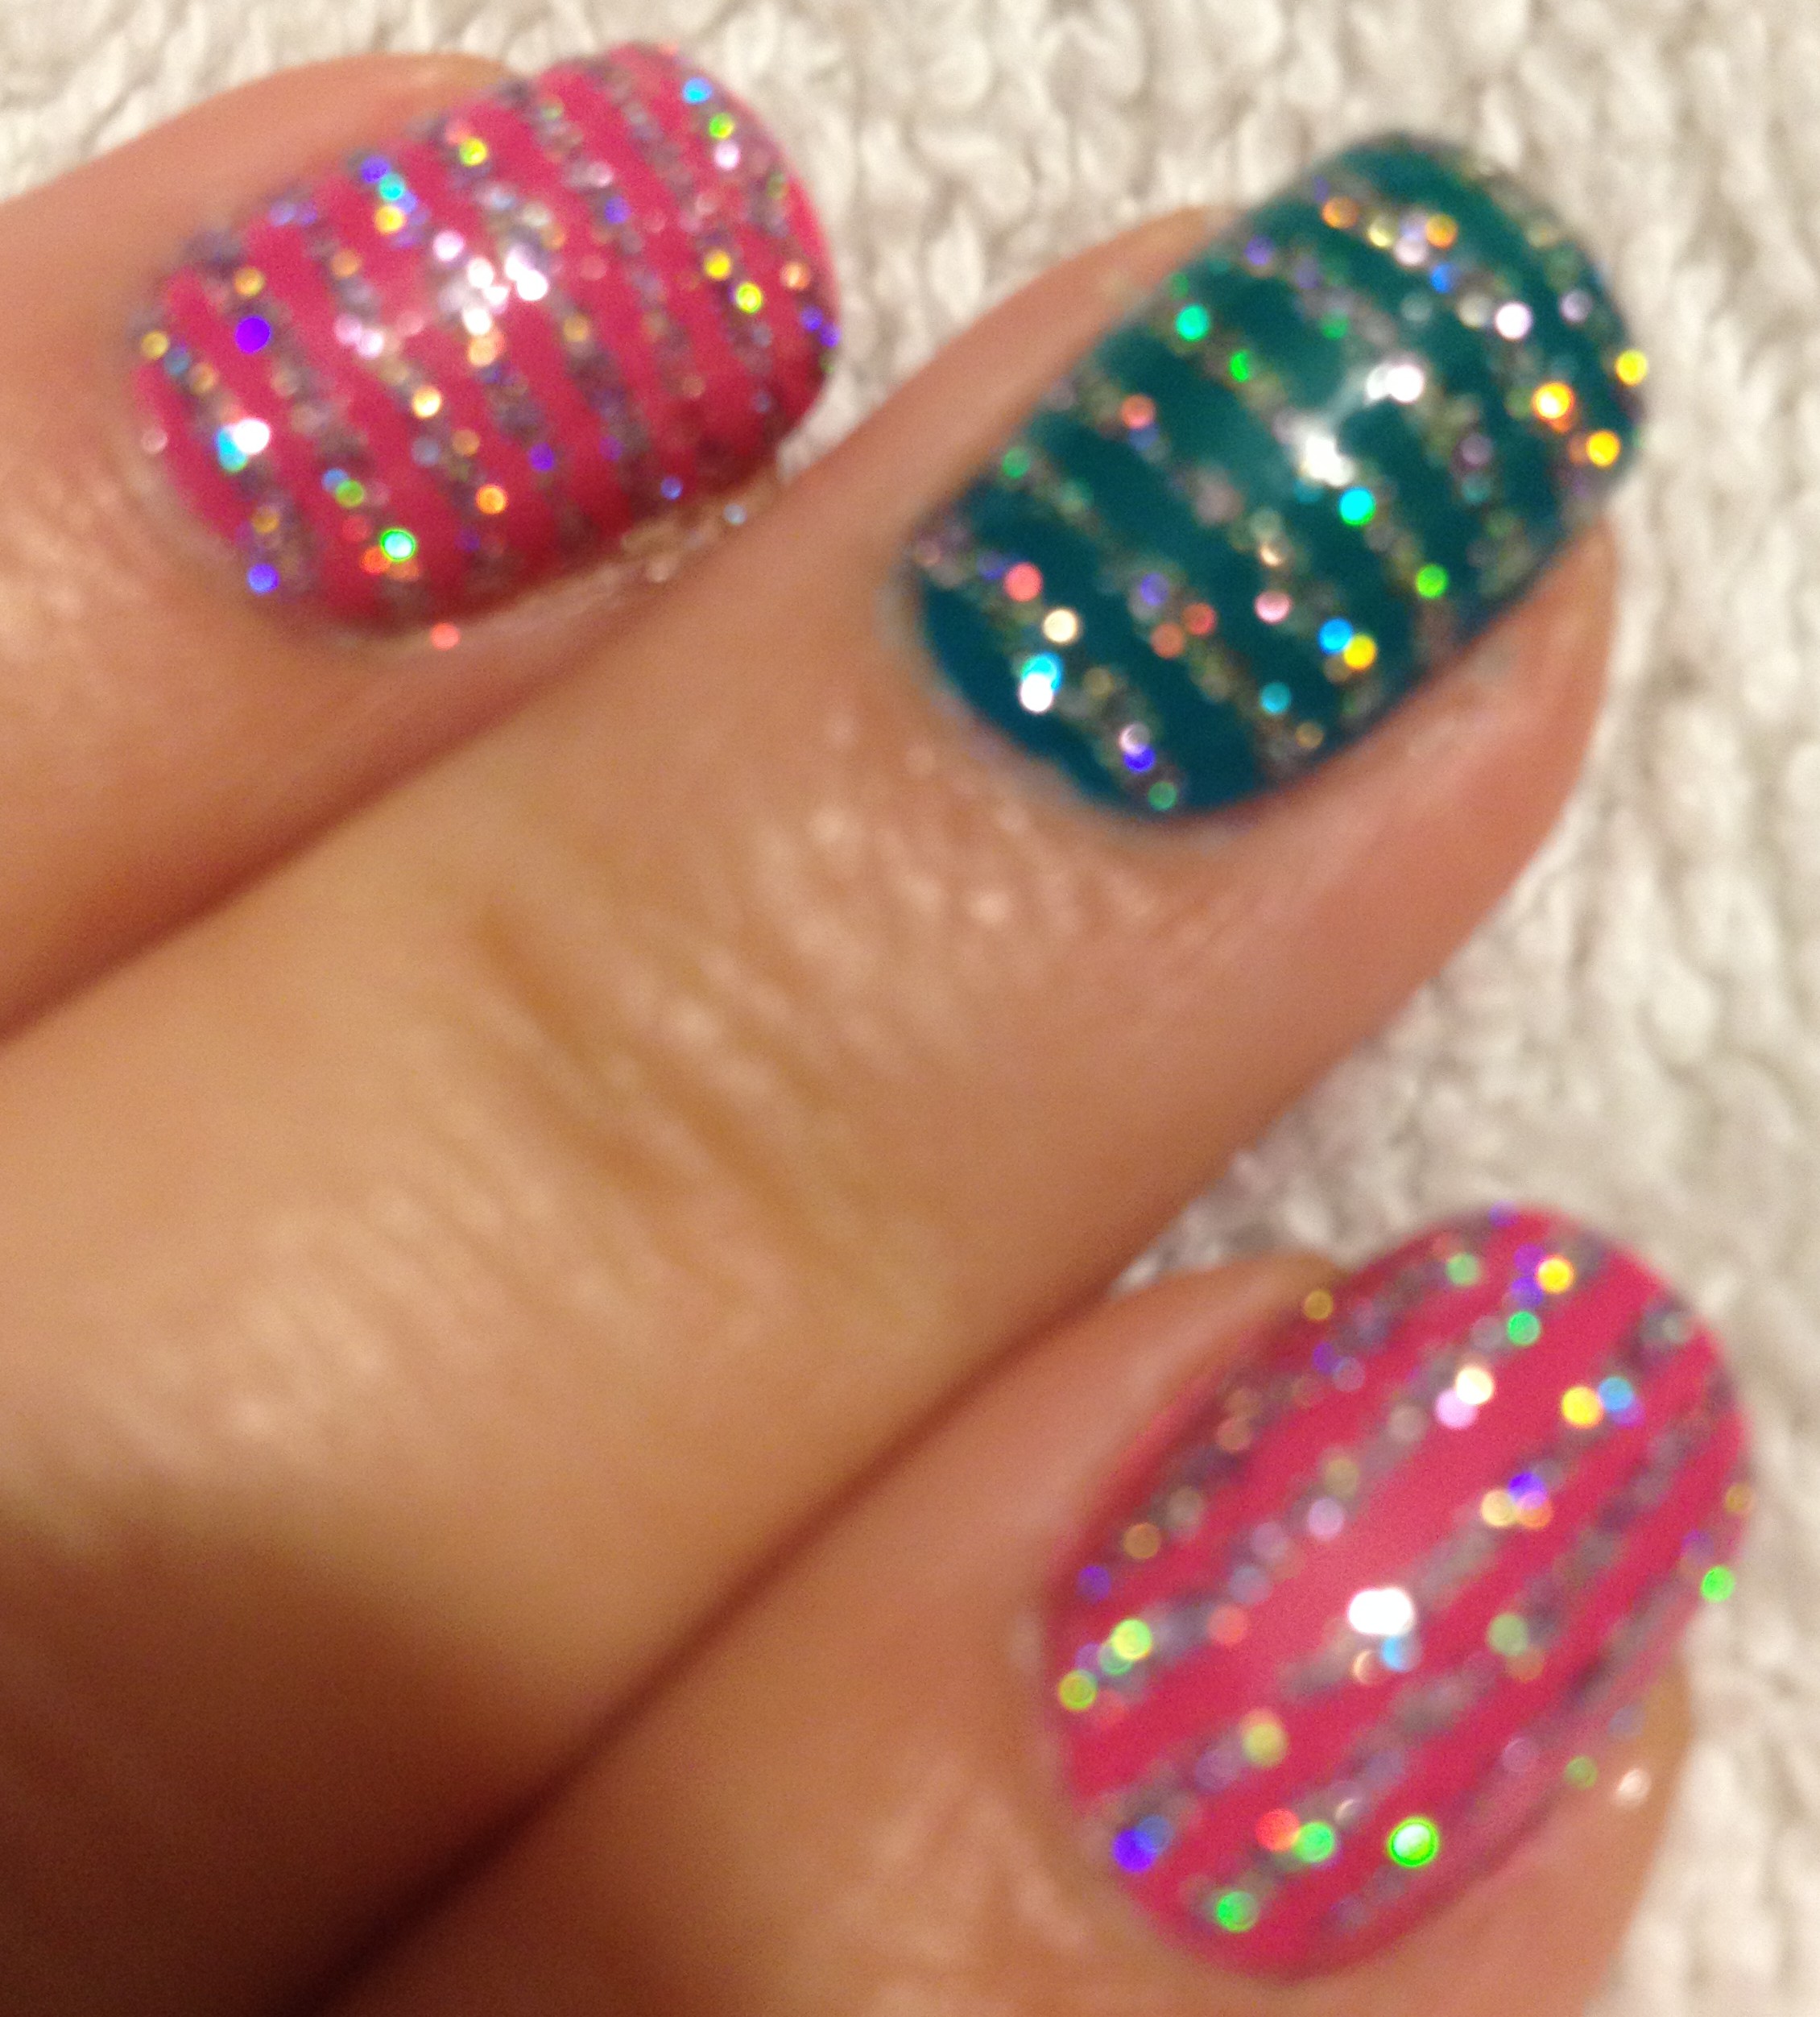
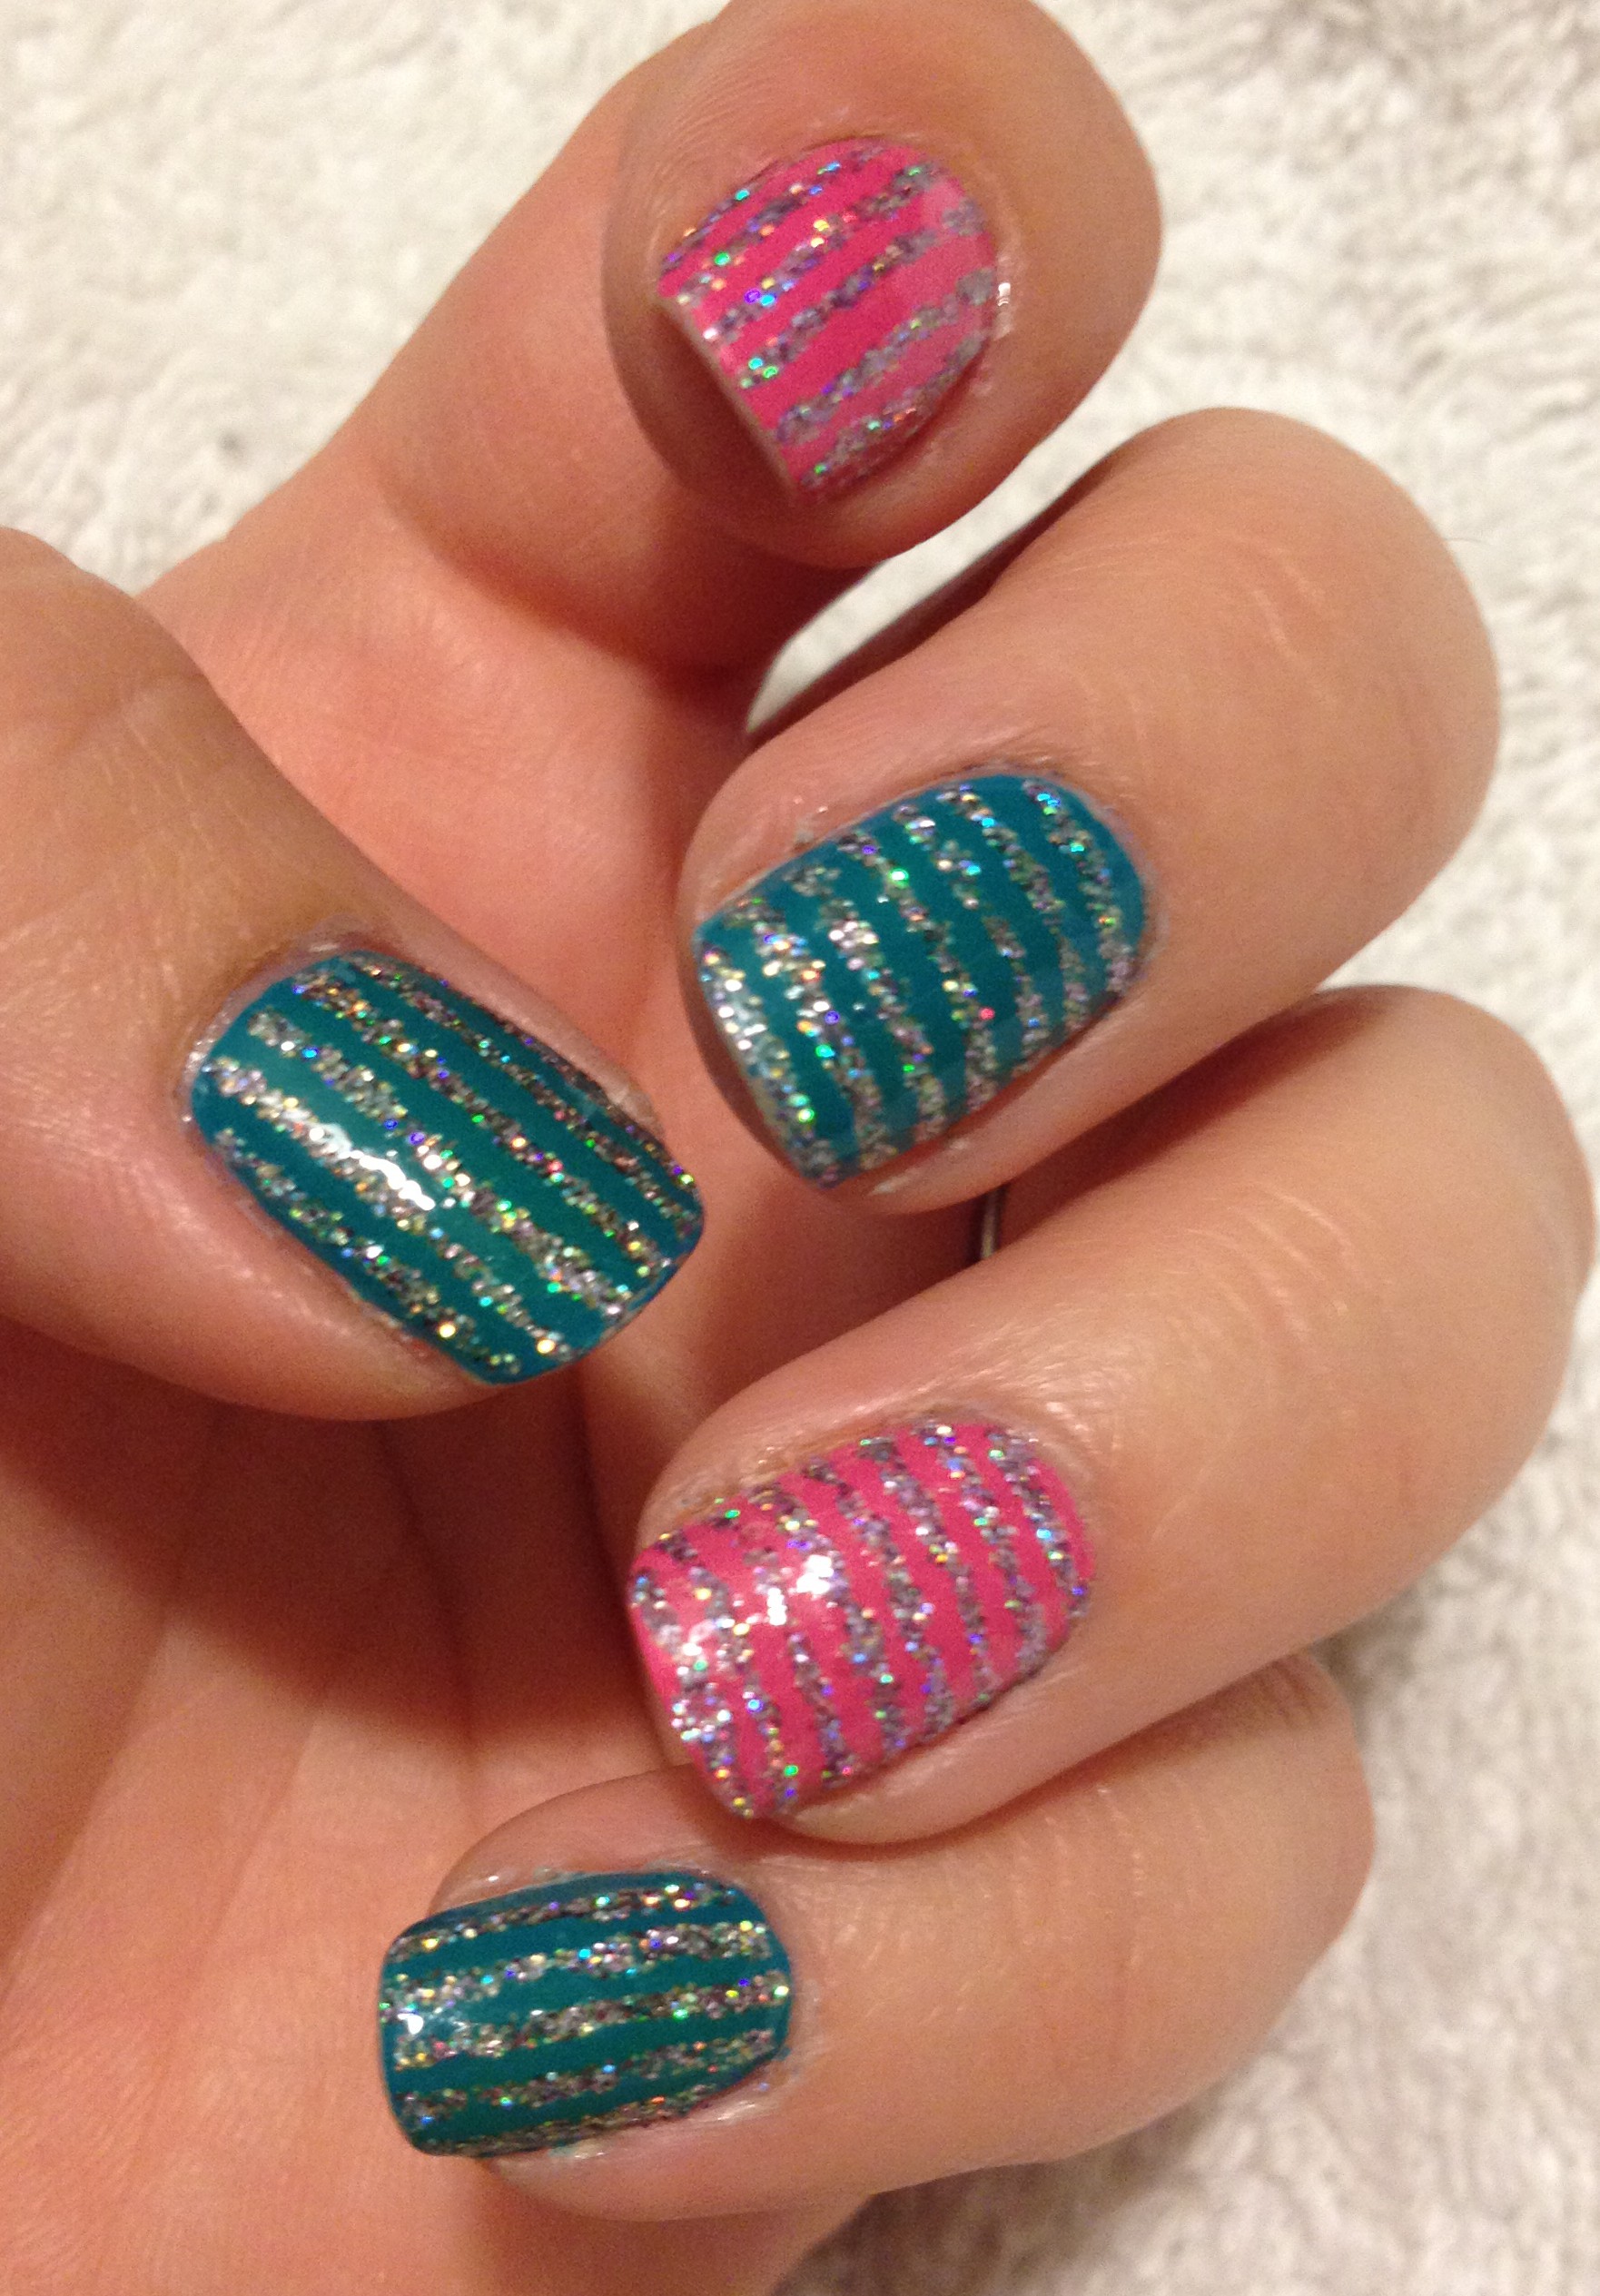
I applied as stripe of polish to each nail in the order that they are pictured, allowing the colors to overlap a little.  Here’s the end result:

IMG_4268 Aren’t they so fun?  I was thrilled with how these turned out!

And you really don’t have to have a white glitter topper to pull off this look.  You could just make a bunch of little random dots with white polish or craft paint over black polish.  Or you could paint pretty much ant white design over black polish and then top it with rainbow jelly stripes for a really cool effect!  If you try anything similar, please let me know!  Thanks for reading!

Snowflake Sandwich with Frankenjelly

I’m pretty open about my love for Broadway Nails – Space Flight.

IMG_3297IMG_3335IMG_3321

I mean, what’s not to love?  It’s a beautiful blue jelly polish that only costs $1!  Well, actually, there are two things that I don’t love about this polish…

1.  It stinks crazy bad.  Like oil-based paint bad.  Like “It’s below freezing, but I need to open a window for ventilation” bad.

2. It’s really dark.  I mean, it’s definitely a jelly polish, but it’s so dark that it covers up whatever is in the middle of my jelly sandwich just a little too much.  And if I felt the need to apply a second coat over my glitter in the name of smoothness or evenness, it just covered my glitter more than I wanted it to.

Then, late one night, in a moment of inspiration I though, “Why don’t I just add some of Space Flight to a clear polish to make a more sheer jelly?”  So that’s what I did.  Behold:

IMG_4277

I added maybe 20 drops of Space Flight into a 3/4 full bottle of clear Wet n Wild polish.  Seriously, it did not take much Space Flight at all to make the clear polish a lovely shade of blue.  Here is one coat of each of these painted over an expired mailer from Bath & Body Works:

IMG_4276

Isn’t that great?  Now that I had my new lovely sheer blue jelly polish, I needed to do something with it.

I acquired Funky Fingers – Olaf on a recent trip to 5 Below.

IMG_4275

This is a clear base with small white hex glitter, tiny white and iridescent glitter, and large white snowflake shaped glitter.  I figured that this would be perfect to use in a jelly sandwich with my Frankenjelly!

I actually started by applying 2 coats of Space Flight to get a nice deep base.  Then I applies one coat of Olaf followed by one coat of my new blue Frankenjelly.  Here’s the result:

IMG_4259I love how this turned out!  The Frankenjelly was dark enough to give the glitter a wonderful blue color and give the effect that the glitter is suspended in the middle of the polish with out covering it up too much!  I wore this for almost 5 days, so that’s saying something!

With the success of this frankenjelly, I may be experimenting with more jellies like this in the future.  Stay tuned!  Thanks for reading!  Oh, and just a reminder, I’m on intagram so find me there!!!

I

My 14 Favorite Polishes of 2014

It seems like pretty much every blogger and YouTuber has listed their 14 favorites from 2014.  I’m totally jumping on that bandwagon.  This was tough, but I did it.  There were a few polishes that it pained me to leave out, but I finally narrowed it down to the 14 polishes that I just couldn’t stop reaching for last year.  Here they are:

IMG_4262Aren’t they so pretty?

Starting in the upper left corner we have Funky Finger – Sand & Stilettos.

IMG_2698IMG_2695IMG_3219

This is just the best sparkly polish ever.  It’s available exclusively at 5 Below.  I’ve seen it at my local 5 Below within the past few weeks, so you can still grab this stunner for yourself for a mere $2.

Next, also available exclusively from 5 Below is Fresh Paint – Guava.  Fabulous color, fabulous formula.  A must-have for summer.  Here it is paired with Sand & Stillettos:

IMG_2727IMG_2681

It’s just the perfect neon peachy color, and a perfect dupe for China Glaze – Flip Flop Fantasy.  I just couldn’t get enough of this color over the summer.

Next, we have one more 5 Below polish: Fresh Paint – Sugar Crush.  This is the first true flaky polish that I’ve ever owned.

IMG_3560

This polish is a show-stopper over any dark color.  It’s mind blowing over black, teal, or dark purple, and I don’t know if I love it better shiny or matte.  You just can’t go wrong with this one.  I’m not sure if you can still find this at 5 Below or not, but if you see it there.  GRAB IT!

Next, I loved China Glaze – Turned Up Turquoise.

IMG_2594IMG_3228

The intense color and the shimmer make me swoon!  I don’t have a picture of it with a shiny top coat, but when you do put a shiny top coat on, the shimmer really pops.  Such a perfect color!

Yes, I’m a sucker for turquoise.  Next is Jordana – Boy Oh Boy.

IMG_3446IMG_3218IMG_2790

It almost looks green in the middle picture, but it’s not.  It’s a deep, beautiful turquoise.  And the formula on this baby is wonderful!  Almost a one coater!

Next we have Ulta – Joined at the Hippo.

IMG_4090IMG_4091IMG_4092

This is one of my more recent favorites.  Actually, I just talked about this polish in my December Favorites.  It’s got a great formula, and while it is a really deep blue, it never looks black.  Just a beautiful polish!

Then there’s Broadway Nails – Space Flight, a really deep blue jelly.

IMG_3335IMG_3321IMG_3262

I’ve actually got this on my nails right now, as you’ll see in a post later this week. This is an amazingly beautiful polish and it only costs $1!  You can find this at Dollar General.

Now we come to the first indie polish that I ever owned: Valley Girl Lacquer – Fantasm.

IMG_21552014-02-03 21.23.44

Even in a really ugly jelly sandwich , I still love this polish:

001

This was my first exposure to the super huge round glitters that are pretty common in indie polishes and they really blew my mind when I first used them. Heck, they still blow my mind!

Next is Wet n Wild – Deception. This was my first really great jelly polish.

IMG_3111IMG_3384

This was in a limited edition collection from the spring, so I’m pretty sure you won’t be able to find this anywhere and I’m very sorry about that.  I’ve used about 1/4 of this bottle already, and I’m going to be heartbroken when it’s gone.This polish takes 5 or 6 coats to get that perfect jelly look, but it’s so worth it!

Next is China Glaze – Peonies & Park Ave from the 2014 spring collection.

IMG_3218IMG_3004

This almost neon pink really doesn’t seem like anything special, but it’s the pink that I reached for repeatedly back in the summer.  I feel like it works well with my fair skin.

Next is a polish that I’ve talked about so many times: Wet n Wild Fergie – Gold Album.

IMG_3149IMG_4023

This is the best gold polish that I’ve ever used!   I love the stuff!  It’s perfect and beautiful every time.

Next is Broadway Nails – Hot & Sexy.  This is a dupe for China Glaze – Ruby Pumps.

IMG_3986IMG_3988

So beautiful and red and sparkly!  I stare at my nails a lot when I’m wearing this! Also available at Dollar General for $1.

Now we have the polish that I loved the most in the fall.  NYC – Royal Chic.  This was from a limited edition collection, but really, there are lots of great browns out there.

IMG_3867IMG_3895

Sadly, these pictures really don’t capture the chocolaty brown goodness that is this polish.  It’s just so pretty and rich looking on the nail.

Last, but certainly not least is Polish me Silly – Tealing no lies.  This is my first indie holographic polish, and wow, it’s amazing.

IMG_4114

I just got this guy for Christmas, so I’ve only worn it once so far, but I pretty much couldn’t stop staring at my nails while it was on.  And I forced my husband to admire my nails so many times while I was wearing this.  It’s really, really amazing, especially in the sun.

So that’s it!  My 14 favorite polishes of the past year!  Thanks for reading!  What were some of your favorite polishes in 2014?  I’d love to know!

Frosty Blue Nails

Here’s a quickie tutorial that requires minimal skill.  Those are the best kind of tutorials, right?

I started off painting my nails with China Glaze – Capacity to See Beyond from the Giver collection.

IMG_4206

I was able to find the complete Giver collection on clearance at Sally Beauty Supply!  I didn’t buy the whole collection – only three – but I FOUND the whole collection!  I had had my eye on this polish in particular, but I just can’t bring myself to spend full price on polishes that are over like, $4.  This one really is a beauty, though!

After letting the base color dry really well, I cut some little round labels that I had into quarters and applied them to my nails.

IMG_4208IMG_4209

These little stickers are the same size and the reenforcer stickers and you can get these pretty much at any office supply store.  I like cutting them into quarters for two reasons.  1. I’m frugal, and if I can get four nails covered with one sticker, I’m gonna do it.  And 2. I think it’s a lot easier to get a good, tight seal between the sticker and your nail along the sides of your nail when you are working with a smaller piece of sticker.

For this look, I put the curved edge of the sticker right across the middle of my nail, but you can use these same stickers for either a half moon mani or a french mani, depending on your placement of the stickers.

Next I painted the top half of my nails with L’Oreal – The True Diamond, which is a shimmery white top coat.  I’m pretty sure this is not available any more, but a silver glitter topper would work really well, too.  Then before the polish could dry, I peeled the stickers off really carefully with tweezers, and I was left with this:

IMG_4210I wanted to add a little something, so I took my tiny brush and Wet n Wild Fergie – Going Platnum and added a little line where the polishes meet.  Really, though, if you don’t have a tiny brush or you don’t trust your hand to be steady enough, you can skip this part.

IMG_4211I got my little brush at Michael’s with a coupon, so it only cost about $3.  I love it!

Here’s the final result:

IMG_4213Cute and simple and perfect for these frosty months!  Thanks for reading!

December Favorites

I’m finally getting around to my December favorites.  Ugh, I have so much catching up to do!  Not surprisingly, in December I loved all sorts of red and gold and glittery polishes.

IMG_4230

Let’s start with the top left.  This is Broadway Nails – Hot & Sexy.

IMG_4235I used this as my base color for my Sparkly Red Snowman Nails.  I just love this polish!  This is a great dupe for China Glaze – Ruby Slippers, and it only costs $1!  The only place I’ve seen these sold is at Dollar General. (You can read more about that here.)  This polish has a red jelly base with tons of red micro glitter.  And if I remember correctly, it’s easy to remove, unlike a lot of glitter polishes.  My little swatch isn’t doing this polish justice.  It’s super beautiful!

Next we’ve got Wet n Wild Fergie – Gold Album.

IMG_4236I’ve talked about this polish lots of times.  Every time I use it, I’m amazed and how beautiful and sparkly and shiny and GOLD it is.  I used this in December in my Advent manicure.  It’s pretty much a one coater, but but I tend to do two coats just to make sure it’s perfect.

Another favorite is Ulta – Joined at the Hippo.

IMG_4231

This was the base color for my Nativity Nails.  This is a beautiful deep blue cream polish.  The thing I love about it is that it is really dark blue, but it never looks black.  The formula is wonderfully easy to work with, also.

I also loved Pure Ice – Studette in December.

IMG_4237The bottle is a little fuzzy in the picture because I focused my camera on the nail swatch instead of the bottle.  This is a really dense micro glitter polish in a clear base that is about 98% gold and 2% red.  So cool!  I used this for my New Year’s Nails.  Really, if there’s ever a time that you can sport obnoxiously glittery nails, it’s New Year’s.  This one is a bugger to remove, but it’s worth it!

Next are my three new Polish Me Silly polishes!  I ordered these through Polish Me Silly’s Etsy shop, along with some polishes for my sister for Christmas.  Then I gave the polishes that I ordered for myself to my Hubby so that he could give them back to me on Christmas.  I know.  We’re weird.

IMG_4233IMG_4234IMG_4232

(Again, the bottles are a little fuzzy, but the swatches are clear.)

The first one is Are You Elfin Kiddin Me?  This is a thermal polish.  The color in the picture is the cold color, but then when it gets warm, the green base turns to white, which makes the dark green glitter really pop out.  It dries to kind of a semi-matte finish, but that’s fixable with a top coat.  (You can read more about what kind of top coat NOT to use with this polish here.)

The middle one is There’s Snow Place Like Home.  This is a dark blue jelly base with a ton, and I mean TON of gold, white and silver glitter in it.  All of that glitter makes it kind of a pain to apply, but the end results are like this:

IMG_4228

The sparkliness is over-the-top!  This is the polish that I’m currently wearing, and I’ve been asked about it so many times.

Tealing No Lies is my final polish.  This is amazingly holographic!

IMG_4114I can’t even tell you how many times I forced my husband to admire my nails while I was wearing this.  In bright sunlight it is so beautiful that it pretty much just makes you go numb with joy just looking at them.  This is definitely one of my favorite polishes of the year.  So amazing!

So, that’s all of my nail polish news, but I do have a little review for you in my new section that I’m calling….

Non-Nail News and Reviews

So, compliments of Influenster, I was sent this new antipersperant to try: Dove Dry Spray.  IMG_4218This is the stuff with the commercials with people touching their armpits and then snapping.  I know, it’s a little weird.  This products claims to be dry instantly.  I think it’s a little more accurate to say that it’s dry in 5-10 seconds.  It has really light sent, sort of like baby powder, but not quite. Pleasant.  It also claims to give 48 hour protection.  I’m not the type to go 2 days without a shower unless I’m in some sort of camping situation, but I will say that after 24 hours, my pits were still stank free.  That’s saying something, because usually I have a little bit of funk going on after 24 hours.  The coolest thing about this deodorant, though, is how it made my armpits feel to the touch.  Even after a full day, I couldn’t feel any weird residue or anything!  My armpit skin just felt clean and smooth and dry!  It was in that moment of touching my own armpit that I suddenly got those commercials with people touching their armpits and snapping.  After 3 days of testing this deodorant, I switched back to my old deodorant with the plan to use up the old stuff here in the colder months so that I can save my Dove Dry Spray for the warm months.  This stuff would be perfect for sleeveless outfits.  (Currently the windchill is below zero {Fahrenheit} and I’ve got three layers on, one of which is wool.  I think I’m a solid four months away from wearing anything sleeveless.  Come on, spring!)  This product is $5.47 at Walmart, and I saw in in Rite Aid for over $7, so it’s definitely a little pricy.  Definitely worth a try, though if you are in search of the perfect antiperspirant.

Thanks for reading!

Happy New Year!

I have been a terrible blogger for the past few weeks.  Seriously, I haven’t posted anything since before Christmas, and that’s downright shameful.  Here are my excuses:

1. Christmas.  It’s just busy.  Lots of baking and cooking to be done, festivities to attend,… You know how it goes.

2. Myrtle Beach.  IMG_4155My parents’ Christmas gift to my three sibs and our spouses and kids was  trip to Myrtle beach, SC for the week after Christmas.  That’s a super affordable place to visit this time of year, and even though it’s not WARM warm, temps in the 50s and 60s feel pretty awesome compared to this below freezing nonsense that pretty much the entire midwest/mid-atlantic/north east of the US is dealing with now.

So, those are my excuses.  I have so many things I need to get caught up on.  I was sent my first Influenster box, so I need to review that product, and I also need to do my December favorites, plus, I’ve got at least one tutorial that I’ve done but haven’t posted.  I think I’m going to spread it out so that I don’t try to cover too many things in any one post.

For now, I’ll just leave you with a look at my super sparkly New Year’s Nails:

IMG_4156

Are you blinded by the sparkle?  The details on this polish will be in my next post, I promise!  Thanks for reading!