Nativity Nails

I love nativities.  I have a beautiful olive wood one that I inherited from my grandparents that I love!  I’ve got a big one in the front yard.  I’ve got lots of little nativity ornaments on my Christmas tree.  For me, these serve as a great reminder of the reason we celebrate Christmas: Christ’s birth.  Because of this, I really like to take a break from the Santa/snowman/candy cane manis and replace them with some nail art that reflects the true meaning of Christmas.

I had a couple ideas rolling around in my head, so I decided to make my right and left hands each a little different.  Here’s my left hand:

IMG_4090The black is craft paint.  The rest is nail polish.  The star glitter was fished out of a glitter polish from a Wet n Wild Fergie polish.  I love these nails!

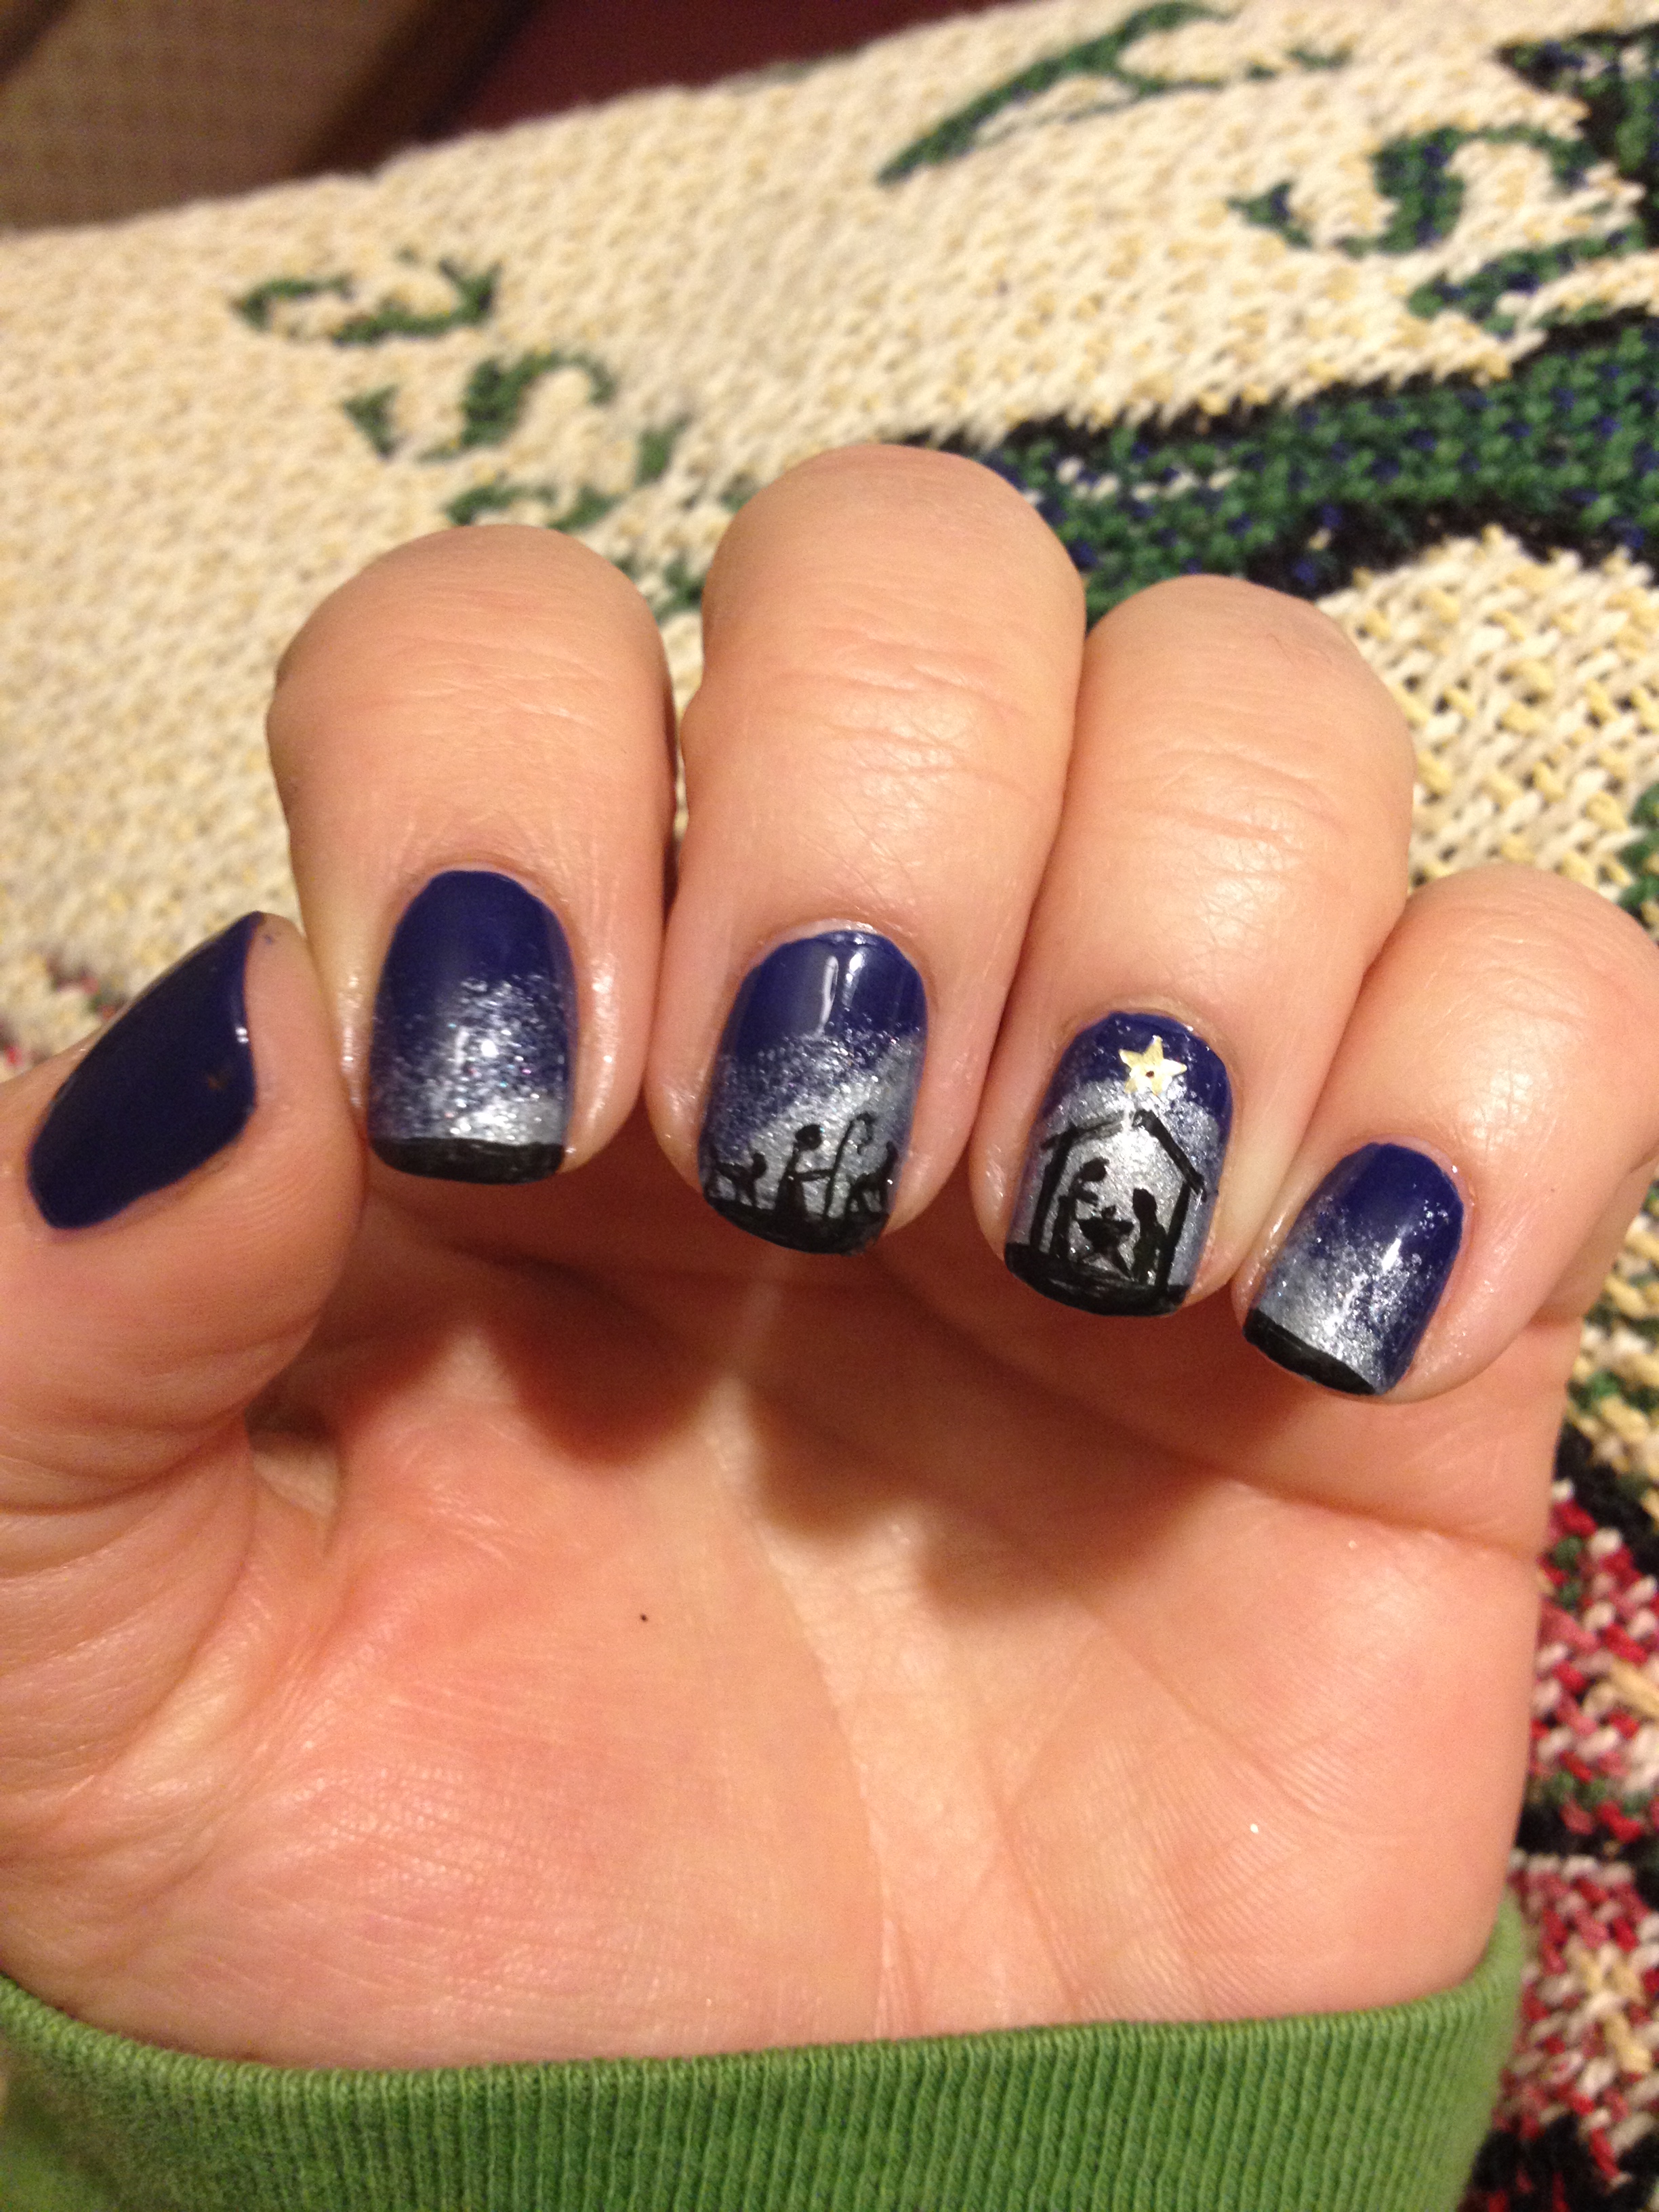
Here’s my right hand:

IMG_4091
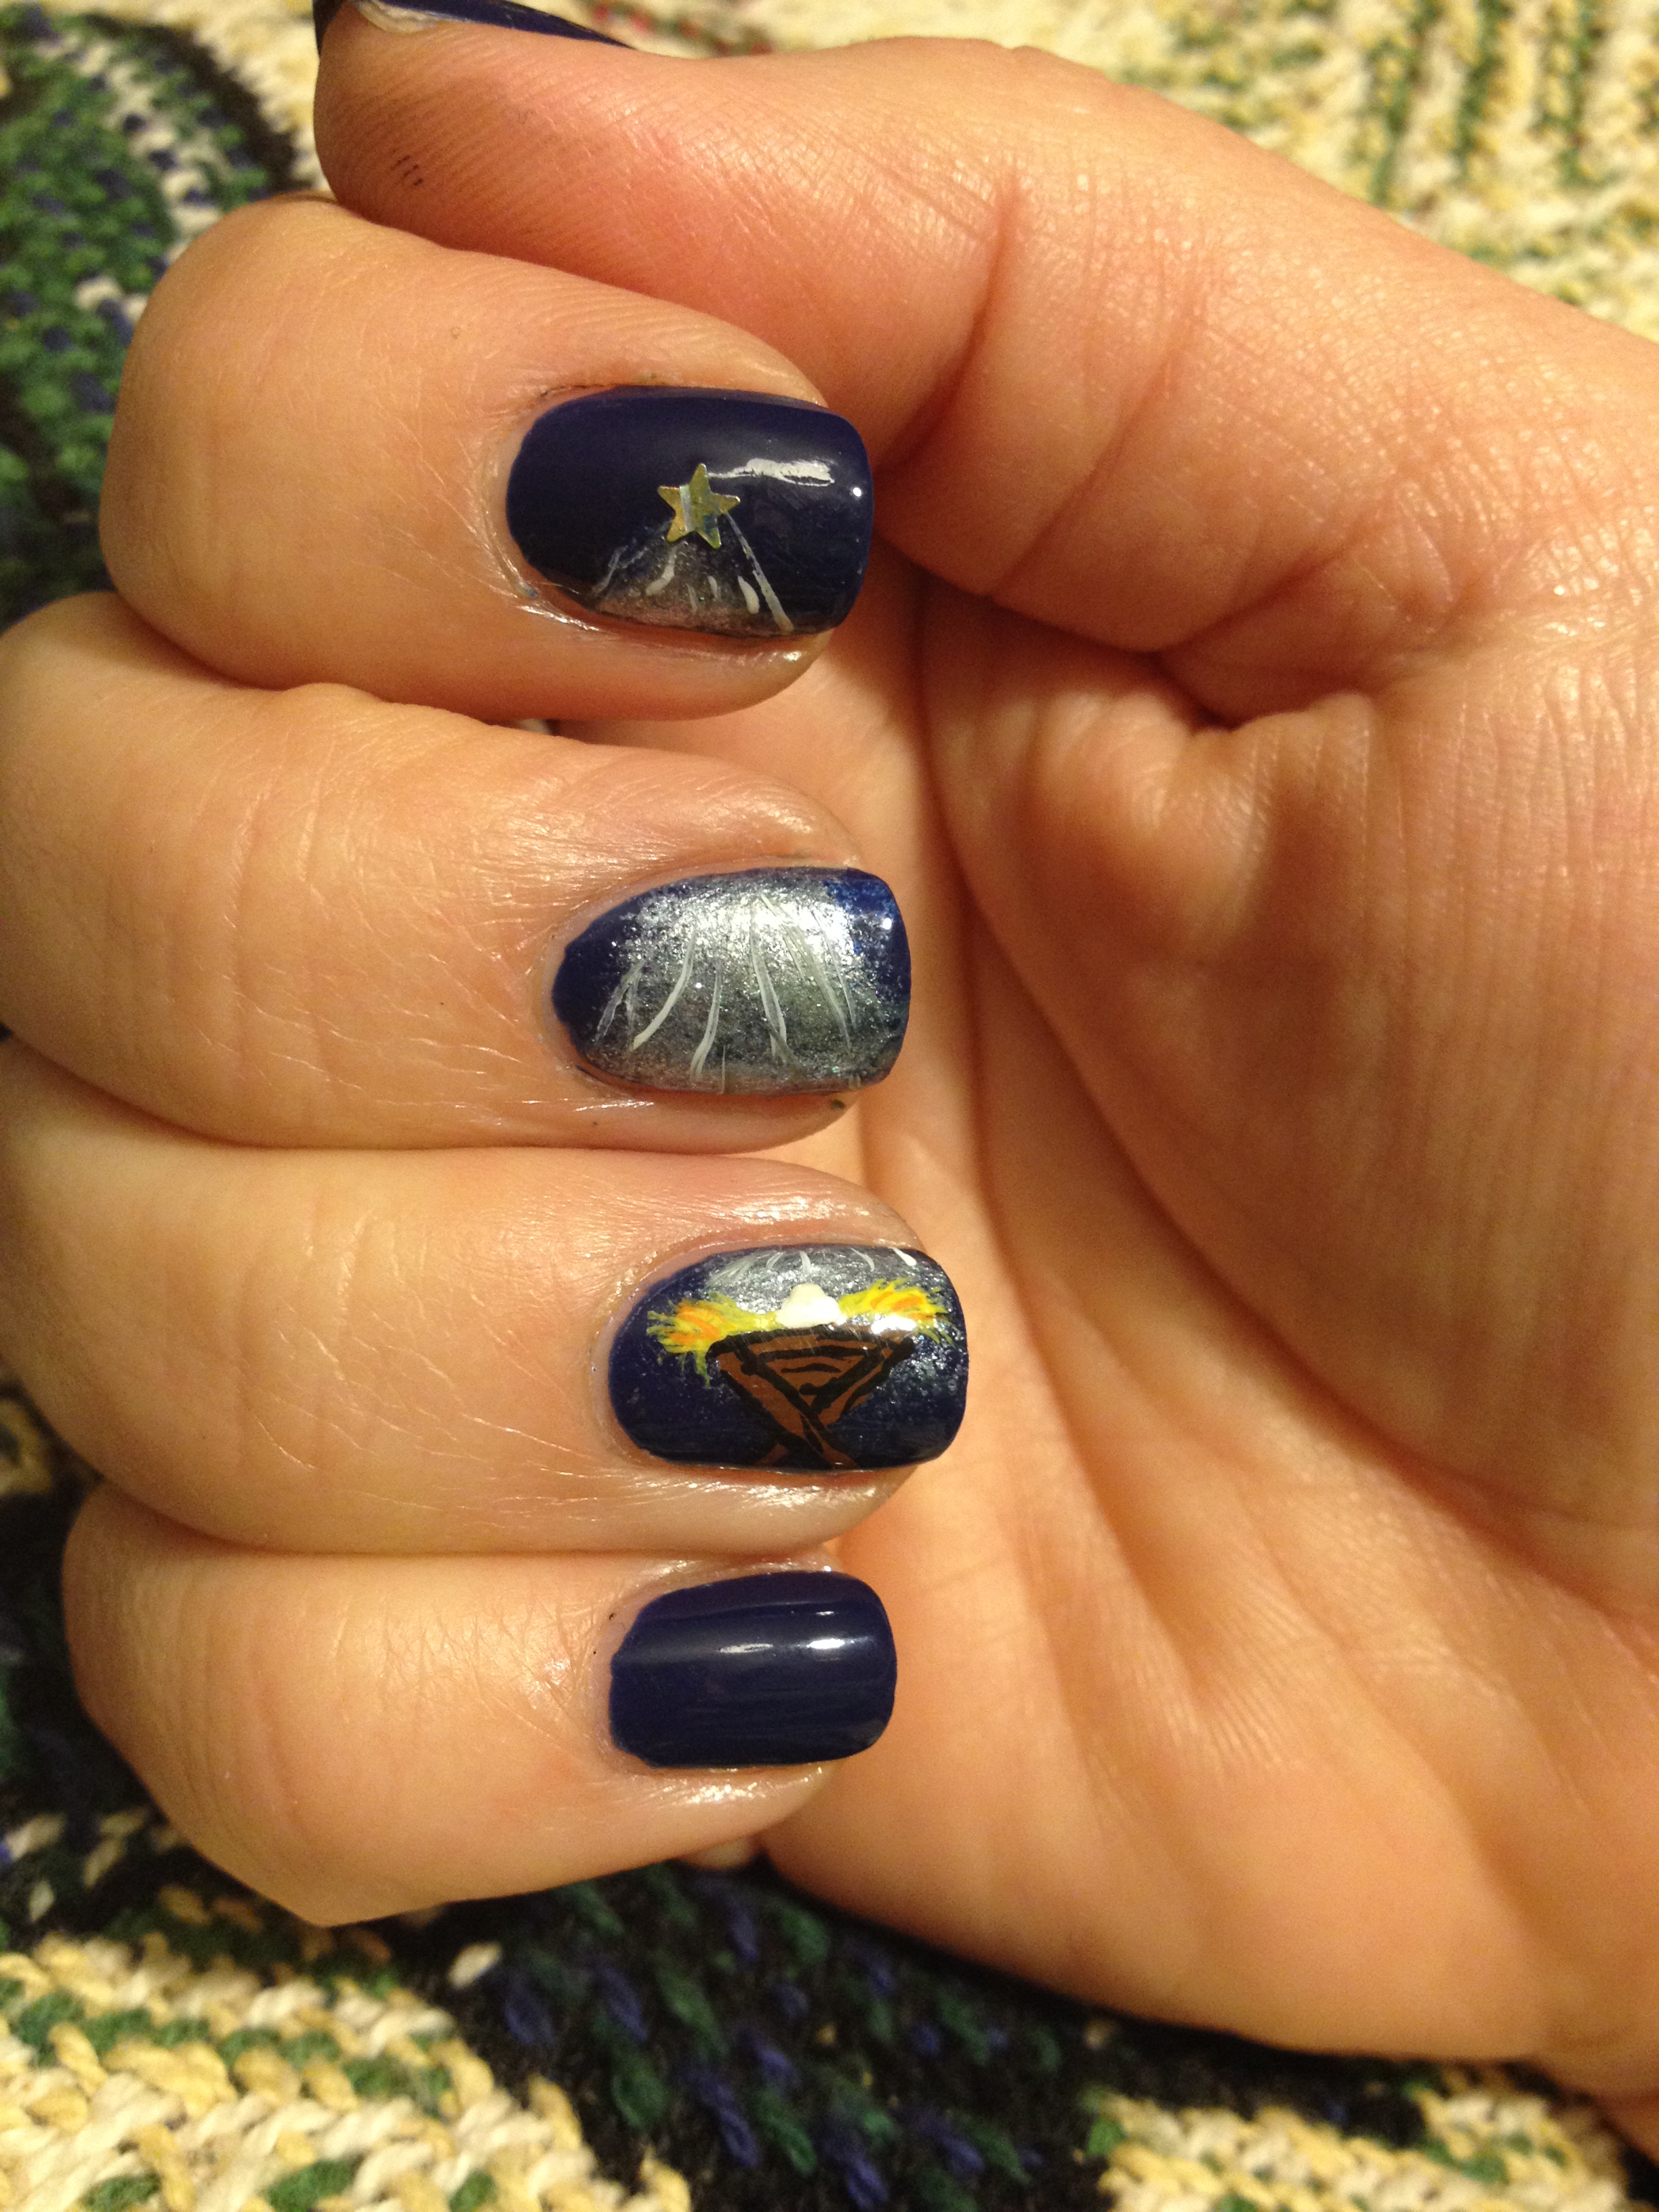
I don’t do a lot of these vertical type manis, but I thought this would be a good opportunity.

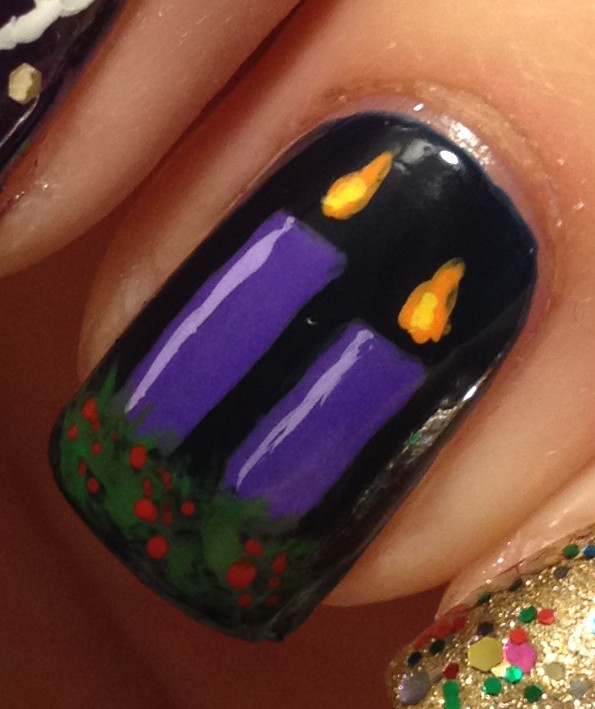
Here’s a close up of my Baby Jesus nail:

IMG_4092

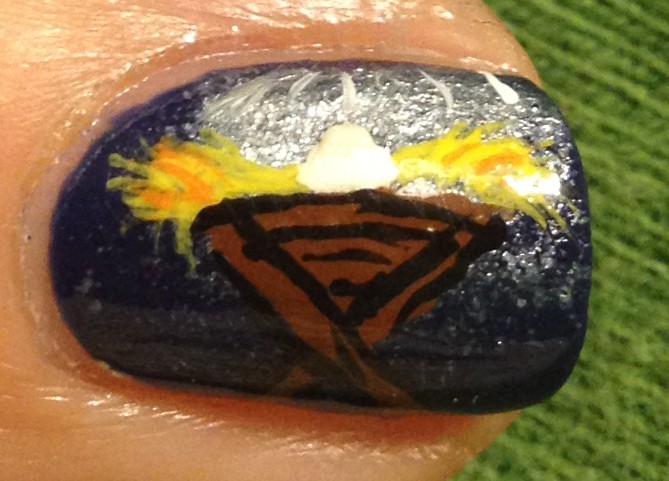
Except for the blue base color and the sparkly background “light”, this was done entirely with craft paint. It always creeps me out a little to see a picture of my nails this close up.

And here’s the reason you should keep practicing your nail art:

IMG_4110

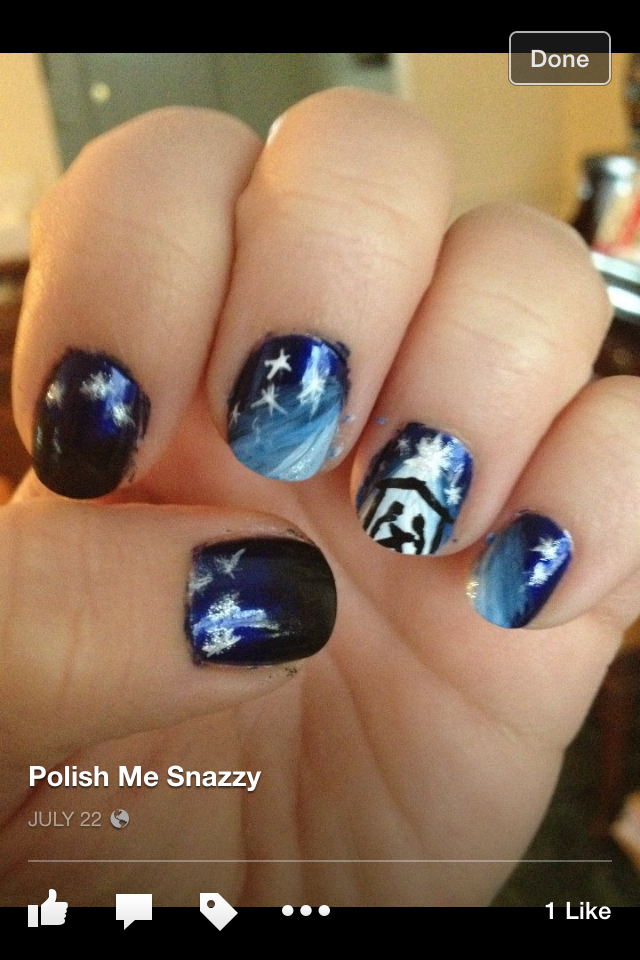
These are the nativity nails that I did last year.  I have since had a TON of practice, learned a few tricks and techniques, and gotten a finer paint brush.  Sometimes progress comes in such tiny steps that it’s sort of hard to see, so looking back a full year to see my improvement is really encouraging.  I’ve still got lots of room for growth!

Thanks for reading!

Candy Cane Water Marble Adventures

I’m finally getting around to my first post this week.  Pathetic, I know, but this time of year gets a little cray-cray.  I’ve seen lots of cute red and white water marble nails on instagram and that inspired me to take another stab at water marbling.  I painted my nails white, and then I made my “bullseye” with alternating rings of red and clear polish.  Here was my first attempt:

IMG_4071IMG_4073

The results were “meh” at best.  My top coat streaked the polish, plus I somehow buggered up my middle finger.  I did, however, like how this finger turned out:

IMG_4074

Hmmm…. the picture looked much clearer before I zoomed in.

Anyway, a few days later I decided to take another stab at it.  This time I opted for a white polish with a frost finish for my base color.  I also decided to create my “bullseye” using red, then clear, then green, then clear, then red…

Here are those results:

IMG_4081

I was much happier with these!  I don’t usually love a frost finish, but I think it’s perfect for this look!  Here’s my favorite nail:

IMG_4082

This one felt like a victory for me!  I wish I had a peppermint scented top coat.  That would be so perfect!  Anyway, thanks for reading!

How I Accidently Un-thermal-ed My Polish

I just recently placed my first order with Polish Me Silly, an indie polish seller on Etsy.  I oped to order from Polish Me Silly because they offer a generous mini size polish of 9 ml in every color of their polish for $650-$7.50.  That’s one ml more than a full sized Julep polish, and let’s be honest:  it’s a rarity to use a a 15 ml bottle of polish.

Alas, half of the order is for my sister for Christmas, so I can’t really swatch those polishes for you, and the other half of the order is for me for Christmas, and the hubby shammed me into putting them away until Christmas.  I did convince him that I should be able to keep out one polish to use before Christmas since it’s so blatantly Christmas-y looking that I wouldn’t want to use it after Christmas.  And this is it:

IMG_4050   It’s called Are U Elfin Kiddin Me?  I’m not a swearer really, but the name cracks me up a little.  The reason I really felt I needed this polish is because it’s a thermal polish.  My hands were ice cold when I did my nails, so this pretty dusty bluish-green is the “cold” color.  Now, from looking at other reviewers pictures, I know this polish is supposed to change to white when it’s warm, and since the part of the nail that extends beyond the nail bed usually is usually the “cold” color even when your hands are warm, I was anticipating having white nails with green tips a lot of the time.

Oddly though, even when I would stick my hands in REALLY hot water, I couldn’t get the polish to change really white.  Here’s  a picture right after I got out of a hot shower:

IMG_4056They are obviously a lighter green, but they are not white.  The only thing I could figures is that somehow either my base or top coat made a difference.  The base coat I used was Orly – Bonder and the top coat was INM – Out the Door.

To make a long-ish story a little shorter, I eventually painted a stripe of the polish on some aluminum foil.  On top of the polish, I painted a little stripe of INM – Out the Door and NYC – Clear, the only two topcoats I had on hand.

Here’s my little swatch after running it under cold water:

IMG_4061

And Here it is after running it under hot water:

IMG_4060

Ah-HAH!  Mystery solved!  You see that spot that stayed green?  Well, that was where I put the INM – Out the Door.  I haven’t really researched the science behind these thermal polishes, but there is something in my Out the Door that un-thermal-ed this particular polish.

By the way, I put this polish on my toes with the same Orly – Bonder base coat and the NYC top coat and they change color just fine.

So, the moral of this story for me is that the next time I get a thermal polish, I’m going to do a test swatch with my base and top coats before I dive in and do all my nails.

Now I’m a little torn.  Should I take off this polish that isn’t even showing any tip wear and redo them with the NYC top coat or should I give it a few days before I redo them?

Oh, and I fully intend to swatch and review the other polishes I got after Christmas, and if my sister is agreeable, I’ll show you the polishes I got for her, too.

Thanks for reading!

Advent Nails

I’m guessing that some of you are super familiar with Advent, while others of you are like, “Wha…?”  Advent, which simply means “arrival” is celebrated by Christians for the four weeks leading up to Christmas, Jesus’ arrival.  (Yeah, we all know that He wasn’t actually born on December 25, but that’s when we celebrate His birth anyway.  Can we please avoid arguments about that?  Thanks.)  Anyway, each of the four weeks has a theme.  Week 1 is hope, week 2 is peace, week 3 is joy, week 4 is love.  Lots of churches, including ours will light one candle the first week, 2 candles the second week, etc., and read scripture and/or sing songs that revolve around the week’s theme.

My hubby and I were asked to light the candles and read the scripture for this past week, so I figured that I should have appropriate nails.  Here they are:

IMG_4016IMG_4023

The gold is Wet n Wild Fergie – Gold Album.  I topped it with a multicolored glitter polish.  The purple on my middle finger is Gap – Pop Star.  I’m pretty sure this polish is more than a decade old.  The background color for the candles is Wet n Wild – Echo Dark that I used most recently for a matte jelly sandwich in this post.

Here’s a close up of my ring finger:

IMG_4016

Everything on this nail, besides Echo Dark is craft paint.

I’m really happy with how these turned out!  They are so festive, but are a nice change of pace from snowmen, reindeer, and Santa.

Thanks for reading!

Sparkly Red Snowman Nails

Let the Christmas manis begin!  Here’s how I kicked things off this year:

IMG_3992

The red and white are nail polish, but all of the details on the snowman are craft paint.  Here’s a better view:

IMG_3994

I was tempted to add stripes to his scarf, but I just didn’t quite trust that I wouldn’t screw up the whole thing.

Oh, and I must tell you about this amazing red polish.

IMG_3986

It’s Broadway Nails – Hot & Sexy.  It’s a red micro glitter in a red jelly base.  When you apply it to your nail, the glitter sort of sinks down so that the surface of the polish is incredibly smooth and shiny.  You know how some micro glitter polishes have a textured finish and if you want them to really be sparkly, you need to add like, four layers of top coat?  Well, this is not like that at all.  The sparkle on this polish has such depth!  I’m really going to have to fight the urge to make this the base of every Christmas mani.

That’s all for now!  Thanks for reading, liking, following and commenting!

November Favorites

Wow, it’s December 1st already!  That means it’s time to talk about November favorites.  Here are the polishes that I was loving last month:

IMG_3980

The first one is Wet n Wild Fergie – Gold Album.  This is just the prettiest, sparkliest gold polish.  I love it more every time I use it!  Here I used it for the leaves in this my Golden Leafy Nails.

IMG_3895

The base for these nails is NYC – Royal Chic.  I am seriously in love with this polish right now.  I know I’ve said this before, but it is just the perfect chocolate brown.  It’s such a rich color.  So dark, but it never looks black.  I also used Royal Chic as the base for these next nails:

IMG_3978

The polish I’m holding is one of my favorites for November also.  It’s Spoiled – Vitamin C.  These polishes are available exclusively at CVS for $1.99.

Vitamin C is pretty sheer on its own.  It takes about 4 coats to be opaque.  It’s almost an orange jelly base with tons of orangey-gold shimmer.  I’ve  layered it over orange polish in the past, but this is the first time I’ve ever tried to layer it over a darker polish.  I was actually really surprised with the results!  I fully expected it to add a bright orange shimmer to my nails, but it it really more of a golden – almost greenish – shimmer.  I always love to discover that  polish I have owned for a while can be worn some new and different way.

Here’s another one of my favorites:

IMG_3940

This is NYC – Precious Peacock.  This was really sheer and took 4 coats to be opaque, but the results were totally worth it!  Such a beautiful shimmery teal polish!  Most of the time this polish looked teal on my nails, but there were times when I felt like it was an emerald green.  Such a perfect color for this time of year!

I was also a huge fan of this polish:

IMG_3902

This is Fresh Paint – Let the Games Begin.  In this picture it looks almost navy, but in real life it’s not quite that dark.  It’s just a really beautiful creamy blue, and it’s opaque in one coat!  I don’t know how much I’ll be wearing this color this month, since I plan to hit the red and green Christmas colors pretty hard, but I’m sure I’ll wear this a bunch in January and February.   By the way, the white crelly polish with the colored matte glitter is Funky Fingers – Jawbreaker.  The formula is just a little too thick and gloppy for me to call it a favorite.

Lastly, I loved this pale blueish-grey polish last month:

IMG_3905IMG_3981

The base for this mani is Fresh Paint – Firefly.  The second picture shows it on the right next to a white polish, just to prove that firefly isn’t actually white.  Firefly’s formula is a little on the thick side, but it is a one coat polish, which is pretty amazing for a light polish!  It’s a great color to us as a base for nail art if you don’t want to use a really stark white.  I’m not sure how this color compares to OPI – My Boyfriend Scales Walls, but I think it might be close.

So, those are my favorites for last month!  I plan to dive head first into Christmas nail art next.  ‘Tis the season!