Lot of Summer Nails

Happy late summer!  Since it my neck of the world it’s still blisteringly hot, it’s not too late to sport cute summer nails!  I really haven’t done anything lately that seemed earth shattering or tutorial worthy, so I thought I would just highlight a bunch of the looks I’ve IMG_8158worn over the past few months.

These are pretty cute, right?  Every summer I end up doing some sort of neon citrus mani.  This is like a pink limeade look or something. This look is so cute with any combination of neon pink, orange, green, or yellow.  The trickiest part is painting the little white lines on the citrus.  I use my tiniest brush and acrylic paint for that part.  These nails just make me happy.

IMG_7674 I really liked these nails too.  The base is Funky Fingers – Mattely in Luv and the polish I used for stamping was Funky Fingers – Sandy Toes.  Sandy Toes is a really interesting color.  In the bottle it looks like a bright, but not neon red polish that leans a little pink.  When you us it for stamping, however, it turns out to be a neon coral color.  And this polish, even in the bottle glows under my black light, so I guess it is neon, even though it doesn’t actually look neon.  In my head, that’s the test if something is neon or not:  whether it glows under a black light.

These nails are pretty loud, right?   I’m pretty sure that I had some jumpers or scrunchies IMG_8015or something that looked like this in the late ’80s. I used the homemade decal method to do these, which turned out to be an error in judgement, so they look a little  messy.  If I do these again, I would paint my nails white and add a top coat.  Then I would use painters tape to block of the section of the nail that I wanted to be neon.  Next I would stamp the black pattern over the nail and quickly peel the painter’s tape off.  Then I would add the neon polish.

I went through a little spell this summer where I was into reverse stamping.  It’s pretty IMG_7941time- consuming, so I pretty much just stuck to doing accent nails. The effect is pretty cute, though!  This also gave me a chance to use IMG_7966some of my colored glitter polishes that don’t always get enough love. Ooo, I’m looking at that pretty  deep yellow polish and I think I might need to pull that one out again before summer is over.  I’ve got a fair complexion (sounds so much nicer than pale) and it’s hard for me to pull off yellow clothing.  Nail polish is a great way to wear a color that is a little trickier for you to pull off..  IMG_8999

What’s more summery than beach nails?  For these, I started with a coat of white polish and then I did a blue-to-white-to-khaki gradient with a damp makeup sponge.  To get the white swirls,  I used the same technique that I wrote about in detail here.  Really easy and such a cool effect!  These look so much more complicated than they actually are.   IMG_8163

I also wore some cute dry brush nails.  I enjoy dry brushing so much!  It’s seriously the easiest nail art ever.  It can barely be called art, it’s that easy.  Neon colors over a white base.  So cute, so easy, so summery.

IMG_8228And these nails…. I’m not really sure what I was going for here.  I think I saw a picture on pinterest.  They can’t all be winners, am I right?  The neon glitter polish on my middle finger Bitzy – Sweetie Pie.  Bitzy is a new makeup line that is exclusive to Sally Beauty Supply.  They are only $1.59 per bottle, and they have lots of fun polishes.  They are a great way to expand your collection without breaking the bank.  FullSizeRender

These are fun, right?  I have  a neon red polish that is just so darn bright that it actually makes me self-conscious to wear it.  I love it in small doses, though.  This was the perfect way to get just a little pop of neon into an otherwise classy manicure.  It’s a bit tricky to paint the underside of your nails, especially where your nail is connected to your finger, but I loved the effect!  I think there are so many fun combinations that you could do.  In October I might try deep purple nails with a neon orange underside.

These nails are kind of classy, I think.  This is just some gold stamping over purple nails.  Nothing fancy but they’re just pretty.   I’ve IMG_9055been doing a lot of nail stamping lately.  I realize that it’s sort of the lazy person’s nail art, but it’s just so fast and easy!  I still love doing the IMG_9070occasional freehand design, but right now, I’m definitely in a stamping groove.

Here’s another easy look thanks to nail stamping.  This is just a metallic teal polish stamped over a nude polish.  Metalic polishes tend to stamp really well.

IMG_8976And here’s one final mani.  If you’re not into freehand designs, and you don’t have any nail stamping stuff, you can always get a really fun look with a glitter topper.  Bitzy has a lot of really fun glitter toppers and so does Funky Fingers at Five Below.  (Yes, you are allowed to shop in there even if you’re over the age of 14.)  I think polish combinations like this look really fun with a matte top coat.

So those are the nails I’ve been wearing for the past few months.  If you have any questions about any of these, please ask!  Thanks so much for reading!

St Patrick’s Day Nails

Happy St Paddy’s Day!  In honor of Saint Patrick, the 5 century Christian missionary who devoted his life to sharing his faith with the people of Ireland, I’ve painted my nails with rainbows and shamrocks and pots of gold.  Makes sense.

IMG_7206The base color on my first and last finger is Barry M – Black Pistachio.  It almost looks black on the nail, but in the bottle you can definitely tell it’s green.   I picked this polish up on by trip to London.  I’m guessing it’s possible to order this one online somewhere…

These nails are topped with Sinful Colors – Feeling Lucky?  This is such an awesome glitter topper and I love this combo!

My Middle finger has a base of Wet n Wild Fergie – Gold Album.  (By the way, I think the Fergie polishes are being discontinued.  I LOVE Gold Album and Going Platinum so I may soon be on the hunt for backups of these two.) I then used a toothpick to add some larger loose gold glitter for a little extra bling.

Except for the light green french tip and the gold glitter in the pot of gold, everything on IMG_7199my ring finger is craft paint. I did the green tip first, then I added the rainbow.  I used my finest brush and started with the red strip, paining it almost the whole way down to the “grass”.  Next I did the orange, then yellow,…  after that I added the black pot where the rainbow ended, then added the grey highlights to the pot.  Next I added the gold glitter, and then finally the darker green to give the grass a little texture.
Really, this was not too tough and I’m so happy with how it turned out!

Did you do anything exciting to your nails for St Paddy’s?  Let me know in the comments!


Lots of Winter Nails

Wow, I’ve been a slacker of a blogger.  Shame on me.  I do have a legitimate excuse, though.  For the past few months we’ve been really involved with an elderly family member who has been dealing with some health issues and major life changes.  There are some seasons of life that are just a little extra stressful and busy and sometimes you have to shuffle your priorities around.  For me, that meant taking a little break from blogging.  I think life will be returning to “normal”, so I should be able to get back to posting more regularly.  I know, you were all so worried.

While I haven’t had the time to write about my nails, I have still been doing my nails.  I thought I would just do one big post to sort of catch you up on some of the looks I’ve sported over the past few months.  Here we go..403

I kicked the year of with these sparkly guys!  I just can never get enough sparkle.  The sparklier, the better.  I know I’m really getting up there in years, and I suspect some people feel that super sparkly nails are not age appropriate for me anymore, but I just love glitter so much.  So pretty.  So sparkly.

Speaking of sparkly nails…

IMG_6867Let me just get all of the sparkly nails out of the way.  I think I like to wear sparkly nails over the winter months because in the warmer months, I tend to go for cream formulas in neon and pastel colors.  Metallic and glitter nails just seem too “heavy” for warm months.  Do you know what I mean?  Plus, snow is sparkly, so there’s that connection.

I did these glitter placement nails for a Weekly Nail Art Challenge (#wnac2016) on instagram.  The theme for the month of January was Glitz and Glam, and one of the weekly prompts was Diamonds.  Instead of opting for a design like a diamond gemstone,  I arranged some glitter in the shape of a IMG_7046diamond.

Here are some other really sparkly nails I wore recently.  The darker base polish is Rimmel London – Diamond Dust, and the ring finger is Funky Fingers – Sand & Stilettos.  That wasn’t sparkly enough, so I topped everything with a holographic glitter topper, Nicole by OPI – Party Bus.IMG_7051

I had the foresight with these to use a peel off base coat, otherwise it would have taken about two gallons of acetone to get this off my nails.

IMG_7039

Here’s a new polish that I picked up.  This is Revlon – Scandalous.  The top picture shows it with a matte top coat, the bottom shows a glossy top coat.  (Sometimes it’s a serious struggle deciding on what kind of top coat to use. )  I think polishes like this are perfect for this time of year.

IMG_6975   And here is the final set of really sparkly nails.  This polish is from China Glaze’s newest collection called House of Color.  This polish is called Moonlight the Night and oh my word, it is amazing.  When you look at it in the bottle, it kind of looks like it’s iridescent glitter in a blue base, but it’s not.  The base is actually clear, but there are translucent purple and blue glitter along with iridescent glitter.  When you put it over white, the iridescent glitter shows up as just a pale peach color.  When you layer it over black, the blue and purple glitter aren’t really visible, but the iridescent glitter shows up as bright orange and green and teal.  It’s wild!  I try to refrain from telling people that they NEED to pick up a specific polish, but you won’t be sorry if you pick this one up.

Here’s another new polish I picked up.  This is Sinful Colors – Rose Dust. I think this is just IMG_6875the most beautiful color, and I think it would work for pretty much all skin tones. This color just makes me feel pretty.

Months and months ago, I picked up some nail foils on clearance at Rite Aid.  Then they just sat around collecting dust.  One of the prompts in January for IMG_6904#wnac2016 was foil, so this was the perfect opportunity for me to finally give them a try.   I really liked how they turned out.  Perfect for wintry weather and SO SHINY!  By the way, if you’d like more information on how I did these or any other nails in this post, just let me know, and I’ll see what I can do.412


I also took another stab at water marbling.  Yep, it’s still a pain in the arse.  I made this picture small on purpose, because the less you can see it, the better it looks.  Trust me.

IMG_6985Now these gradient heart nails were some of my favorite nails that I’ve done in awhile.  They are super cute, right?!?  I just sponged on a gradient with a bright pink, a purple-ish pink, and a bright purple and then topped it with Sinful Colors – Love Sprinkles, a limited edition polish that I picked up last Valentine’s day.  For my accent nail, I painted it white and then applied a quick dry top coat.  Then I cut a little heart out of painters tape and stuck it on my nail and then did the gradient over the tape.  Then I peeled the tape off and topped it with 428Love Sprinkles.  I sort of felt like these nails were 20 years too young for me, but I loved them anyway.

I also did these “quilted” nails.  I didn’t love how they turned out, but they can’t all be winners.  I did take pictures each step of the way when I did them, so if you want to see a tutorial on these, let me know.  If you don’t want to see a tutorial, I’m not offended.  I know they’re not the greatest.

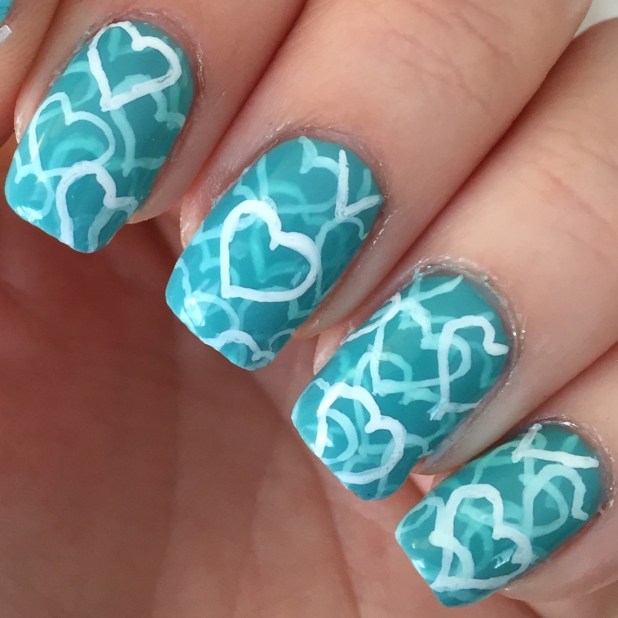
And here are the nails that I’m actually IMG_7055currently wearing.  This is a pond mani using Wet n Wild – Gyp-Sea Green, a limited edition polish from a few years ago.  It’s a really sheer jelly polish, so I actually started with a base of Wet n Wild Megalast – I Need a Refresh-Mint.  (I have the old formula which is a dead on dupe for China Glaze – For Audrey.)  Then I used white craft paint to paint a few hearts on each nail.  Then I added a coat of Gyp-Sea Green followed by a few more hearts, followed by another coat of Gyp-Sea Green, followed by more hearts,…  I lost track of how many 414layers I actually did.  I just kept going until I felt like they looked like I wanted them to look.  They are pretty cute, I think.

And I finally decided to dive into the world of nail stamping.  I have had a cheap stamper and a few really dinky stamping plates on hand for 3 or 4 years, but I just finally decided to use an Amazon gift card that I got for Christmas to get myself some reall stuff.  I got a Winstonia marshmallow (sticky) stamper and eight Born Pretty Store stamping IMG_6930plates.  There’s been a definite learning curve to the whole thing, but I’m getting better!  I did the quilted nails the day after I got my stamping stuff, and you can see my so-so attempt at stamping on my index and pinky fingers.

Here are some plaid nails I did using my stamping stuff.  You can see that my pinky is IMG_6970sort of wonky and crooked, but hey, I’m still learning.

I have always thought that stamping was sort of nail art for cheaters, but I’ve sort of changed my mind.  I still have way more respect for awesome freehand designs, but lets face it, we can’t all be Jaunty Juli .  (She’s awesome, by the way.)  Stamping lets you get really intricate designs on your nails reallyIMG_6841 quickly, while still allowing you to feel creative.

These French tip nails were my first attempt at reverse stamping. These turned out not too bad, but I definitely want to get better at this technique.IMG_6958  This was one of those “they looked better in my head” situations.

And the final set of nails that I’ll throw at you in this post are these newsprint nails.  I actually started with a white base and used a Sinful Colors – Rose Dust to stamp a delicate design on my nails.  Then when they were dry, I dipped pieces of news paper in rubbing alcohol and pressed them onto my  nail for about 30 seconds.  I opted for a matte top coat with these, because that just seemed appropriate for IMG_7014newsprint.  I really liked how these turned out.

Again, if you want me to go into more detail about how I did any of these nails, please let me know, and I’ll be happy to provide a tutorial.

If you’ve made it this far, thank you for reading!  As my life gets back to normal, I fully anticipate getting back to a more regular blogging schedule.  Have a blessed weekend, everyone!


Striped Irridescent Nails

Within the last week, I’ve seen at least four nail bloggers and/or youtubers talking about this fun new trend in nails art: shattered glass nails.  They all say that this trend started in South Korea, and if everyone says it, it must be true.  Like Wikipedia.  If it’s on Wikipedia, it must be true.  So I’m just going to say what everyone else is saying.  This trend was stared in South Korea.

For the shattered glass effect, you pretty much take tiny triangles of iridescent tissue paper, and and apply them to your nails IMG_6456sort of randomly.  It looks really cool, but I wanted to try something a little bit different, since everyone has been doing the little triangles thing.  I opted for stripes.  Here’s how I got this look.

The first thing I needed to do was get me some iridescent tissue paper.  I checked around my little town first, but I had no luck, so I needed to head down the road a few miles to either a craft store or a party supply store.  Even thought I IMG_6430had a coupon for Michael’s, I opted to go to Party City.  In Party City, I can pretty much march right it, pick up the thing I need, pay for it, and get out.  Michael’s will suck me in for two hours, and then I end up spending $150 on enough supplies to make a bar of soap and crochet a scarf for every single person I know.  Plus maybe I want to take up beading and oil painting… Anyway, at Party City I got the smallest pack of iridescent tissue paper they had and it cost me $2.99.  Make sure you actually get the iridescent stuff, and not just the clear stuff.  It should shimmer pink and green.  By the way, they call it iridescent tissue paper, but it’s not actually IMG_6431paper.  It’s a really thin plastic type stuff.  And I’m getting tired of typing out “iridescent tissue paper” so from now on, I’m just going to refer to it as ITP.

So, I got my ITP home and I cut off a little triangle that was about 2″ x 3″.  In the end, I didn’t need nearly that much.  I cut it into little thin strips, and then cut the strips into lengths that were about a half an inch, give or take.  IMG_6435

I then painted my nails this dark berry color, Jordana – Hypnotizing.  This particular polish dries darker than it appears in the bottle. I sort of liked the color in the bottle a little better, but it’s still super pretty.  Really, any dark color will work for this look.  A dark blue or green would look great, and black would work just fine, too.  If you use a lighter polish, you’ll get a more subtle effect.  ITP tends to reflect gold/green/blue when it’s over dark colors.  Over light colors it reflects pink/gold.

IMG_6437While my purple polish was drying, I took one of my smallest dotting tools and dipped the end in wax from a candle I was burning.  When the wax cools, it remains just tacky enough to pick up IMG_6438the pieces of ITP.  This is actually a great little trick to pick up any little gems or glitter that you are trying to place on your nail.  It gives you a lot of control, and in the end, the wax just wipes off the dotting tool.  A toothpick dipped in wax would work just fine, too.

When my polish was pretty much dry, I applied a thick-ish coat of clear polish to one of my fingers.  (I wouldn’t recommend using a quick dry top coat for this step.  I think it would dry to quickly and you’d end up not really being able to get the strips of ITP to stick.)  I then picked up a strip of ITP with my waxy dotting tool and placed it in the IMG_6440center of my nail.  I then added a strip on each side. I pressed each strip down kind of firmly, but not too firmly.  I then moved on to the next finger.  Polish, strip, strip, strip.  Next finger: polish, strip, strip, strip… You get the pattern, right?

By the time I was done with my 10th finger, the first finger I did was pretty much dry.  I realized that my waxy dotting was leaving little wax smudges on the strips of ITP.  (See the picture on the left.)  Because IMG_6441the clear polish was pretty much dry at this point, I REALLY gently took a tissue and wiped down each nail.  This took care of the wax smudges.  Just be careful.  You don’t want to mess up your work thus far!  (See the picture on the right.)

IMG_6449I let them dry for a while, since I had so many coats of polish on at this point, but I eventually applied two layers of quick dry top coat.  Even after both layers of top coat dried completely, I can still feel the ridges of the ITP strips, so I think I might be adding a third layer of top coat.

I’ve been out and about a little bit, and I’ve gotten so many comments on these nails!  Seriously, they are quite show stopping!  I’ve got a few more ideas I’d like to try out using ITP, and I’ll make sure I write about it when I do.  Thanks for reading!  Let me know if you try this look!

Dry Brush Nails

Here are my current nails:

IMG_6388Pretty cute, right?  I’ve only done dry brush nails a few times, but every time I do, I’m reminded of how easy they are!  And they look really cool!  I’ve acquired a good pile of compliments on these nails so far, and nobody really believes me when I say these are super easy, so I figured I’d provide a little quicky tutorial on these.  Disclaimer: I totally didn’t invent this technique.  It’s been around for a few years now, and I really don’t have any idea who the originator is.  But I’m definitely sure that it wasn’t me.

First you start with your base coat and then a light, neutral polish.  This time I went with Wet n Wild – Yo Soy.   IMG_6386Seriously, this is such a pretty nude color and it’s only $.99!  I’m not sure how it works with other skin tones, but with my pale pinkish skin, it works really well.  This picture was taken without a top coat, so you can really see how shiny it is!  This is two coats, and it’s totally opaque.  For dry brushing, you can never go wrong with a white base either.

IMG_6393Now, pick a few contrasting colors.  I opted for Jordana – Hypnotizing, China Glaze – Budding Romance, and Fresh Paint – Let the Games Begin.  Budding Romance is the most sheer out of these three polishes, so I decided to use it last.  I decided to start with Let the Games Begin, the blue.

Shake (or better yet, roll) your polish like normal, but here’s the important part: after you open your bottle, wipe as much polish as possible off on the neck of the IMG_6399bottle.  Like, six times.  Just keep wiping.  You just want the littlest bit of residual polish on the brush.  After you’ve wiped all of the excess polish off of the brush, pick a direction, IMG_6387and drag the brush over your nail.   I decided to mix it up, so I dragged the brush down my thumb, middle finger and pinky vertically, and across my other two fingers horizontally.

I then did the exact same thing with the purple polish, and then with the green polish, kind of filling in the empty spaces.  Although I intended to take pictures of each step of this manicure, I didn’t.  Fail.  See, I’m usually watching something important on TV (like Sister Wives or Dance Moms) while I’m doing my nails, so I tend to forget to take pictures of each step.  I just crank along and then I’m like, “Oh dang, I’m done… And I only have 2 pictures.”

So anyway, after adding the purple and green polish, I finished off with a matte top coat.  I don’t know why, but I feel like dry IMG_6401brush nails look the best with a matte top coat.

Oh, cautionary tale time; there’s really only one way you can screw up dry brush nails, and that is by not wiping the brush off well enough.  Exhibit A is here on the right.  This is my ring finger on my right hand.  See that big blob of blue?  That’s where I didn’t wipe the brush off well enough.   Moral of the story: wipe the brush off.  A lot.

Thanks for reading!  I hope this inspires you to try this technique.  Please let me know if you have any questions.  Until next time, happy polishing!


Monster of Frankenstein Nails

You know how facebook likes to show you what you posted several years ago on this same day?  Well, a few days ago, this atrocity popped up on my timeline: IMG_6309I made the image nice and big so that you can see just how terrible it is.  My black lines are terrible, apparently I’d never heard about clean up, and what’s with the grotesque hand pose?  I felt like I needed to recreate this look, only better.

Here’s what I did:

IMG_6334I started with a base coat, of course.  I’ve been using Rejuvacote for…. I’m not really sure.  Six month, maybe?  This is still my first bottle and I still have about half of it left.  It had really helped the condition of my nails.  They are just so much stronger and rarely peel anymore.  It’s about $10, but that’s not bad at all considering how long a bottle lasts.

IMG_6335Next I applied a coat of a sheer nude colored polish.  I think this is some old Mary Kay stuff that I’ve had for years and years.  I don’t even remember buying it, so I’m not really sure how I ended up with it.  I used this just to tone down the yellowness of my nails, but really, you can just skip this step if you feel like it.

I then applied some liquid latex around the sides of my nails.  This is just to make clean up easier in the end. The stuff I use IMG_6336is actually hair glue and I got it for super cheap ($2 maybe) at Sally Beauty Supply.  You could also use school glue instead.  Whatever you use, just make sure you let it dry before you move on.  Oh, here’s something that nobody ever mentions about liquid latex: it sticks to itself.  So, if you have the sides of your fingers covered with latex (like I do in this picture), you have to be really careful that your fingers don’t touch each other.  If the latex on one finger touches the latex on its neighboring finger, it will just stick together an pull right off one finger.

IMG_6337Next, I took orange, purple, and green polishes, and using the brushes in the bottles, I did two swipes on each nail to make a “V” shape.  I started about halfway down the nail and just sort of dragged the brush, aiming for the opposing corner.  If your lines aren’t perfectly straight, it’s not a big IMG_6339deal, because you’re going to go over them with black anyway.

I then went over each nail with a second coat to make sure that it was opaque.  Oh, and I painted my ring finger solid green.  It was at this point that I realized that I wouldn’t have had to put a coat of the nude polish on my ring finger or put latex on that finger either.  Oh well.  Stuff like that happens when you watch TV while you do your nails.

IMG_6340I then peeled off the latex.  Use tweezers or an orange stick or something to remove the latex.  Obviously, if you use your nails, you’re just going to mess stuff up.

As you can see, most of the extra polish came off with the latex, leaving IMG_6341just a little bit to clean up.  I then used my little $1 elf concealer brush dipped in acetone to remove the little bit of remaining polish around my nails.  Seriously, this is the best little brush.  And it’s $1.  Who doesn’t love good quality things that are also cheap?  These little brushes last for a pretty long time, too, and when they finally do wear out, hey, they only cost $1 to replace.  I usually get about 6 months use out of one of these brushes, and that’s doing my nails 2-3 times a week.

Okay, at this point, I got a little excited and sort of forgot to take pictures of each little step as I was doing it.  I’ll talk you through it.

I used black acrylic (or craft) paint and a thin brush that I got at Michael’s to line the “Vs” on my nails. For my thumb, I IMG_6342started on the left side of my nail and painted a thin line to the point of the “V”.  Then I started on the right side of my thumbnail and painted a thin line that I extended the whole way to the corner of my nail.

I then did the same thing on each finger (except for my ring finger), mirroring the design on each finger, just to keep it interesting looking.  lastly, I went back and added the “stitches”.   As you can see, I sort of added the stitches in pairs.

On my ring finger, started by making two black circles with my largest dotting tool right in the middle of my finger for the eyes.  Using my little brush, I added hair, a mouth (with stitches), and eyebrows.  I then took white paint on the same large dotting tool and added the whites of the eyes, being careful not to cover the entire black circle underneath it.  Then I used a little dotting tool with black paint to add the pupils of the eyes.  I pretty much did that IMG_6343immediately after I did the white dots, so the white paint was still wet.  Then I let it dry for a while.

Because they eyes had so many layers of paint, they definitely sort of stuck out.  After the eyes were dry to the touch, but not completely dried through (maybe 10 minutes), I carefully pressed the eyes down with my finger.  Here’s a sideways shot of my finger after I smooshed the eyes down.  Hopefully you can tell how I sort of flattened them.

IMG_6352I let them dry for a while longer before I added the top coat.  I’d made the mistake in the past of not letting the acrylic paint dry completely before applying top coat, and it really shortens the lifespan of your manicure.

So here’s the final look!  Much better than two years ago!

In case you’re wondering, the polishes I used are NYC – High Line IMG_6345Green, Sally Girl – Mango, and Ulta – Tinsel Town.

Well, that’s it!  you’ve got one more day to paint your nails for Halloween, so get crackin’!  Have a fun, safe, and smart holiday!  Don’t do anything stupid!

Thanks for reading!

Awesome Argyle Nails

It’s been way to long since I posted a good old fashioned tutorial, so today I’ll show you how I got these cute nails:

IMG_4932I was prompted to do these nails for the Weekly Nai Art Challenge (#wnac2015) on instagram.   This month’s theme is Paterns and this week’s prompt was coral.  It’s been a long time since I’ve done argyle nails, so this seemed like the perfect opportunity!  Here’s how to get this look…IMG_4917

1.  Start by picking three colors.  I opted for white, a neon coral (Fresh Paint – Guava), and a darker orangey-pink (Wet n Wild – Dreamy Poppy).  Paint alternating nails with the two lightest colors.   It’s easier to start with a base of lighter colors, because we’re going to layer the darker colors over top.  Obviously, It’s easier to cover a lighter color with a darker color than the other way around.  Let them dry really well.

2.  Take a 6 inch  (15 cm) strip of painter’s tape and stick it to a piece of

IMG_4918wax paper.  I cut my painter’s tape in half long-ways and then snipped it into little half an inch (8 mm) squares.

3.  Using tweezers, peel your little squares of painter’s tape off of your wax  paperIMG_4923 and stick them onto your nails.  Tweezers are helpful because they keep you from messing up your wet nails by picking off the tape with your nails, and it also helps to keep the tape from losing its stickiness by being touched by your fingers too IMG_4924much.

Take your time with this step.  You will want to put the corners of the tape in the middle of your nails.  While you’re sticking the tape on your nails, make sure that you are making nice right angles with the tape.  If your tape is nice and straight, you should have the illusion of two straight lines crossing on your nail like an “X”.

4.  Using the tweezers or a cuticle pusher, make sure the edges of the tape IMG_4925are pressed down well on your nails.  You don’t want any polish leaking underneath.

5.  Doing one nails at a time, take the polish that is a shade darker than your base color, and paint it over the exposed parts of your nail. Us a quasi thick coat of polish and make sure you have nice, even coverage.

IMG_4926 6.  Using the tweezers, peel off the tape.  Make sure you grab the part of the tape that is not covered in polish.  Look how nice and pretty and crisp the lines are!

The reason we do this step one nail at a time is because we don’t want the polish to start drying before we have a chance to peel the tape off.   IMG_4929

7.  After you’ve done this to all of your nails, it’s time for the step that makes them really look like argyle!  TakeIMG_4930 a really little brush and dip it in whatever of the three colors is missing from your nail.  Then paint four thin lines in a diamond shape on your nail.  You want the lines to parallel the “X” that is in the middle of your nail.  It’s okay if these lines cross each other at your cuticle, nail tip, and the sides of your nail, because that gives the illusion of the pattern continuing off your nail.   This is the step that requires a bit of a steady hand, but don’t stress.  Just relax and let the polish flow!

10.  Let your nails dry for a bit, and then add your top coat.  I opted for a glossy quick dry top coat, but this would look really good with a matte top coat, too.  Kind of like fabric.    IMG_4931If you give these a try, please let me know!  Tag me on facebook or instagram!  Thanks for reading, and happy argyle nails to you!

April Favorites

IMG_4827So, before it’s ancient history, here are my April Favorites.  Let’s start on the left….

First up we have Bonita – Made to Envy.  It had been ages since I had purchased a Bonita Polish.  I used to buy them on IMG_4676occasion at Francesca’s when they used to carry them.  That was maybe 4 or 5 years ago.  Within the past year or so, I’ve noticed little Bonita displays in Kmart and Rite Aid.  IMG_3940I’ve seen at least 3 different bottle shapes, which is sort of unique for a nail polish line.  Anyway, I had been eying Made to Envy for a few months.  I’m a real sucker for teal polishes.  I have a good half a dozen shimmery teal polishes, so I had been telling myself that I didn’t need this one, too.  I can’t remember exactly how or why or when I finally caved and bought this, but am I glad I did!  the thing that makes it unique to my collections is that it is a one-coater!  And the color is just so rich and beautiful!  And it’s only $2.49, so I’d definitely recommend picking this baby up, if you can.

Just for comparison, here on the left is NYC – Precious Peacock.  Although it looks much more green in this picture than Made to Envy, they really are super close in color in real life.  This is four coats of Precious Peacock.  Four coats.  Ain’t nobody got time for that.

Back to Made to Envy… It’s just so pretty. Sometimes I just hold this polish and stare at it lovingly.   P.S.  My hubby really likes this one.

Next we have NYC Prospect Park Bloom.  After wearing a lot of bright polishes, I was craving something neutral.  This one was in my untried stash. IMG_4728  This polish is pretty sheer, so I think this took 3 coats.  I just love how shiny it is and how soft the color is!  Neutral colors like this are really forgiving if your application isn’t perfect.  Heck, there could be all sorts of polish gunked on my cuticles, but you wouldn’t even be able to tell.  The best thing about colors like this is you really can’t tell when they start to wear or chip a little.   I’m not sure how this polish would look on someone with darker or more olive-toned skin, but if you are a bit on the pasty white side like me, this will work well for you.

Next is Fresh Paint – Honeydew.  Really, I’m kind of embarrassed to even put this polish in my favorites.   This was in both my February and March favorites.  When I’m looking to pick out my Monthly Favorites, I don’t really look at (or remember) what polishes I picked the month before.  I just look back through my instagram account for the past month and pick out the polishes that I really liked and/or used a lot.   Apparently, I’ve been fixated on this polish for at least 3 months.  I specifically picked it as an April favorite because I used it for both of my Easter manis.  This polish is one of those neon pastel type colors that is all the rage these days.  I realize that this polish is exclusive to Five Below, which is not really convenient for lots of you.  Sorry about that.

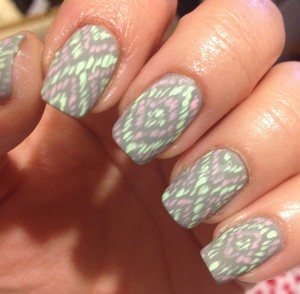
Next up is NYC – Sidewalkers.  This is just a plain old grey polish.  (I like “grey” better than “gray”.  I feel like the spelling with an “e” just looks nicer.)IMG_4688   Anyway, I went through a phase 3 or 4 years ago where I wore this polish all the time, but in recent months, it’s just been sitting on my shelf, unloved.  I pulled it out to use as a base for my pastel ikat nails for a nail art challenge (#wnac2015) on instagram.   It made me remember how much I like this polish!  It’s such a pretty cool-toned polish that works well for pale people.  I’m sorry if I’m not much  help to you darker skinned people.  Maybe I should just do a post on the colors that look awful on my, assuming that would mean they would look good on darker people.  Not sure if that’s solid logic or not.  P.S.  My hubby does not like this color.

My final polish China Glaze – Sun of a Peach.  That name just cracks me up!  I used this polishIMG_4667 in one of my Easter manicures, and it was just so bright and pretty!  In general, I can’t really pull of orange, but this shade is one shade in the orange family that I can actually wear pretty well on my nails.  I had been wanting this polish for a while, and I found a little mini bottle at Sally Beauty Supply for like, $1.29 or something, so I couldn’t really turn that down.  Mini bottles are just the best, aren’t they?  I mean, they don’t cost as much as a full size bottle, they don’t take up much room on my nail rack, and really, it’s a rarity that I finish a full size bottle of nail polish anyway.

So, that’s that.  Thanks for reading!  Seriously, I appreciate all of your comments and “likes”.

Fun With Painter’s Tape

We are in the process of redoing our living room.  Right now we’re painting.  I was actually supposed to be painting when I came up with these nails.

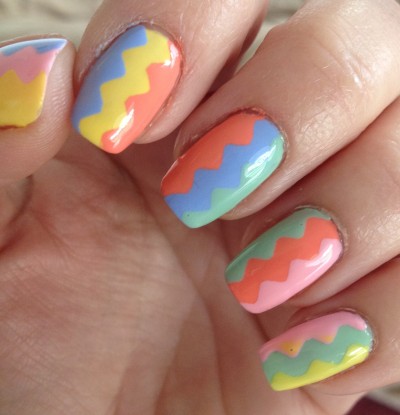
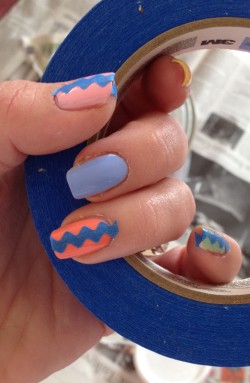
IMG_4705While I was getting ready to start painting, I saw a roll of painter’s tape laying there, and it hit me that painter’s tape should work really well to make my own nail vinyls.  And it did!   Here’s how I got this look…

FirstIMG_4719 I picked out five polishes that I liked together and painted each finger a different color.  Then, while my nails were drying, I took a piece of wax paper and stuck about a 10 inch piece of painter’s tape to it.

IMG_4702Then I took my zig-zaggy crafty scissors and snipped the tape into a bunch of little strips.   When my nails were really dry, I stuck a strip of my zig-zag cut tape down the center of each nail.

Then, one nail at a time, I painted the sides of each nail a different color.  I brushed a pretty thick coat down the sides of the nails because I wanted it to cover the polish that was underneath in one coat.

As soon as I painted both sides of the nail, I pulled up the painters tape with tweezers.  You don’t want to wait until the polish is dry, or the polish will come up with the tape.

The colors on my nails look pretty random, but there actually is a pattern.  I lined up my polishes in this order:  pink, yellow, periwinkle, coral, green.  For the sake of ease, let’s just number them 1 – 5.  I painted my nails with colors 1-5, starting with my thumbs.  on the sides of my thumbs, I used colors 2 and 3.  On my first fingers, I used colors 3 and 4, on my middle fingers I used 4 and 5, on my ring fingers I used 5 and 1, and on my pinkies, I used 1 and 2.

I topped these with a quick dry top coat, and I loved how glossy they looked!

I sort of felt like the end result looked like a pinata, but I really liked it!  The colors were soft enough to keep them from looking obnoxious.   These nails actually got a ton of compliments and they really weren’t hard at all!  I will definitely be using this technique in the future.

Thanks for reading!  I hope this inspires you to fancy up your nails.

Easter Nails 2015

This is just a little recap of the nails that I wore for Holy Week and Easter.

IMG_4661

Although I like chicks and bunnies and candy as much as the next person, Easter is just so much bigger than that for those who believe in Jesus.  It’s the day that we celebrate his resurrection from the dead, a fact for which there is pretty good historical evidence.  Because this is the foundation of my belief system and worldview, I love taking this opportunity to fancy up my nails with some symbols that hold some really important significance to me.

IMG_4667

So, here are the two designs that I wore for Holy Week and Easter.  The ring finger on the bottom picture was inspired by @icandynails on instagram. I’m loving that we are finally out of winter, so I’ve been sporting the springiest colors on my nails!

I totally get that not everyone shares my beliefs.  I welcome any civil discussion, but I won’t tolerate any nastiness in the comments.  I hope you all had a blessed Easter.  Thanks for reading, as always.