Here’s a quickie tutorial that requires minimal skill. Those are the best kind of tutorials, right?
I started off painting my nails with China Glaze – Capacity to See Beyond from the Giver collection.
I was able to find the complete Giver collection on clearance at Sally Beauty Supply! I didn’t buy the whole collection – only three – but I FOUND the whole collection! I had had my eye on this polish in particular, but I just can’t bring myself to spend full price on polishes that are over like, $4. This one really is a beauty, though!
After letting the base color dry really well, I cut some little round labels that I had into quarters and applied them to my nails.
These little stickers are the same size and the reenforcer stickers and you can get these pretty much at any office supply store. I like cutting them into quarters for two reasons. 1. I’m frugal, and if I can get four nails covered with one sticker, I’m gonna do it. And 2. I think it’s a lot easier to get a good, tight seal between the sticker and your nail along the sides of your nail when you are working with a smaller piece of sticker.
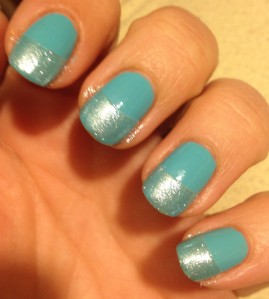
For this look, I put the curved edge of the sticker right across the middle of my nail, but you can use these same stickers for either a half moon mani or a french mani, depending on your placement of the stickers.
Next I painted the top half of my nails with L’Oreal – The True Diamond, which is a shimmery white top coat. I’m pretty sure this is not available any more, but a silver glitter topper would work really well, too. Then before the polish could dry, I peeled the stickers off really carefully with tweezers, and I was left with this:
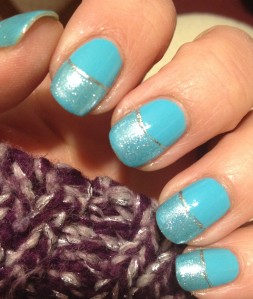
 I wanted to add a little something, so I took my tiny brush and Wet n Wild Fergie – Going Platnum and added a little line where the polishes meet. Really, though, if you don’t have a tiny brush or you don’t trust your hand to be steady enough, you can skip this part.
 I got my little brush at Michael’s with a coupon, so it only cost about $3. I love it!
Here’s the final result:
 Cute and simple and perfect for these frosty months! Thanks for reading!


I do not have the steadiest hand. How well do you think it would work to put the line on before you removed the sticker?
LikeLike
I think that could work pretty well. You might have a bit of an issue when you go to remove your stickers, though. If the polish dries to the sticker too much , it will pull up the polish. If you try it, let me know how it works!
LikeLike
I have a post that I scheduled to come out later. I used striping tape and have a diagonal split in my nails. I am telling you because:
a. that worked great
b. didn’t want you to think I ripped off your idea without crediting you
🙂
LikeLiked by 1 person
Awesome! I can’t wait to see them 🙂
LikeLike